The Dreamiest Lemon Dessert You’ll Make Without Touching the Oven: A Zesty, No-Bake Marvel
Imagine a dessert that captures the very essence of sunshine in a single, luscious bite. This dreamy no-bake lemon dessert is exactly that—a perfect harmony of bright, citrusy flavor and cloud-like creaminess that will instantly transport you to a warmer, happier place. Best of all, you can create this stunning treat without ever turning on your oven, making it the ultimate solution for hot summer days or when you simply crave something spectacular without the fuss. The simplicity of the process belies the elegant and impressive final result, which is guaranteed to become a staple in your recipe collection.
Furthermore, this creamy lemon dessert relies on a few clever techniques and quality ingredients to achieve its incredible texture and taste. The filling is velvety smooth with a pronounced tang that is beautifully balanced by the subtle sweetness of a simple crumb crust. Each component works in concert to create a refreshing treat that feels both indulgent and light. Consequently, it is the ideal finale to a rich meal or a delightful afternoon pick-me-up. This recipe proves that you do not need complex skills or specialized equipment to make a dessert that looks and tastes like it came from a professional patisserie.
Ultimately, this easy no-bake dessert is a celebration of flavor and simplicity. The vibrant yellow hue is inviting, while the aroma of fresh lemon zest is utterly irresistible. It is a dessert that appeals to all ages and is perfectly suited for any occasion, from a casual family dinner to a festive potluck or holiday gathering. Once you experience the joy of making and sharing this delightful creation, you will understand why it deserves a permanent spot in your culinary repertoire. Get ready to fall in love with the most refreshing and effortless dessert you will ever make.
Quick Recipe Highlights
- Flavor Profile: This dessert delivers a powerful punch of sunny, bright lemon flavor that is both tart and sweet. The zest provides an aromatic citrus oil essence, while the juice offers a pure, refreshing tang that cuts through the richness of the creamy base perfectly.
- Texture: The texture is a study in contrasts, featuring a firm but tender crumb crust that gives way to an impossibly smooth, velvety, and mousse-like filling. It is rich and creamy yet simultaneously light and airy, melting delightfully on the tongue.
- Aroma: The key aromatic notes are unmistakably and wonderfully citrus-forward. Freshly grated lemon zest releases potent essential oils that perfume the entire dessert, promising a burst of freshness with every single spoonful you take.
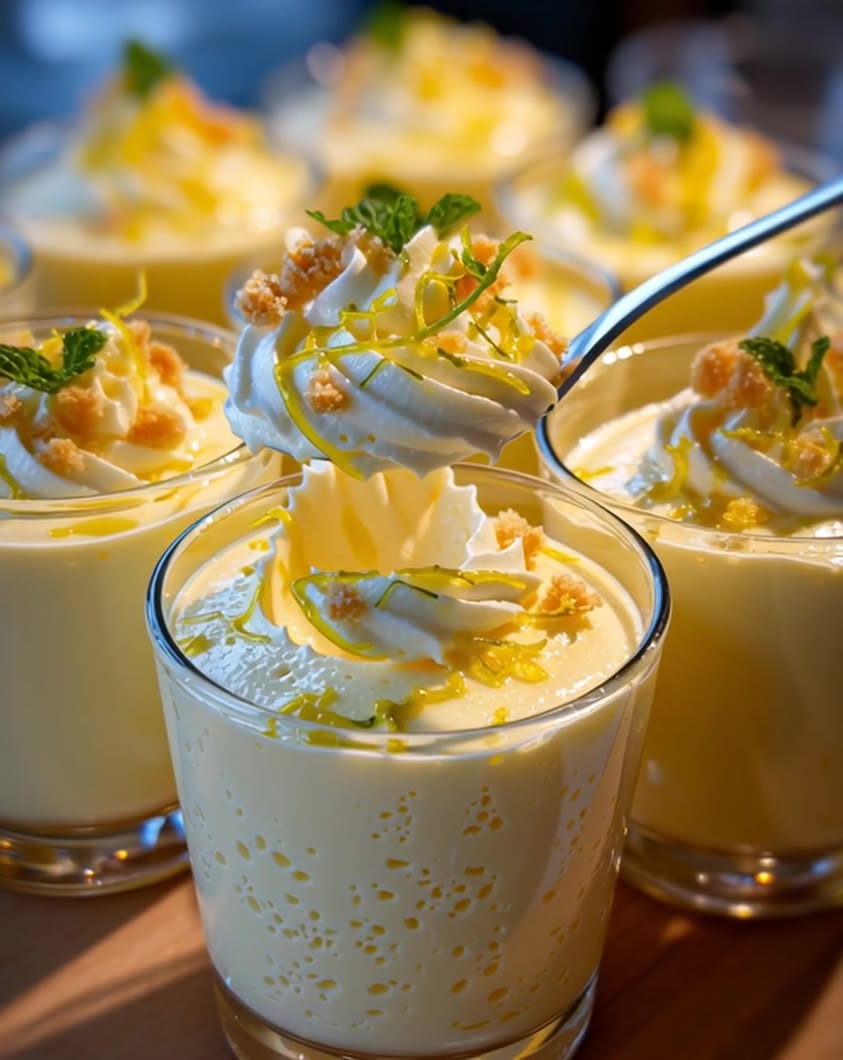
- Visual Appeal: This dessert boasts a stunning visual appeal with its vibrant, sunny yellow filling nestled against a pale, sandy-colored crust. It is often garnished with thin lemon slices, a sprinkle of zest, or a dollop of whipped cream, making it look as beautiful as it tastes.
- Skill Level Needed: This recipe requires absolutely no advanced culinary expertise. In fact, it is perfectly suited for beginners and seasoned cooks alike. The most important skills involved are zesting a lemon and whipping cream to soft peaks.
- Special Equipment: You will need a standard 9-inch springform pan or a pie dish to set the dessert. Additionally, an electric hand mixer or a stand mixer is recommended for whipping the cream and cream cheese to ensure a perfectly smooth and lump-free filling.
Recipe Overview
- Difficulty Level: This recipe is classified as easy because it involves no baking, no complex techniques, and no finicky steps. The process is straightforward: mix the crust, press it into a pan, whip the filling ingredients together, pour, and chill. It is virtually foolproof and an excellent project for cooking with children.
- Category: This dish falls squarely into the dessert category. More specifically, it is a refrigerated set dessert, similar to a cheesecake or a mousse pie. It is a sweet course intended to be served cold, making it particularly refreshing.
- Cuisine: While lemon desserts appear in many culinary traditions, this particular no-bake version has strong roots in American home cooking. It draws inspiration from classic lemon icebox pies and no-bake cheesecakes, which are beloved staples of potlucks and family gatherings across the United States.
- Cost: This is a very cost-effective dessert to prepare. The main ingredients—cream cheese, whipped topping or heavy cream, and lemons—are relatively inexpensive and often already on hand. The graham cracker crust is also a budget-friendly base, making this an affordable showstopper.
- Season: This dessert is truly perfect for the spring and summer seasons. Its bright, citrusy flavor and cool, creamy texture are designed to combat the heat. Conversely, it also serves as a wonderful burst of sunshine during the darker, colder winter months.
- Occasion: This versatile dessert is suitable for a wide range of occasions. It is casual enough for a weeknight family treat, yet elegant enough for a dinner party, holiday celebration, baby shower, or birthday. It is always a crowd-pleaser.
Why You’ll Love This Recipe
You will adore this dreamy no-bake lemon dessert first and foremost for its spectacular taste and texture. The flavor is an exhilarating balance of sweet and tart, with the fresh lemon shining through brilliantly against the rich, creamy backdrop. Each bite is cool, smooth, and incredibly refreshing, offering a truly satisfying sensory experience. The contrast between the crunchy crust and the velvety filling adds a delightful complexity that keeps you coming back for more. It is a dessert that feels indulgent without being overly heavy or cloying, making it the perfect end to any meal.
Furthermore, the convenience factor of this easy no-bake dessert cannot be overstated. Without an oven involved, you eliminate the risk of over-baking, cracking, or dealing with unpredictable heat. This makes the recipe incredibly reliable and stress-free. You can easily prepare it ahead of time, allowing the flavors to meld and intensify in the refrigerator. This is a huge advantage when entertaining, as it frees up your oven and your time for other dishes. It is the ultimate solution for a last-minute dessert that looks and tastes like you spent hours slaving in the kitchen.
From a nutritional perspective, this creamy lemon dessert offers some surprising advantages, especially when compared to traditional baked goods. While it is certainly a treat, using fresh lemon juice provides a dose of vitamin C and antioxidants. You also have control over the ingredients, allowing you to adjust the sugar level or choose lower-fat alternatives for the dairy components if desired. The portion control inherent in a sliced dessert also helps manage indulgence. It is a satisfying sweet treat that can be enjoyed guilt-free in moderation.
The social and entertaining value of this dessert is immense. Its bright, cheerful appearance and universally loved flavor make it a guaranteed conversation starter at any gathering. It is easy to transport in its pan, making it an ideal contribution to potlucks, picnics, and parties. Guests are always impressed by its professional appearance and vibrant flavor, often requesting the recipe. Sharing this dessert is a joyful experience, creating sweet memories around the table.
Finally, this recipe is remarkably cost-effective and accessible. It requires no exotic or expensive ingredients; everything can be found at any standard grocery store. The recipe is also very forgiving and adaptable to what you have on hand. For instance, you can use store-bought whipped topping or whip your own heavy cream. You can use a pre-made crust or make your own from scratch. This accessibility ensures that anyone can create a stunning, restaurant-quality dessert without breaking the bank or making a special trip to the store.
Historical Background and Cultural Significance
The concept of no-bake lemon desserts has its roots deeply embedded in early to mid-20th century American culinary innovation. The invention of sweetened condensed milk in the 1850s and the later popularization of cream cheese and electric refrigerators (often called “iceboxes”) in the 1920s and 1930s created a perfect storm for no-bake recipes. Home cooks, particularly in the warm southern states, began experimenting with ways to create creamy, set desserts without heating up the kitchen with an oven. Thus, the “icebox pie” was born, with lemon being a quintessential flavor due to its availability and refreshing qualities.
Culturally, these no-bake desserts became symbols of convenience, practicality, and clever home economics. They were featured prominently in community cookbooks and women’s magazines, celebrated as modern and effortless. The lemon icebox pie, a direct ancestor of this dreamy no-bake lemon dessert, became a staple at church socials, family reunions, and Fourth of July celebrations across the country. It represented a shift towards easier, more reliable cooking methods while still delivering homemade comfort and joy.
The evolution of this recipe is a fascinating journey through American food trends. The original versions often relied heavily on sweetened condensed milk and lemon juice to create a chemical reaction that thickened the filling without heat. Later variations incorporated cream cheese for a richer, denser texture reminiscent of cheesecake. The advent of commercial whipped toppings in the mid-20th century offered another shortcut to airy lightness. Today’s versions, like this one, often blend these techniques—using cream cheese for tang and body, and freshly whipped cream for ethereal lightness, all while honoring the classic, refreshing lemon flavor.
Regional variations of this concept abound, showcasing local ingredients and preferences. In the South, a classic lemon icebox pie might feature a buttery pastry crust, while in other regions, a graham cracker crust is preferred. Some areas add a layer of meringue on top, though that requires baking. Others incorporate local berries or a raspberry coulis for a color and flavor contrast. This particular recipe represents a modern fusion, taking the best elements from various traditions to create a creamy lemon dessert that is both timeless and contemporary, satisfying the palate of today’s home cook.
Ingredient Deep Dive
Graham crackers form the foundation of the crust and have a unique history. Developed in the 19th century by Presbyterian minister Sylvester Graham as part of a bland, vegetarian diet to curb sinful desires, they were originally quite plain. Today, they are sweetened with honey and cinnamon, providing a warm, toasty flavor that perfectly complements the sharp lemon filling. Nutritionally, they offer a small amount of fiber and whole grains. For the best crust, use name-brand crackers for consistent texture and flavor. Store opened packages in an airtight container to maintain crispness. For a gluten-free version, simply substitute gluten-free graham-style crackers.
Cream cheese is the heart of the filling, providing structure, richness, and a delightful tang. It was invented in New York in 1872 and revolutionized cheesecake making. It is an excellent source of vitamin A and provides some protein and calcium. For optimal results in your no-bake dessert, ensure your cream cheese is fully softened to room temperature; this is the single most important step for preventing a lumpy filling. Store it tightly wrapped in the refrigerator. For a lighter version, Neufchâtel cheese can be used as a direct substitute, as it has a similar texture with less fat.
Fresh lemons are the undisputed star of this show, providing the vibrant flavor and aroma. Lemons are believed to have originated in Northeast India and have been cultivated for over 2,500 years. They are packed with vitamin C, a powerful antioxidant that supports immune function. When selecting lemons, choose fruits that are heavy for their size with bright, firm, and glossy skin, as these will be the juiciest. To get the most juice, roll them firmly on the counter before cutting and juicing. Always zest your lemons before juicing them. Store lemons at room temperature for a week or in the fridge for up to a month.
Heavy whipping cream is whipped to incorporate air, giving the filling its light, mousse-like texture. It is the high butterfat content (36-40%) that allows it to hold soft peaks and provide stability. It is a source of energy-dense calories and fat-soluble vitamins. For the best volume, ensure both your bowl and beaters are chilled before whipping. You can substitute it with an equal amount of thawed frozen whipped topping for a similar effect, though the flavor will be slightly less rich. For a dairy-free alternative, well-chilled full-fat coconut cream can be whipped following the same method.
Common Mistakes to Avoid
- Using cold cream cheese: This is the most common error. Cold cream cheese will never blend smoothly and will result in a lumpy, unappealing filling. Always plan ahead to let it sit on the counter for at least one hour until it is completely soft to the touch.
- Over-whipping the cream: If you whip the heavy cream beyond stiff peaks into buttery granules, it will deflate when folded into the filling and make it grainy. Stop whipping as soon as the cream holds firm peaks when the beaters are lifted.
- Not tasting the filling: Lemons vary in juiciness and tartness. Always taste the filling before adding it to the crust. You may need to add a touch more lemon juice, zest, or sugar to achieve the perfect balance for your palate.
- A weak crust: The crust must be firmly and evenly pressed into the pan. If it is too loose, it will crumble when sliced. Use a flat-bottomed measuring cup to press it down firmly for a compact, cohesive base.
- Insufficient chilling time: Patience is key. The dessert needs adequate time in the refrigerator to set properly. Cutting into it too early will result in a soupy mess. A minimum of four hours is essential, but overnight is ideal.
- Zesting too deeply: When zesting your lemons, only remove the bright yellow outer layer. The white pith beneath is intensely bitter and can ruin the flavor of your entire creamy lemon dessert.
- Using bottled lemon juice: The flavor of bottled juice is flat, processed, and often contains preservatives. It cannot compare to the bright, vibrant flavor of freshly squeezed lemon juice, which is absolutely essential for this recipe.
- Not loosening the crust: If using a springform pan, always remember to run a thin knife around the edge of the dessert before unclamping the ring. This prevents the beautiful crust from cracking and breaking upon serving.
Essential Techniques
Zesting is the first critical technique. It involves using a microplane or the fine side of a box grater to remove only the outermost, brightly colored layer of the lemon peel. This part, called the zest, is where all the potent aromatic citrus oils reside. Avoid grating into the bitter white pith beneath. The zest provides an intense burst of lemon essence that permeates the entire dessert, offering a fragrance and flavor that juice alone cannot achieve. For the best results, zest the lemon directly over the bowl to capture every drop of the precious oils that spray out during the process.
Properly whipping cream is non-negotiable for the texture of this easy no-bake dessert. Start with a very cold bowl and cold beaters; this helps the fat globules in the cream coalesate faster and more稳定. Begin whipping on medium speed until the cream becomes frothy, then increase to medium-high. Watch carefully as soft peaks will form first—these peaks will droop when the beaters are lifted. Continue just until stiff peaks form; these will hold their shape firmly. The moment you see stiff peaks, stop immediately. Over-whipping leads to butter and buttermilk, which will ruin the smooth, creamy texture of your filling.
Folding is the gentle technique used to combine the whipped cream with the cream cheese mixture without deflating the air you worked so hard to incorporate. Use a large rubber spatula. Cut through the center of the mixture, scrape along the bottom of the bowl, and fold over the top. Rotate the bowl a quarter turn and repeat. This method gently integrates the two components while maintaining the airy volume. Avoid stirring or beating, as this will aggressively pop the air bubbles and result in a dense, heavy filling instead of the light, dreamy texture that defines this dessert.
Pro Tips for Perfect The Dreamiest Lemon Dessert
For an ultra-smooth filling, take the extra step of beating the softened cream cheese by itself first until it is completely lump-free and silky. This ensures that no stubborn chunks remain before you add the other ingredients.
Boost the lemon flavor phenomenally by rubbing the lemon zest into the granulated sugar with your fingertips before adding it to the cream cheese. This abrasion releases the citrus oils from the zest into the sugar, perfuming it intensely.
To create a protective barrier and prevent a soggy crust, consider brushing the bottom of the pressed crust with a thin layer of melted white or dark chocolate and letting it set for five minutes before adding the filling.
For picture-perfect clean slices, dip your sharp knife in very hot water and wipe it dry between each cut. The heat will glide smoothly through the creamy filling without dragging or sticking.
If your lemons are stubbornly dry and not yielding much juice, microwave them for 10-15 seconds first. This gently heats them and makes them much easier to juice, maximizing your yield.
Garnish just before serving. A last-minute sprinkle of fresh zest, a twist of lemon slice, or a mint leaf adds a pop of color and ensures the garnishes look fresh and vibrant, not wilted.
Variations and Adaptations
For a delightful regional variation, transform this into a Florida Key Lime Pie-inspired dessert. Simply replace the lemon juice and zest with an equal amount of fresh Key lime juice and zest. The result will be a tart, aromatic, and distinctly tropical version of this creamy lemon dessert that is equally refreshing and beloved.
Seasonal adaptations are endless. In the summer, swirl in a puree of fresh raspberries or mashed blueberries for a patriotic red, white, and blue effect. During the fall, a teaspoon of ground ginger or a hint of cinnamon in the crust can add a warm, spicy note that complements the lemon beautifully. For a winter holiday version, garnish with sugared cranberries and rosemary sprigs.
Dietary modifications are straightforward. For a gluten-free dessert, use certified gluten-free graham crackers or gluten-free shortbread cookies for the crust. To make it dairy-free, use a plant-based cream cheese alternative and whip well-chilled coconut cream instead of heavy whipping cream. Ensure all other ingredients are checked for hidden dairy sources.
Experiment with flavor variations by adding different extracts. A half teaspoon of pure vanilla extract will add a classic, warm depth. For a more complex citrus profile, a quarter teaspoon of pure orange extract works wonderfully. A tablespoon of poppy seeds folded into the filling creates a delightful textural variation and visual appeal, making a lemon-poppy seed mousse dessert.
Serving and Presentation Guide
Plating techniques can elevate this simple dessert to a restaurant-quality presentation. Instead of serving a wedge directly from the pan, use a thin offset spatula to carefully transfer each slice to the center of a chilled plate. Wipe the edge of the plate clean with a towel for a professional finish. Alternatively, for a more rustic yet elegant look, serve the dessert in individual mason jars or glass trifle dishes, layering crumbled crust and filling.
Garnishing ideas are key to maximizing visual appeal. A dollop of freshly whipped cream, a thin twist of lemon peel, a few fresh raspberries or blueberries, a sprinkle of toasted coconut, or a light dusting of powdered sugar all make beautiful toppings. A mint leaf adds a touch of green that contrasts beautifully with the yellow filling. For a special occasion, a delicate drizzle of lemon curd or a raspberry coulis around the plate adds sophistication.
Traditional accompaniments are simple and focus on complementing, not overpowering, the lemon flavor. A cup of hot tea or coffee is a classic pairing. For a more decadent experience, a small glass of dessert wine like Moscato d’Asti or a late-harvest Riesling pairs wonderfully with the citrus notes. Fresh seasonal fruit, such as a berry medley, served on the side is always a welcome addition.
Wine and Beverage Pairing
Selecting the right wine pairing enhances the experience of this dreamy no-bake lemon dessert. The high acidity and citrus notes demand a wine with matching brightness and a touch of sweetness. A German Riesling, particularly a Spätlese, is a magnificent choice. Its natural acidity mirrors the lemon, while its residual sugar beautifully balances the tartness. A French Moscato d’Asti from Piedmont is another superb option, offering light effervescence, low alcohol, and peachy sweetness that complements the creamy texture without overwhelming it.
For non-alcoholic alternatives, consider beverages that can stand up to the dessert’s vibrant flavor. Sparkling water with a squeeze of fresh lemon or lime keeps the palate refreshed. homemade lemonade, perhaps infused with rosemary or lavender, creates a thematic and delicious pairing. A chilled glass of tart cherry juice or a sparkling apple cider also provides a sweet-tart balance that works well with the creamy elements of the dessert.
If coffee or tea is your preference, opt for lighter roasts and blends. A bright, citrusy Ethiopian Yirgacheffe coffee can echo the lemon notes beautifully. For tea, a classic Earl Grey is perfect, as the bergamot citrus oil in the tea harmonizes with the lemon in the dessert. Avoid heavy, dark roasts or bitter teas, as they can clash with the dessert’s lightness and acidity.
Storage and Shelf Life
Proper storage is crucial for maintaining the texture and flavor of this easy no-bake dessert. Always keep it covered tightly with plastic wrap or stored in an airtight container in the refrigerator. The cold environment keeps the filling firm and prevents the growth of bacteria. The dessert is best enjoyed within 3-4 days of making it. After this time, the crust will begin to soften significantly from the moisture of the filling, losing its desirable crisp texture.
Freezing is a viable option for longer storage, though it will slightly alter the texture. To freeze, place the entire dessert or individual slices on a parchment-lined baking sheet until solid. Then, wrap each piece tightly in plastic wrap and place them in a heavy-duty freezer bag. It can be frozen for up to 2 months. Thaw overnight in the refrigerator before serving. Note that the whipped cream element may weep slightly upon thawing, making the dessert a bit less firm but still perfectly delicious.
Make Ahead Strategies
This dessert is an ideal candidate for making ahead, as the chilling time only improves its flavor and texture. You can prepare the entire dessert up to 24 hours in advance. Simply cover it well and refrigerate until ready to serve. This makes it perfect for stress-free entertaining. For the best results, add any delicate garnishes like fresh fruit or whipped cream dollops just before serving to maintain their freshness and structural integrity.
If you need to break up the work, you can prepare the crust up to 2 days ahead. Press it into the pan, cover it tightly with plastic wrap, and store it at room temperature. The filling can also be prepared and stored separately in an airtight container in the refrigerator for 1 day. When ready to assemble, let the filling sit at room temperature for 10-15 minutes to soften slightly for easy spreading, then pour it into the crust and return it to the fridge to set completely for at least 4 more hours.
Scaling Instructions
This recipe scales up or down with simple math, but equipment size is a key consideration. To halve the recipe, simply divide all ingredients by two. Use a 6-inch springform pan or a standard pie dish. The preparation method remains exactly the same. The total setting time may be slightly reduced due to the smaller volume.
To double the recipe for a crowd, multiply all ingredients by two. It is crucial to use two separate 9-inch pans rather than one gigantic pan. A single overly deep dessert will not set properly in the center and will be impossible to slice neatly. Mixing a double batch might require a very large bowl or working in batches to ensure everything is incorporated evenly. The chilling time may need to be extended by an hour or two to ensure the center is fully firm.
Nutritional Deep Dive
A typical serving of this creamy lemon dessert provides a balance of carbohydrates, fats, and a small amount of protein. The primary sources of carbohydrates are the graham cracker crust and the granulated sugar, which provide energy. The fats come from the cream cheese and heavy whipping cream, contributing to the dessert’s rich, satisfying mouthfeel and helping to slow the absorption of sugars for more stable energy levels. While it is an indulgent treat, it also offers nutritional benefits from the fresh lemons, which are an excellent source of vitamin C, a potent antioxidant that supports immune health and collagen production.
For those mindful of their intake, several modifications can lighten the dessert without sacrificing flavor. Using reduced-fat cream cheese and a light whipped topping can significantly reduce the fat and calorie content. You can also often reduce the sugar in the filling by 10-15% without a noticeable difference, especially if your lemons are very juicy and flavorful. Remember, this dessert is meant to be enjoyed in moderation as part of a balanced diet. Its bright, refreshing quality often means a small portion is deeply satisfying.
Dietary Adaptations
Creating a gluten-free version of this dreamy no-bake lemon dessert is simple and effective. Replace the graham crackers in the crust with an equal amount of certified gluten-free graham-style crackers or gluten-free shortbread cookies crushed into fine crumbs. All other ingredients in the filling—cream cheese, sugar, lemons, heavy cream—are naturally gluten-free, but always double-check labels on packaged products like whipped topping to ensure no cross-contamination or hidden gluten ingredients.
For a vegan adaptation, replace the dairy components with plant-based alternatives. Use vegan cream cheese and a vegan butter alternative for the crust. For the filling, use a plant-based cream cheese and whip well-chilled full-fat coconut cream (the solid part from a can of coconut milk) instead of heavy whipping cream. Sweeten with regular granulated sugar, but confirm it is not processed with bone char if strict veganism is a concern. The lemon juice and zest remain the same, providing the signature flavor.
Troubleshooting Guide
If your filling is lumpy, it is almost certainly because the cream cheese was too cold. Unfortunately, once lumpy, it is difficult to fix. For future reference, always ensure cream cheese is softened at room temperature. As a last resort for a current lumpy batch, you can try pressing the entire mixture through a fine-mesh sieve, but this can be tedious and may deflate the whipped cream.
A runny filling that won’t set is typically caused by two issues: insufficient chilling time or under-whipped cream. First, ensure the dessert has chilled for the full, recommended 4 hours, preferably overnight. If it’s still runny, the cream may not have been whipped to stiff peaks. Unfortunately, the only fix is to return it to the fridge for several more hours to see if it firms up. To prevent this, always whip the cream until it holds firm peaks on the beater.
If your crust is too crumbly and falls apart when slicing, it likely wasn’t pressed firmly enough into the pan or may need a bit more butter to act as a binder. Next time, use the bottom of a measuring cup to press the crust mixture very firmly and evenly into the pan. For a salvage operation, you can serve the dessert as a deconstructed parfait, layering the crumbled crust and filling in glasses.
Frequently Asked Questions
Can I use bottled lemon juice instead of fresh?
It is highly discouraged. Bottled lemon juice undergoes processing and often contains preservatives that result in a flat, metallic, or overly sour flavor. Freshly squeezed lemon juice is essential for the bright, vibrant, and authentic citrus taste that defines this dreamy no-bake lemon dessert. The flavor difference is significant and worth the extra effort.
Why did my filling turn out lumpy?
Lumps are almost always caused by cream cheese that was not softened to room temperature before mixing. Cold cream cheese will not blend smoothly with the other ingredients. To prevent this, take the cream cheese out of the refrigerator at least one hour before you begin making the recipe, ensuring it is soft and pliable.
How can I prevent my crust from getting soggy?
To create a moisture barrier, you can brush the bottom of the pressed and chilled crust with a thin layer of melted white or dark chocolate. Let it set for 5-10 minutes until firm before adding the filling. This creates a seal that prevents the creamy filling from softening the crust prematurely.
Can I make this dessert without a springform pan?
Absolutely. A standard 9-inch pie dish works perfectly well. The only difference is that you will serve slices directly from the dish rather than removing the entire dessert. For serving, ensure you run a knife around the edge between the filling and the crust to create clean slices.
How far in advance can I make this?
You can prepare this dessert up to 24 hours in advance. In fact, making it the day before allows the flavors to meld beautifully and ensures it is perfectly set. Keep it covered in the refrigerator. Add any fresh garnishes like whipped cream, berries, or zest right before serving.
Is it possible to freeze this dessert?
Yes, you can freeze it for up to 2 months. Wrap the entire dessert or individual slices tightly in plastic wrap and then aluminum foil. Thaw it overnight in the refrigerator before serving. Be aware that the texture may be slightly less firm after thawing, as the whipped cream can sometimes release a small amount of water.
Can I use Cool Whip instead of whipping my own cream?
Yes, this is a common substitution. Use an 8-ounce container of thawed frozen whipped topping. Fold it into the cream cheese mixture at the end, just as you would with the homemade whipped cream. The texture will be slightly lighter and less rich, but still delicious and stable.
My dessert is too tart/too sweet. How can I adjust this?
The best way to avoid this is to taste the filling before you add the whipped cream. Remember that the sweetness will mellow slightly once chilled. If it’s too tart, add a tablespoon more of confectioners’ sugar. If it’s too sweet, add a little more lemon juice or zest to balance it.
Additional Resources
If you loved the techniques in this easy no-bake dessert, you might enjoy exploring other no-bake recipes on our site. Our No-Bake Strawberry Cheesecake and No-Bake Chocolate Peanut Butter Bars use similar methods for creating luxurious desserts without an oven. For more lemon inspiration, check out our Lemon Blueberry Loaf or our Honey Lemon Chicken for a savory take on this versatile fruit.
For mastering fundamental skills that elevate all your cooking, our guide on “How to Zest Citrus Without the Pith” and “The Ultimate Guide to Whipping Cream” offer detailed, step-by-step instructions and video tutorials. Understanding these basics will ensure success not just with this recipe, but with countless others that rely on these essential techniques.
When it comes to equipment, a good quality microplane zester is invaluable for efficiently removing citrus zest. A stand mixer or a powerful hand mixer takes the effort out of whipping cream and beating cream cheese. Finally, a reliable springform pan is the best tool for creating beautiful, easily removable desserts like this one. Investing in these few key items will make your baking and no-bake endeavors much more enjoyable and successful.
PrintNo-Bake Lemon Dream Delight
Description
A creamy, zesty, and refreshing lemon dessert that requires no baking and comes together effortlessly for a perfect sweet treat.
Ingredients
For the Crust:
- 1 ½ cups graham cracker crumbs
- ½ cup unsalted butter, melted
- 8 oz cream cheese, softened
- 1 cup powdered sugar
- 2 cups heavy whipping cream
- ¼ cup fresh lemon juice
- 1 tbsp lemon zest
- 1 tsp vanilla extract
- Lemon slices for garnish (optional)
Instructions
1. Prepare the Crust:
- Mix graham cracker crumbs and melted butter, press into a 9×9 inch pan to form the crust, and chill for 10 minutes.
- In a large bowl, beat cream cheese and powdered sugar until smooth. Add lemon juice, zest, and vanilla, mixing well.
- In a separate bowl, whip the heavy cream until stiff peaks form, then gently fold into the cream cheese mixture until fully combined.
- Spread the filling evenly over the crust, cover, and refrigerate for at least 4 hours or until set. Garnish with lemon slices before serving if desired.
Notes
You can customize the seasonings to taste.
I’m Shaykee—born in Morocco, seasoned across continents. From airplane galleys to home kitchens, I share the flavors and stories that shaped my journey.