Mini Mocha Power Bites: Indulge in a rich, fudgy square where bold chocolate meets intense espresso. The perfect no-bake energy bite for a powerful pick-me-up!
Are you searching for the ultimate snack that perfectly marries dessert and energy? Look no further than these incredible Mini Mocha Power Bites. This recipe delivers an irresistible combination of deep, dark chocolate and a robust coffee kick in one convenient, no-bake package. Moreover, each bite offers a satisfyingly fudgy texture that melts in your mouth, providing a moment of pure indulgence. Consequently, you get a gourmet experience without any oven time or complicated techniques.
Imagine reaching into your fridge for a quick treat that simultaneously satisfies your sweet tooth and gives you a gentle energy lift. These power bites achieve exactly that. They are crafted from wholesome ingredients like nuts, dates, and cocoa, ensuring you fuel your body properly. Additionally, the intense espresso flavor cuts through the richness of the chocolate, creating a beautifully balanced profile. Ultimately, this snack is perfect for busy afternoons, pre-workout fuel, or a secret dessert stash.
Furthermore, the versatility of these mocha bites is truly remarkable. You can easily customize them to suit various dietary needs or personal taste preferences. Whether you need a vegan option, a gluten-free snack, or a keto-friendly version, this recipe adapts seamlessly. The process is straightforward and family-friendly, making it an excellent activity to do with kids. In the end, you will have a batch of delicious, energy-boosting squares ready to enjoy all week long.
Quick Recipe Highlights
- Flavor Profile: These Mini Mocha Power Bites boast a dominant dark chocolate flavor that is immediately complemented by a sharp, aromatic espresso note. The combination creates a sophisticated adult treat that is not overly sweet.
- Texture: Expect a dense, fudgy, and chewy texture that is remarkably similar to a decadent truffle. The finely processed nuts and dates create a smooth consistency with a slight crumbly feel that holds together perfectly.
- Aroma: As soon as you open the container, you are greeted by the rich, inviting scent of high-quality cocoa and freshly brewed coffee. This aromatic promise is a prelude to the delicious flavor experience that follows.
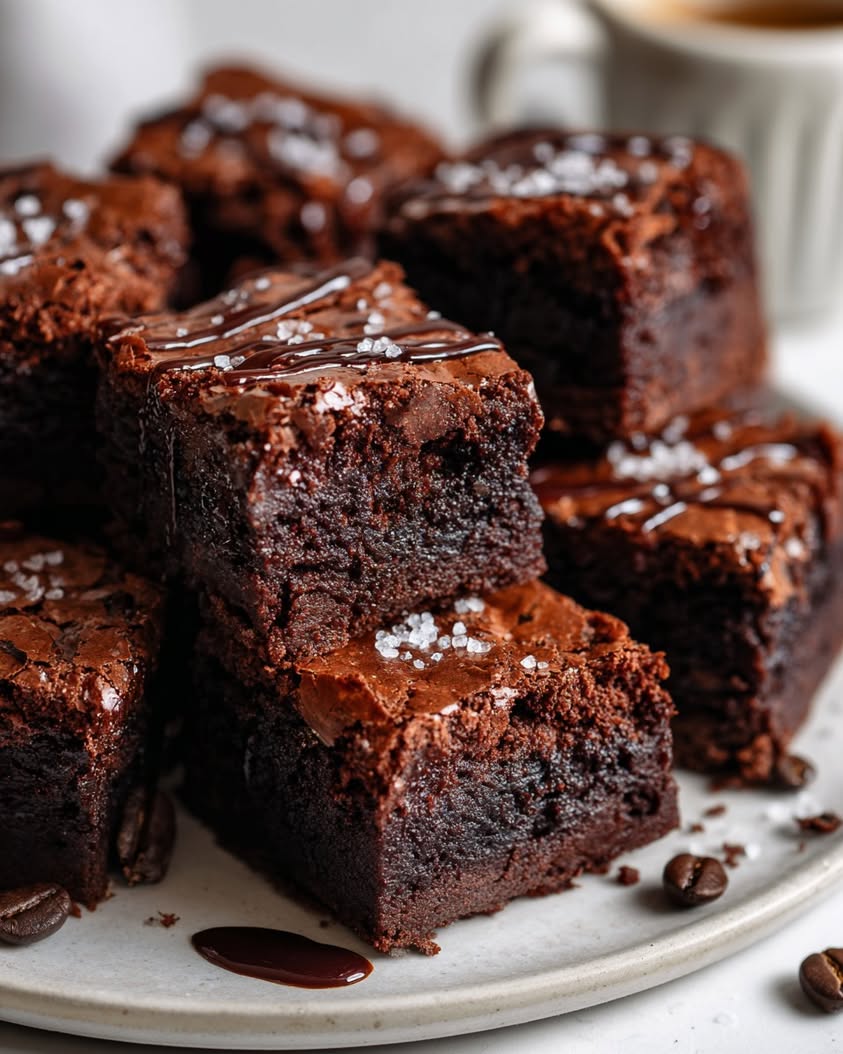
- Visual Appeal: These bites have a dark, matte finish speckled with visible coffee grounds, presenting a rustic yet elegant look. Their uniform, square shape makes them perfect for arranged plating or casual snacking.
- Skill Level Needed: Absolutely no advanced cooking skills are required for this recipe. Essentially, if you can operate a food processor, you can create these gourmet-tasting energy bites with ease.
- Special Equipment: The only essential tool is a reliable food processor or high-powered blender to achieve the fine, sticky crumb necessary for the mixture to bind together into perfect squares.
Recipe Overview
- Difficulty Level: We classify this recipe as easy because it involves no cooking, baking, or complex techniques. The entire process is a matter of pulsing ingredients in a processor and pressing them into a pan. Therefore, it is completely accessible for beginner cooks and seasoned chefs alike.
- Category: These bites fit wonderfully into multiple categories including no-bake desserts, healthy snacks, and energy bars. They are ideal for a quick breakfast on the go, a post-lunch treat, or a pre-gym energy boost.
- Cuisine: While not tied to a specific traditional cuisine, these mocha bites draw inspiration from global energy ball trends and classic coffee-and-chocolate pairings found in European desserts. They are a modern fusion treat.
- Cost: This recipe is very cost-effective, especially when you consider the price of store-bought energy bars. The main ingredients like nuts, dates, and cocoa are pantry staples that can be bought in bulk, making each bite surprisingly affordable.
- Season: These power bites are truly a year-round snack. However, they are particularly excellent during the fall and winter months when we naturally crave richer, comforting flavors paired with warm beverages.
- Occasion: Perfect for casual everyday snacking, meal prep, potlucks, or even as a homemade edible gift during the holidays. They are also a great offering at book clubs or coffee meetings.
Why You’ll Love This Recipe
First and foremost, the taste and texture appeal of these Mini Mocha Power Bites is undeniable. They deliver a luxurious, dessert-like experience that feels indulgent yet is made from nutritious ingredients. The deep chocolate flavor satisfies cravings instantly, while the espresso provides a sophisticated bitterness that prevents the bite from being cloying. Every mouthful is a perfect balance of rich, fudgy, and energizing elements that make you forget you are eating something healthy.
Secondly, the convenience factor is a massive win. From start to finish, you can have a complete batch ready in under fifteen minutes with zero baking required. This no-bake approach is perfect for hot summer days when you do not want to turn on the oven. Furthermore, the simple process involves minimal cleanup, essentially just a food processor bowl and a square pan. You can easily whip up a batch while your morning coffee is brewing.
Nutritionally, these bites are a powerhouse. They are naturally sweetened with dates, which provide fiber and essential minerals, unlike refined sugars. The nuts offer healthy fats, protein, and a dose of antioxidants, making this snack both satisfying and sustaining. The caffeine from the espresso gives a natural energy boost, which is far better than the crash from processed energy drinks or candy bars. You are fueling your body with real food.
For social and entertaining value, these mocha bites are a fantastic make-ahead option. You can prepare them a day or two before a gathering, and they will still be perfectly fresh and delicious. They are a crowd-pleaser for both adults and older children who appreciate coffee flavor. Present them on a beautiful platter for a party, or pack them individually for a hike or picnic. Their elegance and portability are unmatched.
Finally, the cost-effectiveness and accessibility of the ingredients make this recipe a staple. Compared to buying similar products at a health food store or café, making these at home saves a significant amount of money. The core ingredients are easy to find at any standard grocery store, and there are numerous substitution options for allergies or preferences. This recipe empowers you to create a gourmet, healthy snack without a gourmet price tag.
Historical Background and Cultural Significance
The concept of energy bites or balls is a relatively modern phenomenon, emerging prominently with the health and wellness movement of the late 20th and early 21st centuries. However, their inspiration draws from much older traditions. For instance, various cultures have long created portable, nutrient-dense foods for travelers and laborers, such as pemmican by Indigenous North Americans or date-based sweets in Middle Eastern cuisine. These Mini Mocha Power Bites are a contemporary iteration of this ancient need for sustaining, convenient nourishment.
Culturally, the pairing of chocolate and coffee has a rich and esteemed history, particularly in European cafés. This combination became a symbol of sophistication and leisure. The integration of these two beloved flavors into a healthy, no-bake format reflects our current cultural desire for food that is both functional and indulgent. It represents a fusion of pleasure and wellness, a hallmark of modern eating habits where we refuse to choose between taste and health.
The evolution of this specific recipe is rooted in the home kitchen experimentation of health-conscious bakers and bloggers. As people sought alternatives to sugary, processed snacks, they began creating “energy ball” recipes using nuts, seeds, and dried fruits. The addition of coffee was a natural progression for adults seeking a caffeine kick without a liquid coffee. The mocha variation quickly gained popularity for its ability to mimic the flavor of decadent desserts while remaining wholesome and easy to prepare.
Regional variations of this concept are endless. In the Mediterranean, similar treats might feature figs and honey with a hint of orange zest. Asian variations could incorporate matcha powder for a green tea flavor profile. The mocha version, with its deep cocoa and coffee notes, has a particularly strong appeal in Western cultures where these flavors are staples in desserts and beverages. This adaptability shows the universal appeal of creating simple, healthy, and delicious finger foods.
Ingredient Deep Dive
Medjool Dates: Medjool dates are the natural sweetener and primary binder in this recipe. Historically, dates are one of the oldest cultivated fruits, with origins in the Middle East where they were a staple food and symbol of hospitality. Nutritionally, they are packed with fiber, potassium, magnesium, and antioxidants. When selecting dates, look for ones that are plump, soft, and glossy; avoid any that are overly dry or have crystallized sugar on their skin. For storage, keep them in an airtight container in a cool, dark place to maintain moisture. If your dates are dry, you can soak them in warm water for 10 minutes to soften them before use. For substitutions, you can use other moist dried fruits like prunes or raisins, though the flavor will change slightly.
Almonds: Almonds provide the base structure, healthy fats, and a subtle nutty flavor. Cultivated for thousands of years, almonds are mentioned in historical texts from various cultures and were transported along the Silk Road. They are a fantastic source of vitamin E, magnesium, and protein. For the best results in this recipe, use raw, unsalted almonds. You can toast them lightly beforehand for a deeper flavor, but it is not necessary. Store almonds in an airtight container in a cool, dark pantry to prevent their natural oils from going rancid. For a nut-free version, sunflower seeds or pumpkin seeds make an excellent substitution while maintaining the necessary texture.
Cocoa Powder: Cocoa powder delivers the intense chocolate flavor without added sweetness. The use of cacao beans dates back to ancient Mesoamerican civilizations like the Maya and Aztecs, who valued it as currency and used it in ceremonial drinks. Natural, unsweetened cocoa powder is rich in flavonoids, which are powerful antioxidants linked to heart health. Always choose a high-quality cocoa powder for the best flavor impact; Dutch-processed cocoa will yield a smoother, less acidic taste. Store cocoa powder in a sealed container in a cool, dark place to protect its flavor. There is no direct substitute for the deep chocolate flavor, but carob powder can be used for a caffeine-free alternative.
Espresso Powder: Espresso powder is the key to the powerful mocha flavor. Coffee itself has a long history originating in Ethiopia before spreading across the Arab world and eventually globally. Instant espresso powder is a modern convenience that captures the concentrated essence of coffee. It provides a robust caffeine kick and deep flavor. From a nutritional standpoint, it offers antioxidants and can enhance mental alertness. Ensure you are using 100% pure instant espresso powder, not a sweetened coffee mix. Store it in a sealed container away from light and moisture. For a caffeine-free version, you can use decaf espresso powder or finely ground chicory root.
Common Mistakes to Avoid
- Using dry, hard dates. This is the most common error. Hard dates will not puree properly in the food processor, resulting in a crumbly mixture that refuses to bind. Always ensure your dates are soft and moist. If they are not, soak them in warm water for 10 minutes and then drain thoroughly before using.
- Not processing the mixture long enough. You must process the ingredients until the mixture begins to clump together into a ball on the side of the processor bowl. Under-processing will leave you with a sandy, crumbly texture that is impossible to press into cohesive squares.
- Adding too much liquid. While a tablespoon of water can help bring the dough together, adding too much will make the mixture sticky and soggy. Always add liquid one teaspoon at a time, pulsing between each addition, until the desired consistency is achieved.
- Skipping the chilling time. Pressing the mixture into squares and then immediately trying to cut them will lead to a messy failure. You must chill the pressed mixture in the fridge for at least an hour to allow the fats from the nuts to firm up, ensuring clean, sharp cuts.
- Using a weak food processor. A low-powered blender or processor may struggle to break down the tough dates and nuts, potentially overheating the motor. For best results, use a standard to high-powered food processor and pulse in short bursts to avoid strain.
- Substituting ingredients without considering texture. For example, using a liquid sweetener like maple syrup instead of dates will drastically alter the moisture content and require adding more dry ingredients to compensate. Stick to the recommended ingredients or research tested substitutions first.
- Not lining the pan. Pressing the mixture directly into an unlined pan will make it extremely difficult to remove the slab later for cutting. Always line your pan with parchment paper, leaving some overhang on two sides to act as handles for easy removal.
- Cutting with a dull knife. A dull knife will squish and deform your beautifully set slab instead of slicing through it cleanly. Use a sharp chef’s knife for the cleanest cuts and wipe it clean between slices for perfect squares.
Essential Techniques
Pulsing the Food Processor: Mastering the pulse function on your food processor is critical for this recipe. Pulsing involves short, quick bursts of power instead of letting the machine run continuously. This technique is important because it allows you to control the texture precisely, ensuring you achieve a fine crumb without over-processing the mixture into a nut butter. To master it, hold the pulse button for one second and release for one second. Common pitfalls include impatience and just letting the machine run, which leads to an oily paste. The visual cue for success is when the mixture looks like wet sand and then suddenly starts to clump together into a larger ball.
Testing the Dough Consistency: Knowing when the mixture has reached the perfect consistency for pressing is a key technique. The dough should hold together firmly when you pinch a small amount between your fingers. If it crumbles, it needs more processing time or a tiny bit of moisture. Why is this important? Because if it is too dry, your squares will fall apart; if it is too wet, they will be sticky and messy. To master this, stop the processor and perform the pinch test every few pulses once the mixture looks combined. The common pitfall is assuming visual appearance alone is enough. The successful cue is a dough that is pliable and slightly sticky but not wet.
Pressing the Mixture Firmly: How you press the mixture into the pan directly affects the final texture of your bites. You must press it down very firmly and evenly with your hands or the flat bottom of a measuring cup. This technique is crucial because it compacts the ingredients, forcing them to bind together and eliminating any air pockets that would cause crumbly bites. To master it, use even, strong pressure across the entire surface. A common pitfall is pressing gently, which results in a loose, fragile slab. The visual cue for success is a smooth, very firm, and compact surface that does not give when you press on it.
Pro Tips for Perfect Mini Mocha Power Bites
For an ultra-smooth texture, use a coffee grinder to pulverize the almonds into a super-fine almond flour before adding them to the food processor with the other ingredients. This extra step ensures a melt-in-your-mouth consistency without any gritty nut pieces.
Elevate the flavor profile by toasting your raw almonds on a dry skillet for 5-7 minutes over medium heat before processing. Toasting nuts unlocks their natural oils and deepens their nutty flavor, which adds another layer of complexity to the final product.
If you are a true coffee aficionado, consider adding a pinch of finely ground cardamom or cinnamon to the food processor. These warm spices complement both the chocolate and coffee flavors beautifully and add a subtle aromatic twist that feels very gourmet.
For a shiny, professional finish and an extra burst of flavor, lightly drizzle the finished and cut squares with melted dark chocolate. Allow the chocolate to set completely before storing. This not only looks impressive but also intensifies the chocolate experience.
When pressing the mixture into the pan, place a sheet of parchment paper on top of the mixture before you press down. This prevents the mixture from sticking to your hands or the measuring cup and allows you to apply maximum, even pressure for a perfectly compacted slab.
For perfectly uniform squares, use a ruler to score the top of the chilled slab lightly with a knife before making the full cuts. This guides your knife and ensures each bite is exactly the same size, which is ideal for portion control and presentation.
If you find the espresso flavor too strong for your taste on the first try, you can reduce the amount by half. Conversely, for a more intense coffee kick, you can increase the espresso powder by another half tablespoon without affecting the texture of the recipe.
Variations and Adaptations
Regional Variations: Around the world, similar treats take on local flavors. For a Mexican-inspired twist, add a tiny pinch of cayenne pepper and cinnamon to evoke the spirit of Mexican hot chocolate. For an Italian variation, incorporate a tablespoon of finely chopped candied orange peel and a drop of almond extract, mirroring the flavors of traditional Italian espresso desserts.
Seasonal Adaptations: Make these bites feel seasonal with simple additions. In the fall, mix in a tablespoon of pumpkin pie spice for a cozy flavor. During the winter holidays, add crushed peppermint candies on top for a festive mocha-mint combination. For spring and summer, roll the finished bites in desiccated coconut for a lighter, tropical feel.
Dietary Modifications: This recipe is incredibly adaptable. For a vegan version, ensure your chocolate chips are dairy-free. For a paleo adaptation, use coconut sugar instead of dates and ensure all ingredients are paleo-compliant. To make them nut-free, replace the almonds with sunflower seeds or toasted oats. For a lower-carb or keto version, use sugar-free chocolate chips and replace the dates with a keto-friendly sweetener paste.
Flavor Variations: The basic recipe is a perfect canvas for experimentation. For a caramel mocha bite, add a tablespoon of lucuma powder. For a raspberry mocha version, mix in freeze-dried raspberry powder. For a cookies and cream twist, replace half of the almonds with crushed gluten-free Oreo cookies. The possibilities for customizing the flavor are virtually endless.
Texture Modifications: Alter the texture to suit your preference. For a crunchier bite, stir in a quarter cup of cacao nibs after processing the main mixture. For a chunkier texture, pulse the mixture less, leaving some larger pieces of nuts. For a smoother, truffle-like interior, process the mixture for a full minute until it becomes almost paste-like.
Presentation Alternatives: Instead of cutting them into squares, you can roll the mixture into traditional ball shapes. You can also press the mixture into silicone molds to create fun shapes like hearts or stars. For a more elegant presentation, after cutting, roll the edges of each square in a coating like crushed nuts, cocoa powder, or shredded coconut.
Serving and Presentation Guide
Plating Techniques: For a simple yet elegant presentation, arrange the Mini Mocha Power Bites on a sleek, dark slate board or a white ceramic plate. The contrast makes the dark chocolate squares pop visually. Space them evenly in a grid pattern for a modern, clean look. Alternatively, you can stack them in a small pyramid on a cake stand for a more dramatic effect at a party or gathering.
Garnishing Ideas: A light dusting of cocoa powder or espresso powder right before serving adds a professional touch. You can also place a single coffee bean or a small twist of orange zest on top of each square. For a festive occasion, a tiny edible gold leaf flake on each bite elevates them to a luxurious dessert.
Traditional Accompaniments: These bites are traditionally served alongside coffee or espresso, reinforcing the mocha theme. A small glass of cold milk or a dollop of lightly sweetened whipped cream also provides a nice contrast to the rich, dense texture of the bites. They are perfect for a coffee break or an after-dinner treat.
Modern Serving Suggestions: Crumble a single power bite over a bowl of vanilla ice cream or Greek yogurt for an instant mocha crunch topping. They can also be served as part of a dessert charcuterie board alongside fresh berries, cheese, and other small sweet treats. For a breakfast parfait, layer yogurt, granola, and crumbled mocha bites.
Temperature Considerations: These bites are best served chilled straight from the refrigerator. The cool temperature firms up the fats, providing a satisfying, firm bite that slowly melts in your mouth. However, allowing them to sit at room temperature for 10 minutes before serving can soften them slightly and make the flavors more pronounced.
Portion Control Tips: Because they are energy-dense, one or two squares make a perfect serving. Pre-portion them by storing them in small individual containers or snack bags. This makes grabbing a single serving easy and prevents overindulgence, which is helpful for mindful eating and maintaining the batch throughout the week.
Wine and Beverage Pairing
Wine Pairings: The rich chocolate and coffee flavors of these bites pair exceptionally well with a fortified wine like Port or a rich Sherry. The sweetness and body of these wines complement the bitterness of the espresso and the depth of the cocoa. A bold Cabernet Sauvignon with dark fruit notes can also stand up to the intense flavor profile. For a dessert wine, a late-harvest Zinfandel would create a beautiful harmony.
Non-Alcoholic Alternatives: A classic cold brew coffee or a freshly pulled shot of espresso is the most natural pairing, amplifying the coffee notes. For a creamier option, a glass of cold oat milk or almond milk provides a smooth, neutral contrast. Sparkling water with a twist of orange or a cherry cola can also cut through the richness effectively and cleanse the palate.
Coffee/Tea Pairings: Obviously, a mug of black coffee is a perfect match. For a more nuanced experience, try a single-origin coffee from Ethiopia or Colombia. If you prefer tea, a strong black tea like Assam or Ceylon works well. A chicory-based coffee alternative would also pair nicely without the caffeine, enhancing the earthy notes in the bites.
Temperature Considerations: Iced beverages provide a refreshing contrast to the dense, room-temperature or chilled bites. A cold glass of milk or an iced latte is fantastic. However, a hot drink like a steaming cappuccino creates a cozy and comforting combination, especially in cooler weather. The temperature play can enhance the overall tasting experience.
Serving Suggestions: When serving these bites with beverages at a gathering, offer a few different options. Set up a small coffee bar with various milks and sweeteners alongside a carafe of cold brew and a pot of hot coffee. This allows your guests to choose their preferred pairing and customize their drink to their taste.
Storage and Shelf Life
Storage Methods: The primary method for storing Mini Mocha Power Bites is in the refrigerator. This is non-negotiable due to the natural fats in the nuts which can become rancid at room temperature. Always store them in a single layer in an airtight container. If you need to stack them, place a sheet of parchment paper between layers to prevent them from sticking together and damaging their shape.
Temperature Requirements: Consistent refrigeration is key. The ideal storage temperature is below 40°F (4°C). The cool environment keeps the texture firm and prevents the bites from becoming too soft or oily. Never leave the container out on the counter for more than an hour, especially in a warm kitchen, as they will soften and become difficult to handle.
Container Recommendations: A glass container with a tight-sealing lid is the best option. Glass does not absorb odors and helps maintain a consistent temperature. Alternatively, a BPA-free plastic container or a stainless steel tiffin works well. The goal is to create a sealed environment that protects the bites from moisture and other food odors in the fridge.
Signs of Spoilage: Although these bites have a good shelf life, it is important to recognize spoilage. The first sign is an off or rancid smell, caused by the oxidation of the nuts’ natural oils. If you see any visible mold, which is rare but possible, discard the entire batch immediately. A change in texture to an unpleasantly hard or excessively oily feel also indicates they are past their prime.
Reheating Instructions: Reheating is not typically necessary or recommended, as they are meant to be eaten cold. However, if you prefer a softer texture, you can let them sit at room temperature for 10-15 minutes before eating. Do not microwave them, as this will melt the chocolate components and make them messy.
Freezing Guidelines: These bites freeze exceptionally well for long-term storage. Arrange them in a single layer on a parchment-lined baking sheet and freeze until solid. This prevents them from freezing together in a clump. Then, transfer the frozen bites to a freezer-safe zip-top bag or airtight container. They can be stored frozen for up to 3 months. Thaw in the refrigerator overnight before serving.
Make Ahead Strategies
Prep Timeline: You can prepare the entire recipe up to 5 days in advance. The flavor often improves after a day in the fridge, as the ingredients have more time to meld together. The complete process, including the hour of chilling time, can be done the day before you need them. This makes them an ideal make-ahead snack for weekly meal prep or for entertaining.
Storage Between Steps: If you need to break up the prep, you can complete the blending step and store the un-pressed mixture in an airtight container in the refrigerator for up to 24 hours. When you are ready to proceed, let the mixture sit at room temperature for 10 minutes to become slightly malleable, then press it into the pan and chill as directed.
Quality Impact Assessment: Making them ahead has a positive impact on quality. The chilling time allows the flavors to deepen and intensify. The texture also sets perfectly, making them easier to cut and handle. There is no degradation in quality for at least the first 4-5 days if stored correctly in the fridge.
Assembly Tips: For parties, you can make, cut, and store the bites ahead of time. Keep them chilled until just before your guests arrive. Then, arrange them on your serving platter and garnish right before serving. This ensures they look fresh and the garnishes like powdered cocoa do not dissolve or get absorbed.
Reheating Guidelines: As mentioned, reheating is not recommended. The make-ahead strategy relies on serving them chilled. If you are transporting them to an event, keep them in a cooler bag with an ice pack to maintain their temperature and firm texture until it is time to serve.
Fresh Element Additions: If you are adding any fresh garnishes like a berry on top or a drizzle of melted chocolate, always add these elements on the day of serving. This prevents the fresh elements from wilting or bleeding moisture into the bites, which could affect their texture and shelf life.
Scaling Instructions
Halving the Recipe: Halving this recipe is straightforward and works perfectly. Simply divide all the ingredient quantities by two. The process remains exactly the same. However, because the volume of mixture is smaller, your food processor might struggle to blend it effectively. To combat this, pulse more frequently and stop to scrape down the sides often. The mixture may come together a bit quicker, so watch it closely. Press it into a smaller pan, like a loaf pan, to maintain the thickness of the slab.
Doubling or Tripling: Doubling or tripling the recipe is excellent for making large batches for events or gifts. Multiply all ingredients accordingly. The main consideration is the capacity of your food processor. You may need to process the ingredients in batches to avoid overfilling the bowl and ensure even blending. After processing each batch, mix them together in a large bowl by hand to ensure uniformity before pressing into a large rimmed baking sheet. The chilling time may need to be extended by 30 minutes to ensure the center is fully set.
Equipment Adjustments: When scaling up, your equipment needs may change. For a double batch, a standard food processor may still work. For a triple batch, you will likely need to work in batches. Ensure you have a large enough pan for the increased volume. A 9×13 inch pan is good for a double batch. For a triple batch, you might need to use two pans or a large half-sheet pan.
Timing Modifications: The prep time will increase slightly when scaling up due to the extra measuring and potential batch processing. However, the actual hands-on active time does not triple; it becomes more efficient. The chilling time remains the same for thickness, but if you press the mixture thicker in a smaller pan, add an extra 30 minutes to the chilling time to be safe.
Storage Considerations: A larger batch means more storage containers. Ensure you have enough airtight containers to store all the finished bites in the refrigerator without overcrowding. If you are making a huge batch for freezing, ensure you have adequate freezer space and freezer-safe bags or containers labeled with the date.
Nutritional Deep Dive
Macro Breakdown: Each Mini Mocha Power Bite provides a balanced macronutrient profile. They are a good source of healthy fats from the almonds and a moderate source of carbohydrates primarily from the dates, which provide natural sugars and fiber. The protein content, while not extremely high, comes from the nuts and contributes to satiety. This macro combination offers sustained energy release rather than a sharp sugar spike and crash, making them an excellent choice for lasting fuel.
Micronutrient Analysis: These bites are a micronutrient treasure trove. Dates are rich in potassium, copper, manganese, and magnesium. Almonds provide a significant amount of Vitamin E, a powerful antioxidant, along with magnesium and biotin. Cocoa powder is famously high in flavonoids, iron, and magnesium. Together, these ingredients support heart health, bone health, and provide essential minerals that are often lacking in modern diets.
Health Benefits: Consuming these bites offers several health benefits. The fiber content promotes digestive health and helps regulate blood sugar levels. The antioxidants from the cocoa, coffee, and almonds combat oxidative stress and inflammation in the body. The healthy fats support brain function and hormone production. The natural caffeine from the espresso can enhance focus, alertness, and even physical performance.
Dietary Considerations: This recipe is naturally gluten-free and dairy-free (if using dairy-free chocolate chips), making it suitable for those with common intolerances. It is also whole food-based, free from refined sugars and processed ingredients. However, it is energy-dense, so portion awareness is important for those monitoring caloric intake. It is not suitable for individuals with nut allergies without modification.
Portion Analysis: One square is a satisfying portion that typically contains between 100-150 calories, depending on the exact size and specific ingredients used. This makes it a perfect snack-sized portion that provides energy without being excessive. The combination of fiber, fat, and protein helps keep you full for longer, preventing mindless snacking on less healthy options later.
Weight Management Tips: For those using these bites as part of a weight management plan, they are an excellent tool. Their rich flavor and satisfying texture can curb cravings for less healthy desserts. Pre-portioning them into single servings prevents overeating. Because they provide sustained energy, they can be a great pre-workout snack that fuels exercise without feeling heavy in your stomach.
Dietary Adaptations
Gluten-free: This recipe is naturally gluten-free as written. The primary ingredients—dates, almonds, cocoa, and espresso powder—are all inherently free from gluten. The only potential source of gluten would be cross-contamination in processing facilities. To ensure 100% gluten-free status, use certified gluten-free oats if you are adding them, and verify that all packaged ingredients like chocolate chips are processed in a gluten-free facility.
Dairy-free: Achieving a dairy-free version is simple. The main recipe contains no dairy. The only ingredient to scrutinize is the chocolate chips. Many dark chocolate chips are naturally dairy-free, but always check the label for milk solids or whey. Opt for brands that are explicitly labeled “dairy-free” or “vegan.” All other core ingredients are plant-based and dairy-free.
Vegan: This recipe is vegan by default if you use dairy-free chocolate chips. All the main components—dates, nuts, cocoa, and coffee—are plant-based. There are no eggs, honey, or other animal products involved. It is a perfect vegan snack that delivers rich flavor and energy without any compromise on taste or texture.
Low-carb/Keto: Adapting this recipe for a keto diet requires significant changes because dates are high in natural sugars. To make a keto version, replace the dates with a combination of a keto-friendly sweetener like erythritol or monk fruit and a binding agent like almond butter or coconut butter. You will also need to use sugar-free chocolate chips. The texture will be different, but the mocha flavor can be preserved.
Paleo: For a paleo adaptation, ensure all ingredients comply with paleo guidelines. The dates, almonds, and cocoa are paleo-friendly. The espresso powder is generally accepted. The main concern is the chocolate chips; you must use paleo-approved chocolate chips sweetened with coconut sugar or another paleo sweetener, avoiding any soy lecithin or dairy.
Low-FODMAP: Dates are high in FODMAPs (specifically excess fructose), so they are not suitable for a strict low-FODMAP diet. To adapt,
Print
Mini Mocha Power Bites
Description
Bite into boldness — rich chocolate meets espresso in every fudgy square. A small cube with intense flavor and energy.
Ingredients
For the Crust:
- 1 cup rolled oats
- 1/2 cup almond butter
- 1/4 cup honey
- 2 tbsp cocoa powder
- 1 tbsp instant espresso powder
- 1/4 cup dark chocolate chips
- 1 tsp vanilla extract
- Pinch of salt
Instructions
1. Prepare the Crust:
- In a bowl, mix almond butter, honey, and vanilla until smooth.
- Add oats, cocoa powder, espresso powder, and salt. Stir until well combined.
- Fold in chocolate chips, then press mixture firmly into an 8×8 pan. Chill for 1 hour before cutting into small squares.
Notes
You can customize the seasonings to taste.
I’m Shaykee—born in Morocco, seasoned across continents. From airplane galleys to home kitchens, I share the flavors and stories that shaped my journey.