Black Forest Cheesecake Bliss: Indulge in Layers of Dark Chocolate, Creamy Cheesecake, and Luscious Cherries
Imagine the ultimate dessert experience, a perfect harmony of flavors and textures that requires absolutely no baking. This Black Forest Cheesecake Bliss delivers exactly that, combining the timeless elegance of a German torte with the creamy, luxurious satisfaction of a classic cheesecake. Each spoonful promises an unforgettable journey, starting with a rich, crunchy chocolate crust, moving through a velvety smooth cheesecake layer, and finishing with a burst of tart, sweet cherries. This dessert is not just a treat; it is a centerpiece, a conversation starter, and a guaranteed crowd-pleaser for any occasion.
The beauty of this no-bake dessert lies in its simplicity and stunning visual appeal. You achieve a dramatic, multi-layered masterpiece without ever turning on your oven. The deep, dark chocolate base provides a sturdy foundation, while the cloud-like cheesecake filling, laced with real cherry pieces, melts in your mouth. Finally, a glossy cherry topping and a shower of chocolate shavings create a professional finish that looks like it came from a patisserie window. This recipe is your secret weapon for impressing guests or treating your family to something extraordinarily special without extraordinary effort.
Furthermore, this cheesecake bliss is incredibly versatile. You can make it ahead of time, allowing the flavors to meld and intensify in the refrigerator. Consequently, it removes the stress of last-minute dessert preparation. Whether you are celebrating a birthday, hosting a holiday dinner, or simply craving a decadent chocolate and cherry indulgence, this recipe answers the call. It is the perfect fusion of convenience and sophistication, proving that the most impressive desserts do not always require complex techniques or hours of labor.
Quick Recipe Highlights
- Flavor Profile: This dessert boasts a sophisticated balance of deep, bittersweet chocolate and rich, tangy cream cheese, perfectly complemented by the bright, fruity acidity of cherries. Every bite is a complex dance of sweet, tart, and creamy notes that linger delightfully on the palate.
- Texture: Experience a delightful contrast in every layer, from the firm and crumbly chocolate cookie crust to the impossibly smooth and airy cheesecake filling. The juicy cherries provide a pleasant burst, while chocolate shavings on top add a final, delicate crunch.
- Aroma: The scent is pure temptation, with the unmistakable, warm fragrance of cocoa and chocolate wafting up first. This is quickly followed by the sweet, inviting aroma of fresh dairy and cream cheese, with a subtle, fruity hint of cherries tying the olfactory experience together.
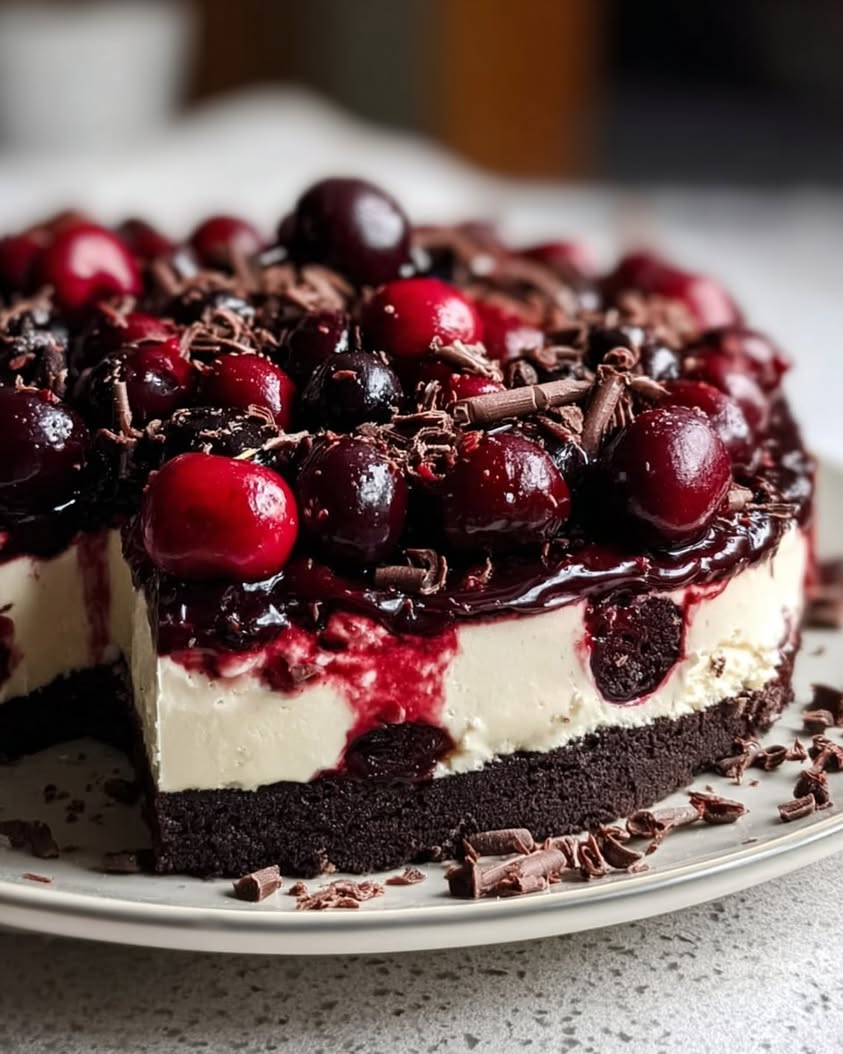
- Visual Appeal: This cheesecake is a showstopper, featuring striking layers that are visible when sliced. The dark chocolate base, off-white filling, and vibrant red cherry topping create a beautiful color contrast that is both elegant and utterly inviting.
- Skill Level Needed: This is an ideal recipe for bakers of all experience levels, especially beginners. Since there is no baking involved, you avoid common pitfalls like cracking. The process primarily involves mixing, pressing, and chilling, making it very approachable.
- Special Equipment: You will need a standard 9-inch springform pan to ensure clean removal of the finished cheesecake. Additionally, an electric hand mixer or stand mixer is essential for achieving the light, fluffy texture of the no-bake cheesecake filling.
Recipe Overview
- Difficulty Level: We classify this Black Forest Cheesecake Bliss as an easy recipe. The steps are straightforward and involve no complex techniques like tempering eggs or baking in a water bath. The most challenging aspect is patience, as you must allow adequate time for the dessert to set firmly in the refrigerator.
- Category: This creation falls squarely into the dessert category. It is a sweet, decadent treat perfect for concluding a meal. Moreover, its richness means a small slice is incredibly satisfying, making it ideal for special occasions and celebrations.
- Cuisine: This recipe is inspired by the classic German Black Forest Gateau, or Schwarzwälder Kirschtorte. We have taken those iconic flavors—chocolate, cherries, and cream—and reimagined them into a simpler, no-bake cheesecake format that retains all the traditional charm and taste.
- Cost: The cost is moderate, as it uses quality ingredients like cream cheese, fresh dairy, and good chocolate. Using canned cherry pie filling can keep costs down compared to using entirely fresh fruit. Overall, it is far more affordable than buying a similar dessert from a bakery.
- Season: While this dessert is fantastic year-round, it feels particularly fitting during the winter holidays and cherry season in the summer. The rich chocolate is comforting in colder months, and the bright cherries are refreshing when the weather is warm.
- Occasion: This cheesecake is perfect for potlucks, dinner parties, birthdays, and holiday gatherings like Christmas or Valentine’s Day. Its elegant appearance and crowd-pleasing flavor profile make it suitable for virtually any festive event where a show-stopping dessert is required.
Why You’ll Love This Black Forest Cheesecake Bliss
First and foremost, you will adore the incredible taste and texture of this no-bake dessert. The combination of dark chocolate, creamy cheesecake, and tart cherries is a classic for a very good reason; it is simply irresistible. Each layer complements the next, creating a harmonious blend that is rich without being overly heavy. The smooth, velvety filling practically melts on your tongue, while the crunchy crust and juicy cherries provide delightful contrast. This is the kind of dessert that makes people close their eyes and savor every single bite, guaranteeing requests for the recipe every time you serve it.
Beyond the flavor, you will love the sheer convenience of this recipe. As a no-bake dessert, it eliminates the anxiety often associated with baking a traditional cheesecake. You do not have to worry about water baths, oven temperature fluctuations, or the dreaded crack down the middle. The preparation is refreshingly simple, mostly involving mixing and chilling. This makes it an excellent project for a hot day when you do not want to heat up the kitchen or for a busy week when you need to prepare a dessert in advance.
Additionally, this Black Forest Cheesecake Bliss offers a touch of nutritional advantage compared to many other desserts. Cherries provide antioxidants and vitamins, while the protein and calcium from the cream cheese and dairy add a modest nutritional boost. Of course, this is still a treat to be enjoyed in moderation, but knowing it contains some beneficial ingredients makes the indulgence feel a little more justified. You can feel good about serving this to your family, knowing you are offering a homemade dessert with recognizable ingredients.
The social and entertaining value of this cheesecake cannot be overstated. Its stunning, professional appearance instantly elevates any table setting. Bringing this dessert to a gathering is a surefire way to become the star of the party. It serves a crowd, making it perfect for potlucks and large family dinners. Furthermore, because it needs to be made ahead, you can spend your time with guests instead of fussing in the kitchen at the last minute. It is a dessert that says you care enough to make something spectacular.
Finally, this recipe is remarkably cost-effective and accessible. The ingredients are common and can be found at any standard grocery store. You do not need any rare or expensive items to create this masterpiece. When you compare the cost of making this at home to purchasing a similar dessert from a high-end bakery, the savings are significant. This accessibility means you can enjoy a luxurious, restaurant-quality dessert anytime the craving strikes, without putting a dent in your wallet.
Historical Background and Cultural Significance
The story of this dessert begins with the iconic Black Forest Gateau, or Schwarzwälder Kirschtorte, from the Black Forest region of Germany. The cake’s origin is somewhat debated, but it is widely believed to have been created in the early 1900s. The name itself translates to “Black Forest cherry torte,” and it traditionally includes layers of chocolate sponge cake, whipped cream, and cherries, all flavored with Kirschwasser, a clear cherry brandy distilled from the region’s sour Morello cherries. The dessert was intended to evoke the beauty and flavors of the Black Forest, with chocolate representing the dark woods, cream symbolizing the snow on the peaks, and cherries reflecting the traditional costumes and abundant orchards.
The cultural importance of the Black Forest Gateau in Germany is profound. It is more than just a cake; it is a national treasure and a symbol of German pastry craftsmanship. By the mid-20th century, it had gained immense international popularity, becoming a staple on dessert menus around the world. Its distinctive look and combination of flavors made it an instant classic. The cake is so revered that there are even legal guidelines in Germany regarding what ingredients must be present for a dessert to be officially labeled a Schwarzwälder Kirschtorte, particularly the use of Kirschwasser.
The evolution of the recipe into a no-bake cheesecake is a fantastic example of how classic desserts adapt to modern tastes and busy lifestyles. The cheesecake version retains the essential flavor profile—chocolate, cherry, and cream—but presents it in a new, incredibly creamy format. This adaptation makes the famous flavors more accessible to home cooks, removing the technical challenges of baking multiple cake layers and stabilizing whipped cream. It is a testament to the timelessness of the original combination that it works so beautifully in this different, yet equally delicious, form.
Regional variations of the original cake abound, and this creativity extends to the cheesecake interpretation. Some versions use a graham cracker crust for a different flavor, while others incorporate cherry juice reduction into the filling for a more intense fruit flavor. The no-bake format allows for even more experimentation, such as adding a layer of chocolate mousse or using a combination of fresh and preserved cherries. This Black Forest Cheesecake Bliss is part of that ongoing culinary conversation, honoring the tradition while embracing modern convenience and innovation.
Ingredient Deep Dive
Chocolate Sandwich Cookies (Oreos): These cookies form the foundation of our crust, providing a deep chocolate flavor and a firm, crumbly texture. The cocoa in the cookies offers flavonoids, antioxidants linked to heart health. When selecting cookies for the crust, you can use name-brand or generic; just ensure they are chocolate-filled sandwich cookies. For a twist, try using chocolate graham crackers. Store unused cookies in an airtight container to maintain freshness. If you need a substitution, graham crackers mixed with cocoa powder and sugar will work, though the flavor will be less intense.
Cream Cheese: This is the star of the filling, providing the signature tangy, rich flavor and luxuriously smooth texture that defines cheesecake. Cultured cream cheese contains probiotics beneficial for gut health and is a good source of vitamin A and calcium. Always use full-fat, brick-style cream cheese for the best results, as low-fat varieties can make the filling watery and prevent it from setting properly. Ensure the cream cheese is at room temperature before mixing to avoid lumps. Store unopened packages in the refrigerator and use by the expiration date.
Heavy Whipping Cream: Whipped to soft peaks and folded into the filling, heavy cream is responsible for the dessert’s light, airy, and mousse-like texture. It adds richness and helps the no-bake cheesecake set firmly when chilled. Heavy cream is a source of fat-soluble vitamins like A, D, E, and K. For the best volume when whipping, ensure both the cream and your mixing bowl are very cold. There is no good substitute for heavy whipping cream in this context; other milks will not whip and provide the necessary structure.
Cherry Pie Filling: This convenient ingredient provides the iconic cherry topping and can also be swirled into the filling for bursts of fruit flavor. It offers the sweet and tart counterpoint to the rich chocolate and cream. Cherries are renowned for their anti-inflammatory properties and are a good source of fiber and vitamin C. You can use canned or jarred pie filling; look for ones with plump, whole cherries for the best appearance and texture. For a homemade touch, you can simmer fresh or frozen pitted cherries with sugar and a thickener like cornstarch.
Dark Chocolate: Used for shaving on top, dark chocolate adds a final layer of intense chocolate flavor and elegant garnish. Dark chocolate with a high cocoa content is rich in antioxidants and flavonoids. Choose a good quality baking bar for shaving, as it will have a cleaner break than chocolate chips. To store, keep chocolate in a cool, dry place away from sunlight. For a different flavor, you can use milk chocolate or white chocolate for garnishing, though dark chocolate best matches the traditional Black Forest profile.
Common Mistakes to Avoid
- Using Cold Cream Cheese: One of the most common errors is adding cream cheese straight from the refrigerator. Cold cream cheese will never become smooth; it will leave stubborn lumps in your filling that are impossible to remove. Always plan ahead and let your cream cheese sit on the counter for at least an hour until it is perfectly soft and at room temperature.
- Under-whipping the Cream: If your heavy cream is not whipped to stiff peaks, your cheesecake filling will be too soft and may not set properly. The whipped cream provides essential structure. Watch for the cream to hold its shape when the whisk is lifted. However, be careful not to over-whip it into butter.
- Not Grinding the Crust Fine Enough: If the cookie crumbs for your crust are too coarse, the base will be crumbly and fall apart when you try to slice the cheesecake. Process the cookies and butter until the mixture resembles wet sand and holds together when you pinch it. This ensures a firm, sliceable foundation.
- Skipping the Chilling Time: Impatience is the enemy of no-bake desserts. The cheesecake needs ample time in the refrigerator—at least four hours, but preferably overnight—to set completely. If you try to slice it too early, the layers will slump and the texture will be messy instead of clean and firm.
- Overmixing the Filling: Once you add the whipped cream to the cream cheese mixture, fold it in gently. Aggressive mixing or using a high speed on the mixer will deflate the whipped cream, resulting in a dense, heavy filling instead of a light and airy one.
- Using the Wrong Pan: A springform pan is non-negotiable for this recipe. Its removable sides are the only way to cleanly extract the tall cheesecake without destroying it. Attempting to use a regular cake pan will lead to disaster when you try to serve it.
- Adding Runny Toppings Too Early: If your cherry pie filling is particularly juicy, adding it immediately before chilling can cause the liquid to seep into the cheesecake layer and make it soggy. For a cleaner layers, add the cherry topping just before serving, or ensure your pie filling is thick enough.
Essential Techniques
Creaming Ingredients: The technique of beating the softened cream cheese with sugar is crucial for achieving a smooth, lump-free base for your filling. This process incorporates air into the mixture, which contributes to a lighter texture. The key to mastering this is ensuring your cream cheese is truly at room temperature. If it is still cold, it will never become perfectly smooth. Common pitfalls include rushing this step and using cold ingredients. A visual cue for success is a completely homogenous, pale, and fluffy mixture that shows no streaks of un-incorporated cream cheese.
Folding: Folding is the gentle technique used to combine the whipped cream with the cream cheese mixture without deflating it. You must use a wide spatula and a light hand. Cut through the center of the mixture, scrape along the bottom of the bowl, and fold over the top. Rotate the bowl a quarter turn and repeat. The importance of this technique is preserving the air bubbles in the whipped cream, which gives the cheesecake its light, mousse-like texture. The common pitfall is stirring or beating, which will crush the air out. You will know you have succeeded when the mixture is uniform in color but still looks airy and voluminous.
Setting a No-Bake Dessert: Understanding how a no-bake cheesecake sets is fundamental. The structure comes from the combination of the fat in the cream cheese and the stabilized air in the whipped cream. When chilled, these elements firm up. The importance of this is patience; the dessert needs uninterrupted time in the cold to achieve the right texture. The common pitfall is checking on it too often or attempting to slice it early. The visual cue for success is a firm top that does not jiggle loosely when the pan is gently shaken.
Pro Tips for Perfect Black Forest Cheesecake Bliss
For an extra-stable crust that holds up perfectly to slicing, try baking it for 10 minutes at 350°F (175°C) and then letting it cool completely before adding the filling. This step is optional but highly recommended for a crisper, sturdier base.
To create beautiful clean slices, dip your knife in hot water and wipe it dry between each cut. The heat will glide through the creamy filling and chocolate layers without dragging or smearing, giving you professional-looking pieces every time.
Enhance the authentic Black Forest flavor by adding a tablespoon of Kirsch (cherry brandy) to the cheesecake filling. If you prefer to avoid alcohol, a teaspoon of pure almond extract is a wonderful alternative that complements the cherry and chocolate notes beautifully.
For a more intense cherry flavor throughout, reserve a half-cup of cherry pie filling and gently swirl it into the cheesecake layer after pouring it into the pan. Use a knife or skewer to create marbled patterns before adding the final topping.
If you have time, let the finished cheesecake sit at room temperature for 15-20 minutes before serving. This slight warming allows the flavors to bloom and the texture to become creamier and more luxurious on the palate.
Garnish with fresh cherries and mint leaves in addition to the chocolate shavings for a pop of fresh color and an extra touch of elegance that makes the dessert truly Instagram-worthy.
Variations and Adaptations
For a seasonal adaptation, try using different fruits. In the fall, a spiced apple pie filling can create a delicious “Apple Crisp Cheesecake” variation. In the spring, a layer of lemon curd swirled into the filling and topped with fresh blueberries offers a bright, citrusy twist. The basic no-bake cheesecake formula is incredibly adaptable to whatever fruit is fresh and available.
Dietary modifications are straightforward. For a gluten-free version, use certified gluten-free chocolate sandwich cookies for the crust. To make it dairy-free, substitute the cream cheese with a plant-based alternative and use coconut cream instead of heavy whipping cream; just ensure all ingredients are well-chilled. For a lower-sugar option, use a sugar substitute approved for baking in the filling and a no-sugar-added cherry pie filling.
Flavor variations can take this dessert in new directions. Incorporate a quarter cup of smooth peanut butter into the cream cheese mixture for a chocolate-peanut butter-cherry combo. Alternatively, add a teaspoon of instant espresso powder to the crust mixture to deepen the chocolate flavor with a coffee note that pairs wonderfully with the cherries.
Consider texture modifications for a different experience. Stir in a half-cup of chopped toasted almonds or hazelnuts into the crust for added crunch. You could also layer sliced fresh cherries between the crust and the cheesecake filling for an extra burst of fresh fruit texture.
Presentation alternatives include making individual servings. Instead of one large cake, layer the crushed crust and cheesecake filling in small jars or glasses for personal parfaits. This is a fantastic option for parties, as it requires no slicing and everyone gets their own perfectly assembled dessert.
Serving and Presentation Guide
Plating this cheesecake is part of the experience. Use a cake server or a thin, offset spatula to lift each slice cleanly from the pan and onto a dessert plate. Wipe the server clean between slices to keep each plate looking pristine. The dramatic layers are a key visual feature, so place the slice with the layers visible to the guest.
Garnishing is the final touch that elevates the dessert from homemade to professional. Beyond the chocolate shavings, a dollop of freshly whipped cream on the side of the slice adds a cloud-like elegance. A single perfect fresh cherry placed on top of the whipped cream or on the side of the plate provides a fresh, vibrant accent.
Traditional accompaniments are simple to allow the dessert’s own flavors to shine. A cup of strong black coffee or an espresso is the classic pairing, cutting through the richness of the cheesecake. For a more indulgent treat, a small glass of the aforementioned Kirschwasser or a cherry liqueur served on the side allows guests to enhance each bite.
Modern serving suggestions might include a drizzle of dark chocolate sauce or a raspberry coulis on the plate for an artistic touch. A scoop of vanilla bean ice cream served alongside is a crowd-pleasing addition, especially for those who love the contrast of cold cheesecake and slightly melting ice cream.
Temperature consideration is important. This dessert must be served chilled straight from the refrigerator. However, as mentioned, a very brief 15-minute rest on the counter before serving can slightly soften the texture and intensify the flavors, making it even more enjoyable.
Portion control is easy because this is a rich dessert. A standard slice from a 9-inch pan typically serves 12 people comfortably. For larger gatherings or as part of a bigger dessert spread, you can easily cut smaller, bite-sized pieces for a buffet-style presentation.
Wine and Beverage Pairing
Wine pairings for this dessert should complement its sweet and rich profile without overpowering it. A classic Brachetto d’Acqui, a lightly sparkling red Italian wine with low alcohol and notes of strawberry and rose, is a perfect match. Alternatively, a late-harvest Riesling with its honeyed apricot and peach notes can stand up to the sweetness while its acidity cleanses the palate. A rich Port wine is another excellent choice, as its deep berry flavors harmonize beautifully with the chocolate and cherry.
For non-alcoholic alternatives, consider drinks that mirror the dessert’s flavors. A black cherry sparkling water or cream soda provides a sweet and bubbly contrast. A cherry-infused iced tea, either black or herbal, offers a refreshing and slightly tannic balance to the creamy cheesecake. A rich, creamy hot chocolate might seem like overkill, but for true chocolate lovers, it is a decadent pairing that doubles down on the dessert’s main theme.
Coffee and tea pairings are a natural fit. A strong, black espresso is the traditional companion, its bitterness cutting through the fat and sweetness perfectly. A cup of French press or drip coffee with similar strength works well. For tea drinkers, a bold Assam black tea or an aromatic Ceylon tea can provide the necessary tannic structure to balance the dessert. A cherry-infused herbal tea would create a harmonious flavor echo.
Temperature considerations are key for beverages. Iced coffees, teas, and sparkling waters should be served very cold. Wines like Brachetto and Riesling are best served chilled. Port can be served at room temperature or slightly cool. Hot beverages like coffee and tea should be freshly brewed and piping hot to provide the best contrast to the cold cheesecake.
Serving suggestions include offering a choice of pairings to guests. You can set up a small coffee and tea station with the dessert. For a dinner party, pouring a small glass of the chosen pairing wine or non-alcoholic sparkler with each plate of dessert creates a thoughtful and complete dining experience.
Storage and Shelf Life
Proper storage methods are essential for maintaining the quality and food safety of your cheesecake. The dessert must always be kept refrigerated due to its dairy content. Cover the springform pan with plastic wrap or, for the best protection, place the entire pan inside a large, airtight container. If you have already sliced it, you can store individual slices in separate airtight containers to prevent them from drying out or absorbing odors from the refrigerator.
Temperature requirements are strict; the cheesecake must be stored at or below 40°F (4°C). Never leave it out at room temperature for more than two hours, as bacteria can grow rapidly in the “danger zone” between 40°F and 140°F (4°C and 60°C). If you are serving it at a party, return any leftovers to the refrigerator promptly.
Container recommendations include using a cake carrier with a lid if you have one. Otherwise, inverting a large bowl over the springform pan can work in a pinch. The goal is to protect the dessert from air exposure, which can cause the topping to dry out and the cheesecake to develop a stale flavor.
Signs of spoilage to look for include an off or sour smell, especially from the dairy components. visually, you might see excessive liquid weeping from the cheesecake or mold growth, though this is rare if consumed within the recommended time frame. If in doubt, it is always safer to discard the dessert.
Reheating instructions are not applicable, as this is a cold dessert meant to be served chilled. Freezing guidelines are simple: this cheesecake freezes exceptionally well. Wrap the entire cheesecake or individual slices tightly in plastic wrap, followed by a layer of aluminum foil. It can be frozen for up to 2 months. Thaw overnight in the refrigerator before serving.
Make Ahead Strategies
The prep timeline for this dessert is ideally a full day ahead. You can prepare the entire cheesecake, up to the point of adding the final cherry topping, and keep it covered in the refrigerator for up to 2 days. Add the cherry topping and chocolate shavings within a few hours of serving to keep the topping looking fresh and prevent potential sogginess.
Storage between steps is simple. The crust can be prepared and pressed into the pan a day in advance. Simply cover the pan with plastic wrap and leave it at room temperature. The filling can also be made a day ahead, poured onto the crust, and chilled. This staged approach breaks the work into manageable parts.
The quality impact assessment of making ahead is positive. In fact, the flavors have time to meld and develop, often resulting in a even more delicious dessert. The texture also has ample time to set perfectly firm, making for cleaner slices. Making it ahead is highly recommended, not just convenient.
Assembly tips for make-ahead include waiting to add any fresh garnishes. If you are using fresh cherries or mint for garnish, add those literally right before serving to maintain their vibrant color and fresh texture. The chocolate shavings can be prepared ahead and stored in an airtight container at room temperature.
There are no reheating guidelines for this cold dessert. If you freeze it, the only guideline is a slow, gradual thaw in the refrigerator for at least 8 hours or overnight. Do not attempt to thaw it at room temperature, as this can create condensation and make the texture watery.
If you want to add a fresh element, consider serving with a side of freshly whipped cream rather than incorporating it into the make-ahead dessert. This ensures the whipped cream is at its peak texture and flavor when served.
Scaling Instructions
Halving the recipe is straightforward if you need a smaller dessert. Simply divide all the ingredients by two. Use an 6-inch springform pan instead of a 9-inch. The preparation steps remain exactly the same. The chilling time may be slightly less, but still allow at least 3-4 hours for it to set completely. This is perfect for a small family or a couple.
Doubling or tripling the recipe is excellent for large events. Multiply all ingredients accordingly. You will need to make the crust and filling in batches unless you have a very large mixer. Use multiple 9-inch springform pans. The chilling time will remain the same, around 4-6 hours, but ensure there is enough space in your refrigerator for air to circulate around the pans for even cooling.
Equipment adjustments are necessary when scaling. For a double batch, you will need a larger mixer bowl or will need to mix the filling in two separate batches and then combine them. Make sure your food processor is large enough to handle a double batch of cookie crumbs for the crust, or process them in batches.
Timing modifications are minimal. The active prep time will increase when you double or triple the recipe, simply because you are handling more ingredients. However, the passive chilling time remains constant. Plan your schedule accordingly to have the desserts ready on time.
Storage considerations for a larger batch are the same; they must be refrigerated. Ensure you have enough space in your refrigerator to accommodate multiple cheesecakes without crowding, which is crucial for proper air circulation and even cooling.
Nutritional Deep Dive
A macro breakdown of a typical slice reveals that this is a energy-dense dessert, as expected. The primary macronutrients are fats from the cream cheese, heavy cream, and cookie crust, and carbohydrates from the sugar and cookies. The protein content is moderate, coming mainly from the dairy. It is a treat best enjoyed in moderation as part of a balanced diet.
The micronutrient analysis shows that this dessert provides some beneficial nutrients alongside its indulgent profile. Cherries contribute vitamin C and potassium. Dairy ingredients provide calcium and vitamin A. Dark chocolate offers iron, magnesium, and flavonoids. While not a health food, it does contain more nutritional value than many other highly processed desserts.
Health benefits are linked to its individual components. The antioxidants in dark chocolate and cherries can support heart health and reduce inflammation. The calcium in dairy supports bone health. However, these benefits must be weighed against the high sugar and saturated fat content, emphasizing the importance of portion control.
Dietary considerations are important for those with specific needs. This dessert is naturally gluten-free if using gluten-free cookies, but it is high in dairy and sugar. Those monitoring their sugar intake, managing lactose intolerance, or following a low-fat diet should be mindful of their portion size or seek adapted recipes.
Portion analysis is key to enjoyment. A standard serving is one-twelfth of the cake. This portion provides a satisfying taste of indulgence without being excessive. Cutting smaller, thin slices can be a strategy for those who wish to enjoy the flavor while more carefully managing their calorie intake.
Weight management tips revolve around mindful eating. Savor a single slice slowly to feel satisfied. Balance the rest of your day’s meals with lighter, nutrient-dense options if you plan to enjoy this dessert. It is about inclusion and balance, not deprivation, within a healthy lifestyle.
Dietary Adaptations
For a gluten-free adaptation, the change is simple. Use certified gluten-free chocolate sandwich cookies for the crust. Ensure that all other packaged ingredients, like the cherry pie filling, are also labeled gluten-free, as some thickeners may contain gluten. The rest of the recipe remains unchanged, resulting in a dessert that is safe for those with celiac disease or gluten sensitivity.
A dairy-free version requires more significant substitutions but is entirely possible. Replace the cream cheese with a high-quality plant-based cream cheese alternative. Use full-fat coconut cream (chilled) in place of heavy whipping cream; the fat content is necessary for whipping. For the butter in the crust, use a plant-based butter or coconut oil. The result will be a slightly different but still delicious creamy dessert.
Creating a vegan Black Forest Cheesecake Bliss involves combining the dairy-free adaptations with other changes. Use vegan chocolate sandwich cookies for the crust (Oreos in many countries are accidentally vegan). Ensure the plant-based cream cheese and butter are vegan. The cherry pie filling must be checked for honey or other animal products. The technique remains the same, producing a decadent plant-based dessert.
For a lower-carb or keto adaptation, the recipe needs a complete overhaul. The crust can be made from a mixture of almond flour, cocoa powder, and a keto-friendly sweetener. The filling would use keto-approved cream cheese, a sugar substitute like erythritol or monk fruit, and perhaps whipped coconut cream. The cherry topping would need to be homemade from low-sugar berries and a keto thickener like xanthan gum. The proportions and techniques would differ significantly from the original.
Troubleshooting Guide
If you encounter a runny filling that won’t set, the most likely cause is under-whipped cream or the cheesecake not chilling for long enough. Unfortunately, once assembled, you cannot re-whip it. The solution is to simply let it chill for several more hours or overnight. If it is still too soft, serve it as a delicious mousse-like dessert in bowls instead of sliced. Next time, ensure your cream is whipped to stiff peaks.
A lumpy filling is almost always due to cream cheese that was too cold when mixed. To avoid this for next time, ensure your cream cheese is softened at room temperature for a full hour. If you have a few small lumps in your current batch, you can try pressing the filling through a fine-mesh sieve before adding the whipped cream, though this is labor-intensive.
If your crust is too crumbly and falls apart, it may not have been processed finely enough or packed down firmly. It could also need more butter to bind it. Unfortunately, this is hard to fix after the fact. Serve the dessert with a spoon and enjoy it as a parfait. For next time, process the cookies into fine crumbs and ensure the butter is evenly distributed. Press the crust down very firmly.
Soggy crust is usually caused by a very wet filling or topping being added and then sitting for too long. To prevent this, ensure your cherry topping is thick, not runny. You can also brush the finished crust with a thin layer of melted chocolate and let it set before adding the filling. This creates a barrier that protects the crust from moisture.
Frequently Asked Questions
Can I use frozen cherries instead of cherry pie filling? Yes, you can. Thaw and drain frozen cherries well, then simmer them with a little sugar and cornstarch or tapioca starch to create a thick syrup similar to pie filling. This allows you to control the sweetness and thickness.
I’m Shaykee—born in Morocco, seasoned across continents. From airplane galleys to home kitchens, I share the flavors and stories that shaped my journey.