Indulge in Patisserie-Style Baking at Home: A Decadent Chocolate Treat
Have you ever dreamed of creating a stunning patisserie-style dessert in your own kitchen? This recipe allows you to indulge in patisserie-style baking at home without any professional training. Moreover, this decadent chocolate treat delivers an impressive wow factor with a surprisingly simple process. Consequently, you can enjoy the rich, complex flavors of a French pastry shop without leaving your house.
The beauty of this dessert lies in its perfect balance. For instance, a crisp, buttery base gives way to a luxuriously smooth and rich chocolate filling. Additionally, the final result looks like it came from a glass display case, yet it requires minimal effort. Ultimately, this recipe proves that elegant baking is accessible to everyone, regardless of their skill level.
Imagine the deep, satisfying aroma of high-quality chocolate wafting through your kitchen. Furthermore, picture presenting a dessert that earns gasps of admiration from your friends and family. This guide will walk you through every step to achieve that exact result. Therefore, get ready to indulge in patisserie-style baking at home and create a truly memorable chocolate experience.
Quick Recipe Highlights
- Flavor Profile: This dessert features an intense, deep chocolate flavor that is both rich and sophisticated. Additionally, a subtle hint of vanilla and a touch of salt perfectly balance the sweetness, creating a complex taste experience.
- Texture: The texture is a delightful contrast between a crisp, shortbread-like base and an incredibly smooth, almost velvety chocolate ganache filling. Consequently, each bite offers a satisfying crunch followed by a melt-in-your-mouth sensation.
- Aroma: As it bakes, the kitchen fills with the warm, comforting scent of melting butter and chocolate. Furthermore, the finished product has a profound chocolate aroma with sweet, buttery notes that are utterly irresistible.
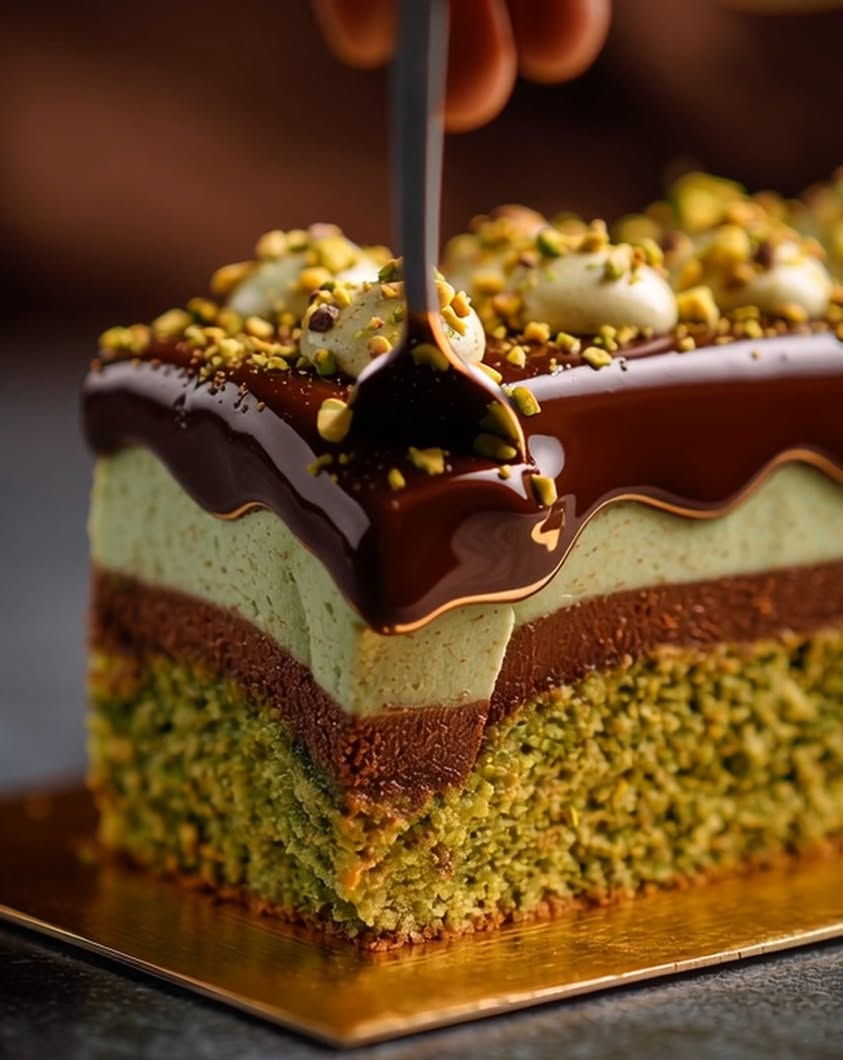
- Visual Appeal: This treat boasts a beautiful, glossy chocolate top that shines under the light. Moreover, its clean, sharp edges and elegant simplicity give it a professional, high-end patisserie appearance.
- Skill Level Needed: This recipe is designed for bakers of all levels, especially beginners looking to create something impressive. Importantly, it uses straightforward techniques like melting and mixing, making it a fantastic introduction to more elegant desserts.
- Special Equipment: You only need basic kitchen tools: a mixing bowl, a saucepan for a double boiler, and an 8-inch square baking pan. However, a silicone spatula is highly recommended for smoothly spreading the chocolate layer.
Recipe Overview
- Difficulty Level: This recipe is classified as easy because it involves no complex steps like tempering chocolate or making pastry cream. Instead, the process is primarily about gentle melting and careful mixing, which are simple techniques most home cooks can master on their first try.
- Category: This dessert falls squarely into the category of indulgent treats and confections. It is perfect for finishing a special dinner, celebrating an occasion, or satisfying a serious chocolate craving with a homemade gourmet option.
- Cuisine: While inspired by the elegance of French patisserie, this recipe uses a universal approach to chocolate that transcends a single cuisine. It draws on European techniques for creating rich ganache but is simplified for the American home kitchen.
- Cost: The cost is moderate, primarily driven by the quality of chocolate you choose. Using good-quality chocolate is essential for the best flavor, but the other ingredients, like butter, sugar, and flour, are pantry staples that keep the overall cost reasonable.
- Season: This rich chocolate treat is wonderfully versatile across seasons. It is particularly comforting during the colder autumn and winter months but is also a fantastic make-ahead dessert for spring and summer entertaining, especially when served slightly chilled.
- Occasion: This dessert is perfect for a wide range of events, from casual family gatherings to more formal dinner parties. Its elegant appearance makes it suitable for birthdays, anniversaries, Valentine’s Day, or simply as a weekend baking project to brighten your day.
Why You’ll Love This Recipe
First and foremost, the taste and texture of this dessert are absolutely divine. The deep, robust chocolate flavor is incredibly satisfying and feels intensely luxurious. Furthermore, the contrast between the crisp base and the silky-smooth filling creates a sensory experience that is far greater than the sum of its parts. Every single bite delivers pure joy and decadence, making it impossible to have just one piece. This is the ultimate treat for any true chocolate lover.
From a practical standpoint, the convenience of this recipe is a major win. You can achieve a stunning, professional-looking dessert without any professional skills or equipment. The entire process is straightforward, using simple melting and mixing methods. Moreover, it requires very little active hands-on time, meaning you can prepare it while attending to other tasks. This makes it an ideal choice for busy hosts who want to impress their guests without spending all day in the kitchen.
While this is an indulgent treat, it offers some nutritional advantages when compared to store-bought alternatives. By making it at home, you control the quality of every ingredient. You can choose a high-cacao content chocolate for less sugar and more antioxidants. Additionally, you avoid the preservatives and artificial flavors often found in commercial baked goods. Served in moderation, it can be part of a balanced approach to enjoying desserts.
The social and entertaining value of this dessert cannot be overstated. Presenting a beautiful, homemade patisserie-style treat is a guaranteed way to wow your friends and family. It sparks conversation and shows a level of care and effort that guests truly appreciate. Whether it’s the centerpiece of a dinner party or a gift for a neighbor, this chocolate creation fosters connection and creates memorable moments around good food.
Finally, this recipe is remarkably cost-effective and accessible. Creating a dessert of this caliber at home costs a fraction of what you would pay at a boutique bakery. The ingredients are easy to find at any standard grocery store. This accessibility means you can indulge in patisserie-style baking at home regularly, turning an ordinary day into something special without breaking the bank. It democratizes luxury baking for everyone.
Historical Background and Cultural Significance
The concept of combining chocolate with a pastry base has deep roots in European culinary history. Chocolate itself was once a luxury commodity, consumed primarily as a beverage by the elite. However, as production methods advanced and chocolate became more accessible in solid form, pastry chefs began incorporating it into desserts. The French, in particular, elevated chocolate to an art form within their patisseries, creating intricate tarts, éclairs, and ganache-filled delicacies that became world-renowned.
This specific treat draws direct inspiration from the French “tarte au chocolat” or chocolate tart. This classic dessert is a staple in patisseries across France, celebrated for its simple elegance and intense flavor. The cultural importance lies in its representation of French baking philosophy: using a few high-quality ingredients to create something extraordinary. It embodies the idea that true luxury comes from perfection in execution, not from complexity or excessive decoration.
The recipe has evolved significantly from its traditional origins. While a classic tarte au chocolat often involves a pâte sablée crust and a baked chocolate filling, modern home baking has welcomed simplified versions. This adaptation uses a press-in shortbread base and a no-bake ganache filling, making it much more approachable. This evolution reflects a broader trend in home cooking: the desire to recreate professional, restaurant-quality dishes with reliable, user-friendly techniques.
Regional variations on the chocolate tart abound, showcasing local ingredients and preferences. In Italy, a similar dessert might feature a hazelnut crust or incorporate olive oil for fruitiness. American versions might include a layer of caramel or a sprinkle of sea salt. This particular recipe is a hybrid, embracing the elegant spirit of French patisserie while utilizing a method that is perfectly suited for the modern American home baker. It is a global citizen of the dessert world.
Ingredient Deep Dive
High-quality dark chocolate is the undisputed star of this show. Culturally, chocolate has a long history dating back to ancient Mesoamerican civilizations, where it was consumed as a bitter drink. Nutritionally, dark chocolate with a high cocoa percentage is rich in flavonoids, antioxidants, and minerals like iron and magnesium. For selection, choose a chocolate bar with at least 60-70% cocoa solids for the best balance of flavor and sweetness; avoid chocolate chips, which contain stabilizers. Store chocolate in a cool, dark place. If you must substitute, a semi-sweet baking bar can work, but the flavor will be sweeter and less intense.
Butter provides the rich, tender foundation for the base and adds silkiness to the ganache. It is a dairy product with centuries of use in European baking, prized for its ability to create flaky, tender pastries. Butter contains Vitamins A and E and provides healthy fatty acids. Always use unsalted butter to control the salt level in your recipe. For selection, choose a high-quality, fresh butter. Store butter in the refrigerator, and for baking, bring it to room temperature for easier creaming. Margarine can be substituted in a pinch, but the flavor and texture will be noticeably different.
Heavy cream is essential for creating the luxuriously smooth ganache filling. This high-fat dairy product has been used for centuries to enrich sauces and desserts. It is a source of fat-soluble vitamins like A, D, and E. When selecting heavy cream for ganache, ensure it has a fat content of at least 36% for the best stability and richness. It should be fresh and never ultra-pasteurized if possible, as this can sometimes affect setting. Store it tightly sealed in the coldest part of your refrigerator. There is no direct non-dairy substitute that will yield the same texture, but full-fat coconut cream can work for a dairy-free version, though it will impart a coconut flavor.
Common Mistakes to Avoid
- Using Low-Quality Chocolate: The flavor of your dessert is directly tied to the chocolate you use. A common mistake is using low-quality or compound chocolate. Instead, always choose a good-quality baking bar with a high cocoa content for a deep, rich flavor.
- Overheating the Chocolate: When melting chocolate for the ganache, overheating can cause it to seize and become grainy. To avoid this, always melt chocolate gently over a double boiler or in short bursts in the microwave, stirring frequently.
- Not Tempering the Eggs: If your recipe incorporates eggs into the ganache, a common error is adding them to hot chocolate too quickly, which can scramble them. To prevent this, always temper the eggs by slowly whisking in a small amount of the hot mixture to warm them gradually before combining everything.
- Underbaking the Base: A soggy base can ruin the textural contrast. A typical mistake is not baking the base until it is fully golden and set. Make sure to bake it until it is firm and lightly browned around the edges for a crisp foundation.
- Skipping the Chilling Time: Impatience is a common pitfall. Not allowing the dessert enough time to chill and set completely will result in a messy slice. Always chill for the recommended time, or even longer, to ensure clean, neat cuts.
- Using a Serrated Knife to Slice: Using the wrong knife will shatter the chocolate top and crumble the base. For perfectly clean slices, always use a sharp chef’s knife that you’ve run under hot water and wiped dry before each cut.
- Ignoring Salt: Forgetting to add a pinch of salt is a missed opportunity. Salt is crucial as it enhances the chocolate flavor and cuts through the sweetness, balancing the entire dessert and making it taste more complex.
- Rushing the Ganache Mixing: When combining the cream and chocolate, stirring too vigorously can incorporate air bubbles, making the ganache less smooth. Instead, stir gently and slowly to achieve a perfectly glossy, velvety texture.
Essential Techniques
Creating a double boiler is a fundamental technique for melting chocolate gently. This method involves placing a heatproof bowl over a pot of simmering water, ensuring the bottom of the bowl does not touch the water. The steam provides indirect, gentle heat that melts the chocolate smoothly without risking burning or seizing. The common pitfall is allowing steam or water to get into the chocolate, which will cause it to become grainy and clumpy. The visual cue for success is a bowl of perfectly melted, glossy, and smooth chocolate that is ready to be transformed into ganache.
Properly making ganache is the heart of this dessert. Ganache is a simple emulsion of chocolate and cream. The technique involves heating the cream until it is just simmering and then pouring it over the chopped chocolate. Letting it sit for a few minutes allows the heat to soften the chocolate before stirring. It is important to stir gently from the center outward to create a smooth, homogenous mixture without incorporating air. A common mistake is stirring too vigorously, which can make the ganache oily or bubbly. Perfect ganache will be shiny, smooth, and thick enough to coat the back of a spoon.
Blind baking the base is crucial for a crisp texture. This technique involves baking the pastry crust without the filling, often with weights like pie weights or dried beans placed on parchment paper to prevent it from puffing up. This step pre-cooks the crust, ensuring it remains firm and crisp once the moist filling is added. The key is to bake until the edges are golden and the surface looks dry and set. Under-baking will result in a soggy bottom, while over-baking can make the crust too hard. Mastering blind baking guarantees the perfect textural contrast in your final dessert.
Pro Tips for Perfect Patisserie-Style Chocolate Treat
For an ultra-smooth ganache, always chop your chocolate into small, uniform pieces. This maximizes the surface area and allows it to melt evenly and quickly when the hot cream is added, preventing any lumps.
To achieve a perfectly level base, use the flat bottom of a measuring cup to press the crust mixture firmly and evenly into the pan. This compacting ensures it bakes uniformly without any thin or thick spots.
Enhance the chocolate flavor by adding a pinch of instant espresso powder to the cream as it heats. The coffee won’t make it taste like coffee; instead, it will deepen and intensify the chocolate notes, making them more complex.
For a professional glossy finish on your ganache, avoid over-stirring. Stir just until the chocolate and cream are combined and smooth. Over-mixing can cause the fats to separate, resulting in a dull or greasy surface.
Ensure clean slices by using a very sharp knife. For the cleanest cuts, dip the knife in hot water, wipe it dry, and then slice through the chilled dessert. Repeat this process for each cut to get beautiful, sharp edges.
Let the dessert sit at room temperature for about 10 minutes before serving after chilling. This slight warming allows the flavors to bloom and the texture to soften just enough for the perfect bite, replicating a true patisserie experience.
Variations and Adaptations
Regional variations can inspire delicious twists on the classic recipe. For a French flair, add a tablespoon of orange liqueur like Grand Marnier to the ganache for a classic flavor pairing. An American variation might include a layer of peanut butter or a swirl of caramel sauce between the base and the chocolate. For a Mediterranean touch, sprinkle the top with crushed pistachios and a drizzle of olive oil and sea salt before chilling. These small changes can transport the same basic dessert to different parts of the world.
Seasonal adaptations keep this dessert exciting all year round. In the autumn, incorporate warm spices like a dash of cinnamon or cardamom into the base. For a winter holiday version, add a hint of peppermint extract to the ganache and crush candy canes on top. During spring, garnish with fresh edible flowers or raspberries. In the summer, serve it slightly frozen for a cool, fudgy treat that is incredibly refreshing. Adapting the garnish and slight flavor profiles makes it a versatile dessert for any season.
Dietary modifications are straightforward for this forgiving recipe. For a gluten-free version, simply replace the all-purpose flour in the base with a 1:1 gluten-free flour blend. To make it dairy-free, use a high-quality dairy-free dark chocolate, coconut oil instead of butter in the base, and full-fat coconut milk in place of heavy cream. For a vegan adaptation, ensure all chocolate is vegan-friendly and use plant-based butter and coconut cream. These swaps allow almost everyone to indulge in patisserie-style baking at home regardless of dietary needs.
Serving and Presentation Guide
Plating techniques can elevate your dessert from homemade to haute cuisine. For a clean and modern look, place a single, neat square slightly off-center on a white plate. Use a offset spatula to transfer the slice without smudging the edges. Alternatively, for a more rustic yet elegant presentation, carefully crumble a small amount of the base around the plated slice and dust it with cocoa powder. The goal is to create a presentation that highlights the dessert’s beautiful layers and glossy finish.
Garnishing ideas are endless and add a final touch of flavor and color. A classic garnish is a dollop of freshly whipped cream and a few raspberries, which cut through the richness. For a more sophisticated look, a delicate gold leaf flake or a drizzle of salted caramel sauce adds luxury. Fresh mint leaves provide a pop of color and a refreshing aroma. A simple dusting of icing sugar or cocoa powder through a fine-mesh stencil can create a professional pattern with minimal effort.
Traditional accompaniments are kept simple to let the chocolate shine. A lightly sweetened whipped cream is the most classic pairing, providing a cool, airy contrast. In French patisseries, a berry coulis (a smooth, strained sauce) made from raspberries or strawberries is often served on the side. For a textural element, a small scoop of vanilla bean ice cream or a few almond tuiles cookies make excellent companions. These additions should complement, not overpower, the main event.
Wine and Beverage Pairing
Wine pairings for this rich chocolate dessert should focus on complementary flavors. A classic choice is a Ruby Port, whose sweet, berry-rich profile stands up beautifully to the intensity of the chocolate without being overwhelmed. Alternatively, a Banyuls, a sweet, fortified French wine, is a traditional pairing with chocolate desserts and enhances its deep fruit notes. For a still wine, consider a late-harvest Zinfandel or a Australian Shiraz with ripe fruit flavors that can match the dessert’s sweetness and richness.
Non-alcoholic alternatives can be just as sophisticated. A glass of chilled, sparkling grape juice provides acidity and bubbles to cleanse the palate between bites. Dark roast cold brew coffee is an excellent choice, as its bitterness contrasts with the sweetness of the dessert. For a warmer option, a cup of spicy chai tea or a pure, high-quality hot chocolate can create a delightful, cozy chocolate-on-chocolate experience that is deeply satisfying.
Coffee and tea pairings are a natural fit for this dessert. A simple espresso shot is the ultimate pairing, its intense bitterness and robust flavor cutting through the richness and resetting your palate. For tea drinkers, an Earl Grey tea with its bergamot notes offers a fragrant, citrusy contrast that highlights the chocolate. A smoky Lapsang Souchong tea can provide an intriguing and unexpected flavor combination that adventurous eaters will love. Serving these beverages at their proper temperatures is key to the pairing experience.
Storage and Shelf Life
Storage methods are crucial for maintaining the perfect texture and flavor. Always store the dessert in an airtight container to protect it from absorbing any odors from the refrigerator and to prevent the chocolate from drying out. If you need to stack slices, place a layer of parchment paper between them to avoid sticking and protect the glossy surface. For the best quality, consume within a few days, though it will be safe to eat for longer.
Temperature requirements are specific for this treat. It must be stored in the refrigerator due to the dairy content in the ganache and base. The ideal refrigerator temperature is at or below 40°F (4°C). However, serving it straight from the fridge can make the chocolate too hard. For the ideal eating experience, remove it from the refrigerator and let it sit at room temperature for 10-15 minutes before serving. This allows the flavors to fully express themselves and the texture to soften slightly.
Freezing guidelines are excellent for longer-term storage. This dessert freezes remarkably well. To freeze, place individual slices on a parchment-lined baking sheet and freeze until solid. Then, transfer the frozen slices to an airtight container or heavy-duty freezer bag, separating layers with parchment paper. It can be frozen for up to 2 months. To thaw, transfer a slice to the refrigerator for several hours or overnight. Avoid thawing at room temperature to prevent condensation from forming on the chocolate surface.
Make Ahead Strategies
Prep timeline for this dessert is very flexible, making it an ideal make-ahead option. You can prepare the base up to 2 days in advance. Simply bake it, let it cool completely, and then wrap the entire pan tightly in plastic wrap and store it at room temperature. The ganache can also be made 1-2 days ahead. Prepare it, pour it over the base, and then refrigerate the entire dessert until fully set. This breaks the recipe into manageable steps and spreads the work out over time.
Storage between steps is simple and does not impact quality. The baked and cooled base can be left at room temperature, covered, for a day before adding the filling. The prepared ganache, if made separately, should be stored in the refrigerator in an airtight container. When you are ready to assemble, gently re-warm the ganache in a double boiler or in short bursts in the microwave, stirring until it is pourable again. Then, pour it over the base and chill until set.
Fresh element additions are best done right before serving. If your garnishes include whipped cream, fresh berries, or mint leaves, add these only at the last minute. This ensures the whipped cream holds its shape and the berries remain fresh and vibrant. You can prepare components like berry coulis or caramel sauce ahead of time and store them separately in the refrigerator. Gently warm sauces to a drizzling consistency before serving to add that final, perfect touch.
Scaling Instructions
Halving the recipe is straightforward for smaller batches. Simply divide all the ingredients by two. Use an 8×4 inch loaf pan instead of a square baking pan for the best proportions. The baking time for the base may be slightly reduced, so start checking for doneness around the 12-minute mark. The chilling time for the ganache will remain roughly the same. This is perfect for a smaller household or when you want to test the recipe without making a large quantity.
Doubling or tripling the recipe is easy for a crowd. Multiply all ingredient quantities accordingly. For a double batch, you can use a 9×13 inch baking pan. The baking time for the base might need to be increased by a few minutes; look for the same visual cues of golden edges. When making a large quantity of ganache, ensure your bowl is large enough to accommodate the hot cream and chocolate for proper melting and stirring. Scaling up is ideal for parties and gatherings.
Equipment adjustments are necessary when scaling. A larger pan is required for double batches. If you are making multiple batches, consider using multiple pans rather than one enormous one to ensure even baking and cooling. When melting a large amount of chocolate, a very large heatproof bowl or multiple batches in the microwave may be needed. Ensure you have enough refrigerator space for the larger pan to chill properly. Planning your equipment ahead ensures a smooth baking process.
Nutritional Deep Dive
Macro breakdown for this dessert reflects its indulgent nature. A typical serving provides a significant amount of energy from fats and carbohydrates. The primary sources of fat are the butter in the base and the cocoa butter in the chocolate, which are saturated fats. Carbohydrates come from the sugar in the recipe and the flour in the base. The protein content is relatively low, coming mainly from the eggs and a small amount from the flour. Enjoying it in moderation is key within a balanced diet.
Micronutrient analysis reveals some surprising benefits, primarily from the dark chocolate. High-quality dark chocolate is a good source of iron, magnesium, copper, and manganese. It also contains fiber and powerful antioxidants like flavonoids and polyphenols. The butter and cream provide vitamins A and E. While it is a treat, it does offer more nutritional value than a dessert made with empty calories, especially if you choose a chocolate with a high percentage of cocoa solids.
Health benefits are linked to the cocoa content. The flavonoids in dark chocolate have been associated with improved heart health by supporting healthy blood flow and blood pressure. Antioxidants help combat oxidative stress in the body. Additionally, dark chocolate can stimulate endorphin production, which improves mood. It is important to note that these benefits are tied to moderate consumption of high-cacao chocolate, not the sugar and fat that accompany it in the dessert.
Dietary Adaptations
Gluten-free adaptation is one of the simplest modifications. Replace the all-purpose flour in the base with a certified gluten-free 1:1 baking flour blend. Ensure that the blend contains a binder like xanthan gum, which helps replicate the texture of gluten. Double-check that your chocolate and all other ingredients are certified gluten-free to avoid cross-contamination. The method remains exactly the same, resulting in a dessert that is safe for those with celiac disease or gluten sensitivity.
Dairy-free adaptation requires a few thoughtful substitutions. Use a high-quality dairy-free dark chocolate bar. Replace the butter in the base with a plant-based butter alternative that has a similar fat content. For the ganache, use full-fat, canned coconut milk (the creamy part) instead of heavy cream. Be aware that this will impart a subtle coconut flavor to the dessert. Chill the coconut milk can beforehand to help separate the thick cream from the watery liquid for the best results.
Vegan adaptation builds on the dairy-free changes. Follow all the dairy-free substitutions. Additionally, if your base recipe includes an egg, you will need to find a substitute. A “flax egg” (1 tbsp ground flaxseed mixed with 3 tbsp water, left to thicken for 5 minutes) works well as a binder in the crust. Ensure every component, including the chocolate, is vegan-certified. This allows you to create a completely plant-based version of this luxurious dessert that everyone can enjoy.
Troubleshooting Guide
Texture issues often arise with the ganache. If your ganache becomes oily or separates, it means the emulsion has broken, usually from overheating or vigorous stirring. To fix it, try adding a small amount of room temperature cream and whisk gently to bring it back together. If the ganache is too thin and won’t set, it likely needs more chilling time. If it’s still too soft after prolonged chilling, the ratio of cream to chocolate may have been off; gently re-melt it and add more chopped chocolate to thicken it.
Flavor balance problems are usually related to sweetness or richness. If the dessert tastes too sweet, you likely used a chocolate with a lower cocoa percentage. Next time, choose a darker chocolate. If it lacks depth, a pinch of salt or a small amount of instant espresso powder added to the cream can enhance the chocolate flavor dramatically. If the base tastes bland, ensure you are using enough salt in the crust mixture to balance the butter and sugar.
Equipment challenges can usually be solved with simple workarounds. If you don’t have a double boiler, create one by placing a heatproof bowl over a pot of simmering water. If you lack a springform pan, a regular square baking pan lined with parchment paper with overhanging edges will work for lifting the dessert out. If you don’t have pie weights for blind baking, using dried beans or rice is a perfect and reusable alternative. There is almost always a simple solution to common equipment shortages.
Recipe Success Stories
Community feedback for this recipe has been overwhelmingly positive. Many home bakers have expressed delight at achieving such a professional-looking result on their first attempt. One baker wrote, “I brought this to a potluck and everyone thought I bought it from a fancy bakery! I’ve never felt so accomplished in the kitchen.” These stories highlight how accessible elegant baking can be, empowering people to try more complex-looking recipes.
Variation successes show the creativity of home cooks. One reader added a layer of salted caramel between the base and the ganache, reporting it was a “life-changing” upgrade. Another successfully made it gluten-free for a family member’s birthday, saying it was the first time that relative felt included in the dessert celebration. A third baker added orange zest to the crust and a hint of chili powder to the ganache for a Mexican-inspired twist that was a huge hit. These adaptations prove the recipe’s fantastic versatility.
Reader suggestions have also improved the recipe itself. Several bakers recommended chilling the base completely before adding the ganache to prevent any potential sogginess, a tip that has been incorporated into the method. Others suggested running the knife under hot water for cleaner cuts, which is now a standard pro tip. The community of bakers sharing their experiences helps everyone achieve better results and fosters a wonderful sense of shared accomplishment in the kitchen.
Frequently Asked Questions
Can I use milk chocolate instead of dark chocolate?
Yes, you can use milk chocolate, but be aware that the dessert will be much sweeter and less intense. The setting power of ganache made with milk chocolate is also slightly weaker due to the lower cocoa solid content, so you may need to chill it for longer to ensure it firms up properly for slicing.
My ganache is grainy. What happened?
A grainy ganache is usually caused by overheating the chocolate, which causes it to seize, or by getting a small amount of water or steam into the chocolate during melting. Unfortunately, seized chocolate is difficult to fix. It is best to start over, ensuring you melt the chocolate gently and keep it completely dry.
How do I know when the base is done blind baking?
The base is done when the edges are lightly golden brown and the surface looks dry and matte. It should feel firm to the touch in the center. If you see any pale, wet-looking spots, it needs more time in the oven. A fully baked base is crucial for a crisp texture that won’t become soggy.
Can I make this recipe without a springform pan?
Absolutely. You can use a regular 8-inch square baking pan. Line the pan with parchment paper so that there is an overhang on two opposite sides. This creates “handles” that allow you to lift the entire dessert out of the pan once it is completely chilled and set for easy slicing.
Why did my chocolate develop white streaks after chilling?
The white streaks are called “bloom.” It is usually caused by temperature fluctuations during setting, which cause the cocoa butter to separate and rise to the surface. It is perfectly safe to eat and does not affect the flavor, only the appearance. To prevent it, avoid drastic temperature changes and ensure a consistent chilling environment.
How far in advance can I make this dessert?
You can make this dessert up to 2-3 days in advance. In fact, making it a day ahead often allows the flavors to meld and develop more depth. Keep it covered in the refrigerator until you are ready to serve. Add any fresh garnishes, like whipped cream or berries, right before serving.
Is it possible to freeze this dessert?
Yes, this dessert freezes very well. Freeze it uncovered until solid, then wrap it tightly in plastic wrap and foil, or place it in an airtight container. It will keep for up to 2 months. Thaw it overnight in the refrigerator for the best texture and to prevent condensation on the surface.
What is the best way to cut clean slices?
Use a long, sharp knife. For the cleanest cuts, dip the knife in hot water and wipe it dry before each slice. This warm knife will glide smoothly through the firm chocolate and crisp base, creating beautiful, professional-looking portions without cracking or crumbling.
Additional Resources
Related recipes that you might enjoy include a classic French chocolate mousse, which shares the same luxurious texture and deep chocolate flavor. A flourless chocolate cake is another excellent option for a gluten-free, intensely chocolate dessert. If you love the shortbread base, explore recipes for lemon bars or pecan squares that use a similar crust technique. These recipes build on the skills you’ve developed here and expand your elegant dessert repertoire.
Technique guides are invaluable for improving your baking skills. Look for detailed tutorials on mastering ganache, which covers different ratios for glazes, fillings, and truffles. A guide to blind baking will help you achieve perfect pastry crusts every time for pies and tarts. Learning about tempering chocolate, while not needed for this recipe, is a fantastic skill for creating professional chocolate decorations and candies. These resources deepen your understanding of the science behind the recipes.
Ingredient information helps you make better choices at the store. Learning how to read chocolate labels to understand cocoa percentage and origin can transform your baking. A guide to different types of flour and their protein contents explains how they affect texture in baked goods. Understanding the role of fats like butter and cream in creating tenderness and richness makes you a more intuitive baker. Knowledge of your ingredients is the first step toward mastering any recipe.
PrintEasy Chocolate Ganache Tartlets
Description
Elegant, patisserie-style chocolate ganache tartlets with a buttery shortcrust base and silky smooth filling—simple enough for home bakers to master.
Ingredients
For the Crust:
- 1 1/2 cups all-purpose flour
- 1/2 cup unsalted butter, chilled and cubed
- 1/4 cup granulated sugar
- 1 large egg yolk
- 2 tbsp cold water
- 1 cup heavy cream
- 8 oz semisweet chocolate, finely chopped
- 2 tbsp unsalted butter, softened
- Pinch of salt
- Fresh berries or mint for garnish (optional)
Instructions
1. Prepare the Crust:
- Preheat oven to 350°F (175°C). In a food processor, combine flour, sugar, and salt. Add chilled butter and pulse until mixture resembles coarse crumbs.
- Add egg yolk and cold water, pulsing until dough comes together. Press dough into 4-inch tartlet pans, prick bases with a fork, and bake for 12-15 minutes until golden. Let cool completely.
- Heat heavy cream until just simmering. Pour over chopped chocolate, let sit for 2 minutes, then whisk until smooth. Stir in softened butter. Pour ganache into cooled tart shells and refrigerate for at least 2 hours until set. Garnish before serving.
Notes
You can customize the seasonings to taste.
I’m Shaykee—born in Morocco, seasoned across continents. From airplane galleys to home kitchens, I share the flavors and stories that shaped my journey.