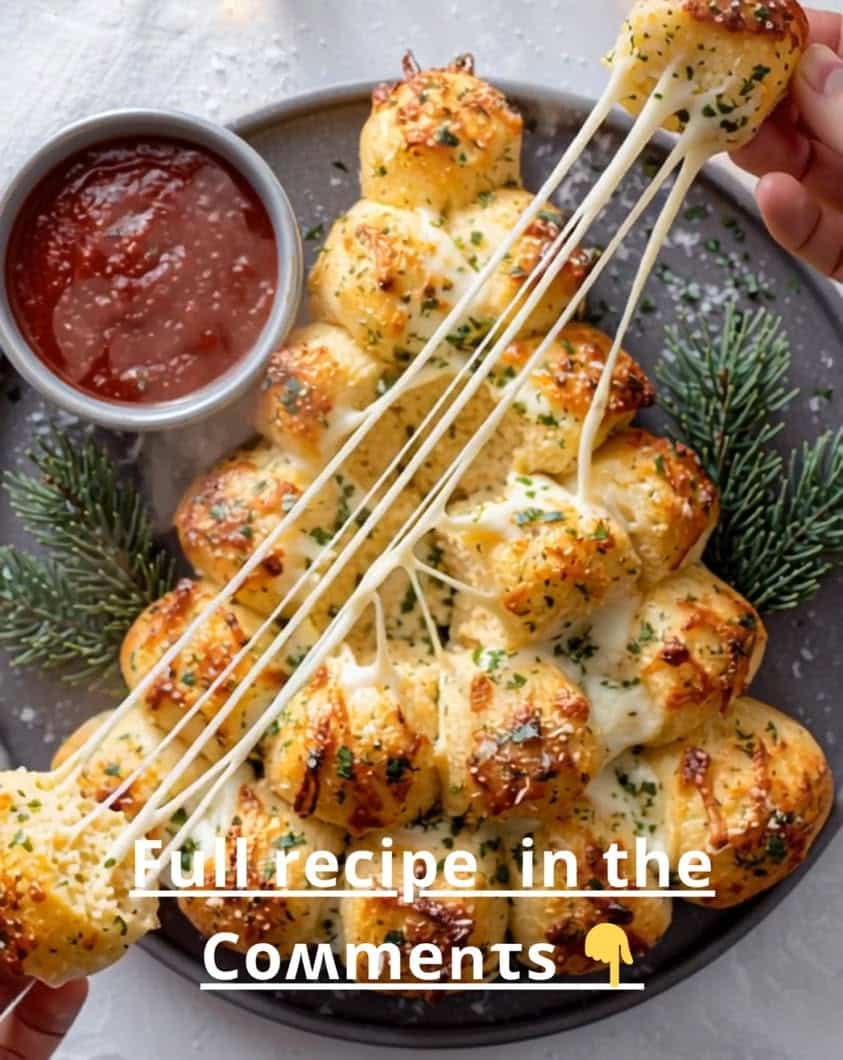
The Ultimate Holiday Appetizer: Cheesy Garlic Pull-Apart Bread Bites
Imagine the scene: a festive gathering filled with laughter, twinkling lights, and the irresistible aroma of garlic and melted cheese wafting from your kitchen. This is the magic you create with the ultimate holiday appetizer. These pull-apart bread bites transform simple ingredients into a spectacular centerpiece that brings people together. Furthermore, they deliver that perfect combination of comfort and celebration in every single, shareable bite.
The beauty of this recipe lies in its glorious simplicity. You start with a humble loaf of bread, but you end up with a golden, cheesy masterpiece. Each piece pulls away easily, revealing stretchy, molten mozzarella and a savory garlic butter infusion. Consequently, your guests will keep coming back for more, creating an interactive and utterly delicious experience. This dish truly embodies the spirit of holiday sharing and joy.
Moreover, this recipe is incredibly forgiving and adaptable. Whether you are a seasoned cook or a kitchen novice, you can achieve spectacular results. The process is straightforward, the ingredients are accessible, and the payoff is immense. Ultimately, this appetizer is not just food; it is an event. It sets the tone for a warm, welcoming, and memorable holiday party.
Quick Recipe Highlights
- Flavor Profile: These bites offer a robust savory experience. The primary taste is a rich, toasted garlic butter that perfectly complements the mild, creamy mozzarella. Additionally, the optional parsley adds a fresh, herbal note that cuts through the richness beautifully.
- Texture: The texture is a delightful contrast of crispy, buttery exterior and a soft, fluffy, cheesy interior. Each bite provides a satisfying pull from the melted cheese, followed by a tender, bread-y give that is incredibly pleasurable to eat.
- Aroma: As they bake, the aroma is absolutely intoxicating. The scent of roasting garlic and browning butter fills your home, creating an instant feeling of warmth and anticipation. This fragrant promise is a key part of the overall experience.
- Visual Appeal: The final product is a golden-brown loaf, glistening with herb-flecked butter. When you pull it apart, the visual of the long, stretchy cheese strings is pure food magic, making it a show-stopping addition to any table setting.
- Skill Level Needed: This recipe requires minimal culinary skill. Essentially, you need to be able to slice a grid pattern, mix a simple butter sauce, and stuff cheese into pockets. Therefore, it is perfect for cooks of all experience levels.
- Special Equipment: You need only basic kitchen tools: a sharp serrated knife for scoring the bread, a mixing bowl, a baking sheet, and a pastry brush for applying the garlic butter. No fancy or specialized equipment is necessary.
Recipe Overview
- Difficulty Level: This recipe is classified as easy because it involves no complex techniques or precise baking science. The steps are simple, sequential, and hard to mess up. Even if your cuts are not perfectly even, the final result will still be delicious and visually appealing. The process is very forgiving.
- Category: This dish falls squarely into the appetizer and party food categories. It is designed for sharing and is often the first food guests encounter at a gathering. It can also serve as a fun side dish for a casual family dinner or a game-day snack.
- Cuisine: While its roots are in Italian-American cuisine, thanks to the focus on garlic, cheese, and bread, it has become a universal party classic. This appetizer is a staple at gatherings across the United States, embodying a love for bold, comforting flavors.
- Cost: This is an incredibly cost-effective dish. A loaf of sourdough or Italian bread, a block of mozzarella, butter, and garlic are all budget-friendly ingredients. You can feed a crowd for a fraction of the cost of store-bought appetizers, making it a smart choice for entertaining.
- Season: This recipe shines brightest during the holiday season, from Thanksgiving through New Year’s. However, its appeal is year-round. It is perfect for summer barbecues, potlucks, and any occasion that calls for a comforting, shareable treat.
- Occasion: It is the quintessential party food. Think Christmas Eve gatherings, Thanksgiving pre-feast snacks, Super Bowl parties, potlucks, birthday celebrations, or even a cozy movie night at home. It fits any event where people gather to enjoy good food and company.
Why You’ll Love This Recipe
First and foremost, the taste and texture are utterly irresistible. The combination of warm, soft bread, savory garlic butter, and gooey, stretchy mozzarella is a classic for a very good reason. Each component complements the others perfectly, creating a harmonious bite that is both comforting and exciting. The crispy edges provide a satisfying crunch, while the cheesy center offers a soft, molten contrast. This sensory experience is guaranteed to bring smiles to your guests’ faces.
From a convenience standpoint, this recipe is a true winner. The preparation time is remarkably short, requiring only about 15 minutes of active work before it goes into the oven. This means you can spend less time in the kitchen and more time with your guests. Furthermore, the ingredients are simple and easy to find at any grocery store. You do not need to hunt for exotic items or make complicated preparations. It is the definition of a low-effort, high-reward dish.
While this is an indulgent treat, it does offer some nutritional perspective. Using a whole-grain sourdough or artisan bread can add fiber and complex carbohydrates. Mozzarella is a good source of protein and calcium. Of course, the key is moderation and balance. Serving this as part of a spread that includes vegetable platters and lean proteins creates a more rounded nutritional profile for your gathering.
The social and entertaining value of this dish cannot be overstated. It is an interactive food that encourages conversation and sharing. The very act of pulling apart the bread is a communal activity that breaks the ice and gets people engaged. It serves as a fantastic centerpiece for your appetizer table, instantly making your spread look more abundant and thoughtfully prepared. It signals to your guests that you have gone the extra mile to create something special.
Finally, the cost-effectiveness and accessibility make this a go-to recipe for any budget. You can easily feed six to eight people for the price of a single restaurant appetizer. This makes it ideal for large families, big parties, or anyone who loves to entertain without breaking the bank. The ingredients are also very adaptable; you can use what you have on hand, making it a practical choice for last-minute gatherings.
Historical Background and Cultural Significance
The origin of pull-apart bread is somewhat murky, but it is widely considered a modern American innovation born from a love of convenience and shareable foods. It likely evolved from traditional stuffed breads found in various cultures, such as Italian focaccia or Eastern European pogaca. The specific concept of scoring a loaf and stuffing it with cheese and butter, however, gained massive popularity in the late 20th and early 21st centuries, largely through the rise of food blogs and social media. This method was a clever way to transform a simple loaf into a festive, interactive dish.
Culturally, this dish represents the American ethos of potlucks and casual entertaining. It is a food meant for sharing, perfectly suited to the informal, communal style of modern gatherings. It has become a staple at holidays like Christmas and Thanksgiving, but also at sporting events and parties. Its significance lies in its ability to bring people together around the table, literally breaking bread in a fun, engaging way. It symbolizes warmth, generosity, and the joy of feeding those you care about.
The recipe has evolved significantly from its likely beginnings. Initially, it may have been a simple garlic bread. The innovation of cutting a grid pattern and stuffing cheese into the pockets was a game-changer. This evolution turned a side dish into a main attraction. Furthermore, the internet has played a huge role in its propagation, with countless variations appearing online. Today, you can find versions with every imaginable filling, from spinach and artichoke to pepperoni and pizza sauce.
Regional variations are now abundant across the United States. In the South, you might find a version with pimento cheese or a Cajun spice blend. In coastal areas, crab dip-stuffed bread is popular. In the Midwest, a version with beef and cheddar is common. Italian-American communities might use provolone and add pepperoni. This adaptability is a testament to the recipe’s foundational strength. It provides a simple template that can be customized to reflect local tastes and ingredient availability.
Ingredient Deep Dive
Let us start with the foundation: the bread. A sturdy, crusty loaf like sourdough or Italian bread is essential. These breads have a tight crumb and a robust structure that can hold the butter and cheese without becoming soggy or falling apart. Sourdough, with its tangy flavor, adds a wonderful complexity that balances the richness of the dairy. When selecting your loaf, look for one that is fresh but firm. Avoid pre-sliced bread, as it lacks the necessary structural integrity. You can store unused bread in a paper bag at room temperature for a day or freeze it for longer storage.
Mozzarella cheese is the star of the show, providing the iconic stretchy, gooey texture. For the best results, use low-moisture, whole-milk mozzarella that you shred yourself from a block. Pre-shredded cheese contains anti-caking agents like potato starch or cellulose, which can prevent it from melting smoothly. The history of mozzarella dates back to Italy, where it was traditionally made from water buffalo milk. Today, most is made from cow’s milk. It is a good source of protein and calcium. For a different flavor profile, you can substitute with provolone, fontina, or a blend of Italian cheeses.
Butter is the carrier for our flavorings and the key to that golden, crispy exterior. Unsalted butter is recommended so you can control the sodium level in the final dish. As the bread bakes, the butter soaks in, enriching the crumb and promoting browning. Culturally, butter has been a cornerstone of baking and cooking across Europe for centuries. For a dairy-free version, a high-quality plant-based butter works remarkably well. Be sure to use one that is designed for baking and has a similar fat content to dairy butter for the best results.
Fresh garlic is non-negotiable for achieving that authentic, robust flavor. When minced and infused into the warm butter, it releases its aromatic oils, creating the signature taste of this appetizer. Garlic has a long history of culinary and medicinal use, dating back thousands of years. From a health perspective, it contains allicin, a compound with potential antioxidant and anti-inflammatory properties. For a milder flavor, you can roast the garlic first. If you are in a pinch, granulated garlic can be used, but the flavor will be less complex and vibrant.
Common Mistakes to Avoid
- Using the Wrong Bread: A common error is selecting a loaf that is too soft, like sandwich bread. This type of bread cannot support the grid structure and will turn to mush. Always opt for a crusty, dense artisan loaf for the best structural integrity and texture.
- Cutting All the Way Through: A critical mistake is slicing completely through the bottom crust. This causes the loaf to fall apart during baking and makes it impossible to serve as a pull-apart bread. Always use a serrated knife and stop cutting about half an inch from the bottom.
- Using Pre-Shredded Cheese: Pre-shredded bags of cheese are coated with starches to prevent clumping. These additives inhibit melting and can result in a greasy, clumpy texture rather than smooth, stretchy cheese. For the best melt, always shred your cheese from a block just before using.
- Overstuffing the Pockets: It is tempting to cram as much cheese as possible into each slit, but this can backfire. Overstuffing prevents the heat from circulating properly, leading to uneven cooking. Some cheese may not melt fully, while other parts of the bread can burn.
- Skipping the Butter Brush: Do not just pour the butter over the top. Taking the time to brush the garlic butter in between the cuts ensures every surface is flavored and helps the bread achieve an even, golden-brown color. This step is crucial for maximum flavor penetration.
- Underseasoning the Butter: Garlic and butter are a powerful duo, but they need help. Forgetting to add salt and perhaps some black pepper or herbs to the butter mixture will result in a bland final product. Always taste your butter mixture and season it adequately.
- Baking at the Wrong Temperature: Baking at too low a temperature will steam the bread rather than toast it, making it soggy. Conversely, too high a temperature will burn the top before the inside is hot and cheesy. The sweet spot is around 350-375°F (175-190°C).
- Not Serving Immediately: This dish is at its absolute peak the moment it comes out of the oven. The cheese is at its stretchiest, and the bread is at its crispiest. Letting it sit for too long causes the cheese to firm up and the steam to soften the bread.
Essential Techniques
The grid cutting technique is the foundation of this recipe. Using a sharp serrated knife, you will score the bread in a crosshatch pattern, taking care not to slice through the bottom crust. This creates individual portions that are still connected, allowing for the signature “pull-apart” action. The key is to make confident, steady cuts. A dull knife will tear the bread, while a slicing knife might crush it. The serrated edge glides through the crust cleanly. Visually, you are aiming for roughly 1-inch to 1.5-inch squares. Do not worry if they are not perfect; the final result will still be beautiful.
Infusing the butter is a simple but vital step for building deep flavor. Gently melting the butter with the minced garlic allows the garlic’s essential oils to dissolve into the fat. This process, called infusion, creates a much more uniform and robust garlic flavor than simply sprinkling garlic powder on top. The trick is to use low heat; you do not want to fry the garlic, as this can make it bitter. You are merely warming it through until the mixture becomes fragrant. This infused butter will then be brushed into every nook and cranny of the scored bread.
Stuffing the cheese effectively requires a bit of finesse. Take small pinches of the shredded mozzarella and gently tuck them into the slits you have created. Using your fingers or a small spoon, push the cheese down into the pockets. The goal is to distribute the cheese evenly without forcing it. If a pocket seems too tight, do not force it, as you might tear the bread. Just move to the next one. A well-stuffed loaf will have a slight, pillowy appearance before baking, as the cheese fills out the spaces between the bread sections.
Pro Tips for Perfect Pull-Apart Bread Bites
- Warm Your Butter Gently: When making the garlic butter, melt the butter over low heat or in short bursts in the microwave. You want it liquid but not hot. If the butter is too hot, it will cook the raw garlic on contact, creating a harsh, bitter flavor instead of a mellow, aromatic one.
- Add Fresh Herbs at the End: If you are using fresh parsley or other delicate herbs, stir them into the butter after you have taken it off the heat. This preserves their fresh color and bright flavor. Adding them too early can cause them to wilt and lose their vibrancy.
- Use a Pastry Brush for Precision: A silicone pastry brush is your best friend for this recipe. It allows you to get deep into the cracks and thoroughly coat the interior surfaces of the bread with the garlic butter. This ensures every single bite is flavorful and helps the bread achieve an even, golden bake.
- Line Your Baking Sheet: Always use parchment paper or a silicone baking mat on your baking sheet. As the cheese melts, it will inevitably bubble out and can stick to the pan, creating a difficult cleanup. The liner prevents sticking and makes your post-party kitchen duties much easier.
- Let it Rest Briefly: When the bread comes out of the oven, let it sit on the baking sheet for just 2-3 minutes. This allows the molten cheese to set slightly, making it less messy to pull apart while still being gloriously gooey. It is the perfect balance between lava-hot and comfortably edible.
- Garnish for a Fresh Finish: Just before serving, sprinkle a little extra fresh chopped parsley or a pinch of flaky sea salt over the top. This not only adds a pop of color but also provides a fresh flavor contrast and a slight textural crunch that elevates the entire dish.
Variations and Adaptations
For regional variations, the possibilities are endless. Create a Tex-Mex version by adding chopped jalapeños, a teaspoon of chili powder to the butter, and using a blend of Monterey Jack and cheddar cheese. For an Italian-inspired twist, mix finely chopped pepperoni or sun-dried tomatoes into the cheese and add a teaspoon of Italian seasoning to the butter. A French-inspired version could use Gruyère cheese and add a teaspoon of Herbes de Provence.
Seasonal adaptations keep this recipe exciting all year round. In the spring, incorporate finely chopped asparagus and fresh dill. During summer, add fresh basil and halved cherry tomatoes. For a cozy autumn feel, mix in cooked, crumbled sausage and sage. A winter holiday version could include a touch of cranberry sauce drizzled over the top after baking for a sweet and savory combination.
Dietary modifications are straightforward. For a gluten-free option, use a sturdy, certified gluten-free artisan loaf. For a dairy-free version, use your favorite plant-based butter and a high-quality vegan mozzarella shreds that melt well. To make it vegetarian, simply ensure all your ingredients meet vegetarian standards, which they typically do. For a lower-carb version, you can use a pre-made keto-friendly bread loaf, though the texture will be different.
Flavor variations can completely transform the profile. Add cooked, crumbled bacon and green onions for a loaded baked potato feel. Incorporate blue cheese crumbles and caramelized onions for a sophisticated twist. For a pesto bread, mix a few tablespoons of pesto into the butter before brushing. A “pizza” version can include layering mini pepperoni slices and a sprinkle of oregano with the cheese.
Serving and Presentation Guide
Plating techniques are simple but effective. Place the entire baked loaf on a wooden cutting board or a large, vibrant platter. This rustic presentation enhances the homemade, shareable vibe. Place a small bowl of warm marinara sauce, pesto, or a garlic aioli for dipping in the center of the board. This not only adds another layer of flavor but also makes the presentation look more abundant and intentional.
Garnishing ideas can elevate the visual appeal instantly. A final sprinkle of chopped fresh parsley or chives adds a touch of green. A light dusting of grated Parmesan cheese right after baking adds a salty, umami kick. For a bit of color and spice, a sprinkle of red pepper flakes is excellent. A drizzle of high-quality olive oil just before serving adds a beautiful sheen and rich flavor.
Traditional accompaniments include other Italian-American favorites like a fresh green salad, antipasto skewers, or cured meats. For a full party spread, it pairs wonderfully with meatballs, wings, and vegetable crudités. The bread acts as a rich, savory anchor to a table full of diverse flavors and textures, complementing both lighter and heavier dishes.
Wine and Beverage Pairing
Wine pairings should complement the rich, garlicky, and cheesy flavors without overpowering them. A crisp, acidic white wine like Sauvignon Blanc or Pinot Grigio cuts through the fat beautifully. The citrus notes in these wines provide a refreshing contrast. For red wine lovers, a light-bodied, low-tannin red like a Gamay (Beaujolais) or a Chianti works well. The fruit-forward nature of these reds stands up to the garlic without clashing.
Non-alcoholic alternatives are just as important. A sparkling water with a squeeze of lemon or lime cleanses the palate between bites. For something more festive, a non-alcoholic sparkling cider or a ginger beer provides sweetness and effervescence that contrasts the savory bread. Iced tea, especially an unsweetened or lightly sweetened variety, is also a classic and refreshing choice.
Coffee and tea pairings are more suited for after the meal, but if serving this as a brunch item, they can work. A medium-roast coffee has enough body to stand up to the strong flavors without tasting bitter. A black tea like English Breakfast or Earl Grey also pairs nicely, as the robust tea flavors can match the intensity of the garlic and cheese.
Storage and Shelf Life
Storage methods for leftovers are straightforward but time-sensitive. Once completely cooled to room temperature, transfer any leftover portions to an airtight container. Do not store it while it is still warm, as the trapped steam will make the bread soggy. It will keep at room temperature for up to one day. For longer storage, refrigeration is necessary, but note that this will significantly change the texture of the bread, making it much firmer.
Reheating instructions are crucial for restoring that just-baked quality. The oven or a toaster oven is always preferable to the microwave. Preheat your oven to 350°F (175°C). Place the bread on a baking sheet and warm it for 5-10 minutes, until the cheese is melty again and the exterior is crisp. The microwave will make the bread very soft and chewy, which is not the desired texture.
Freezing guidelines can help you prepare ahead. You can assemble the entire loaf, wrap it tightly in two layers of plastic wrap and then a layer of foil, and freeze it for up to 2 months. When you are ready to bake, you do not need to thaw it. Simply unwrap it, place it on a parchment-lined baking sheet, and bake from frozen, adding 10-15 minutes to the baking time. The result will be nearly identical to fresh.
Make Ahead Strategies
Prep timeline for stress-free entertaining is a major advantage. You can fully assemble the loaf up to 24 hours in advance. After stuffing the bread with cheese and brushing it with the garlic butter, wrap it tightly in plastic wrap and store it in the refrigerator. About 30 minutes before you plan to bake it, take it out to come closer to room temperature. This prevents the cold center from delaying the cooking time. Then, bake as directed.
Storage between steps is simple. If you are prepping components separately, you can shred the cheese and make the garlic butter a day ahead. Store the cheese in an airtight container in the fridge. The garlic butter can be melted, mixed, and then stored in a separate container in the fridge. Gently reheat the butter until it is liquid again before using it.
Quality impact assessment is important. Making it ahead has a minimal impact on the final quality. In fact, some argue that letting the garlic butter soak into the bread overnight results in even more flavor penetration. The texture of the baked bread remains excellent. The only potential issue is if the bread itself was starting to go stale before you assembled it.
Scaling Instructions
Halving the recipe is simple if you are cooking for a smaller group. Use a smaller loaf of bread, about half the size of a standard one. Simply halve all the other ingredients: butter, garlic, cheese, etc. The baking time may be slightly reduced, so start checking for doneness around the 15-minute mark. The visual cues of golden-brown color and bubbling cheese will still apply.
Doubling or tripling the recipe is perfect for a large crowd. You will make multiple loaves. It is best to bake them on separate baking sheets, preferably on the same oven rack, or rotating the sheets halfway through baking for even cooking. Do not try to put two loaves on one sheet, as this will impede air circulation and lead to steaming instead of baking. The preparation time will increase linearly, but the active hands-on time per loaf decreases as you get into a rhythm.
Nutritional Deep Dive
A macro breakdown provides a general understanding of this indulgent dish. It is primarily a source of carbohydrates from the bread and fats from the butter and cheese. The mozzarella provides a moderate amount of protein. A single serving is quite energy-dense, making it a substantial appetizer. While it is not a low-calorie food, it is meant to be part of a celebratory spread where balance is achieved across multiple dishes. Enjoying it in moderation is the key.
Micronutrient analysis reveals some benefits alongside the indulgence. Mozzarella cheese is a good source of calcium and phosphorus, which are vital for bone health. Using whole-grain bread can add B vitamins, iron, and fiber. Garlic contains manganese, vitamin B6, and vitamin C, along with the beneficial compound allicin. Using herbs like parsley can contribute small amounts of vitamin K and vitamin A.
Dietary considerations are important for those with specific needs. This recipe is naturally vegetarian. For gluten-free needs, use a certified gluten-free loaf. For dairy-free, use plant-based alternatives. It is not suitable for a vegan diet without significant modifications, nor is it low-carb or keto-friendly in its standard form. Those watching their sodium intake should be mindful of the salt content in the butter and cheese.
Dietary Adaptations
For a gluten-free adaptation, the most important step is selecting the right bread. Look for a sturdy, pre-made gluten-free artisan loaf from a bakery or a reputable brand at the grocery store. Many gluten-free breads are too soft and will not hold the structure. The rest of the recipe remains the same. Be sure to check that all other ingredients, including any pre-shredded cheese, are certified gluten-free.
A dairy-free version is very achievable with modern products. Use a high-quality vegan butter stick (not the tub kind, which has more water) for the garlic butter. For the cheese, the market for vegan mozzarella has improved dramatically. Look for brands that are specifically noted for their melting capabilities. The baking process and times will be identical. The final product will have a slightly different flavor but the same delightful pull-apart texture.
Creating a vegan version combines the dairy-free adjustments with other considerations. Use vegan butter and vegan mozzarella. You may also want to add other fillings to boost flavor, such as finely chopped sun-dried tomatoes, olives, or caramelized onions, since you will be missing the rich, savory notes of dairy. The technique and cooking instructions remain exactly the same.
Troubleshooting Guide
If you encounter texture issues like soggy bread, the culprit is likely under-baking or using a bread that was too soft to begin with. To fix it, you can return it to the oven for an additional 5-10 minutes. If the top is browning too quickly but the inside is still cold, tent the loaf loosely with aluminum foil to prevent further browning while the center cooks through.
Flavor balance problems, such as blandness, are usually due to underseasoning. The butter mixture must be adequately salted. If you find the baked bread is bland, you can brush it with a little more melted, salted butter right after it comes out of the oven. For a burst of flavor, a sprinkle of flaky sea salt or garlic salt on the hot exterior can work wonders.
If the cheese is not melting properly, the oven temperature may be too low, or you may have used pre-shredded cheese with anti-caking agents. Ensure your oven is fully preheated. If the cheese is browning but not melting inside, the heat is likely too high, cooking the exterior too fast. Lower the temperature slightly and extend the baking time to allow the interior to heat through.
Recipe Success Stories
Community feedback on this recipe consistently highlights its reliability and crowd-pleasing nature. Many home cooks report that it has become their most-requested party dish, a staple they are now known for among friends and family. The joy it brings to guests is a common theme, with many noting that it disappears from the table faster than any other appetizer. It is often described as “foolproof” and “impressive,” which is a winning combination.
Variation successes are frequently shared. One reader created a “Thanksgiving Leftovers” version using shredded turkey, cranberry sauce, and stuffing mixed with the cheese. Another made a “Break-for-Brunch” version with scrambled eggs and cheddar cheese baked inside. These creative adaptations show the recipe’s fantastic versatility and how it can serve as a canvas for personal culinary expression.
Reader suggestions have also enriched the recipe over time. A common tip is to add a thin layer of cream cheese inside the pockets before adding the mozzarella, which adds an extra layer of creaminess. Another popular suggestion is to mix grated Parmesan cheese into the garlic butter for a deeper, nuttier flavor. The community around this recipe is vibrant and always sharing new ideas.
Frequently Asked Questions
Can I use a different type of cheese? Absolutely. While mozzarella is classic for its stretch, other great melting cheeses like provolone, fontina, Gruyère, or a mild cheddar work wonderfully. You can also use a blend for more complex flavor. Just avoid very hard, oily, or non-melting cheeses like halloumi or feta for the main filling.
How do I prevent the bottom from getting soggy? The key is using a sturdy bread and ensuring your baking sheet is preheated in the oven. Placing the assembled loaf directly onto a hot baking sheet helps the bottom crust start cooking immediately, creating a barrier against moisture. Also, avoid over-brushing with butter; you want the bread coated, not soaked.
Can I make this without garlic? Yes, you can simply omit the garlic for a plain cheesy bread. Alternatively, you can infuse the butter with other flavors like herbs (rosemary, thyme), a dash of onion powder, or even a little truffle oil for a different, but equally delicious, flavor profile.
My cheese leaked out a lot. Is that normal? Some cheese leakage is completely normal and even desirable—those crispy, browned bits of cheese on the parchment paper are a cook’s treat! However, excessive leaking usually means the pockets were overstuffed. Next time, use a slightly lighter hand when stuffing to keep most of the cheese inside the structure.
Can I use frozen bread? It is not recommended to assemble this with a fully frozen loaf, as it will not absorb the butter properly and the inside may still be frozen when the outside burns. If you only have frozen bread, thaw it completely in the refrigerator overnight and then bring it to room temperature before assembling and baking.
What is the best way to reheat leftovers? The oven or a toaster oven is always best. Reheat at 350°F (175°C) for 5-10 minutes until warm and crispy. The microwave will make the bread rubbery and the cheese overly soft. Reheating restores much of the original texture, especially the crispy exterior.
Can I add meat to this recipe? Definitely. Diced, cooked bacon, crumbled cooked sausage, or small pieces of ham are excellent additions. Mix them in with the shredded cheese before stuffing. Ensure any meat you add is pre-cooked, as the baking time is not long enough to safely cook raw meat.
Why did my bread burn on top before the cheese melted? This typically means your oven temperature was too high, or the rack was positioned too close to the top heating element. Next time, try baking at 350°F (175°C) and place the rack in the center of the oven. If the top browns too quickly, tent it with foil.
How can I tell when it is done? The visual cues are your best guide. The top should be a deep, golden brown, and you should see cheese actively bubbling out from some of the seams. The internal temperature, if you check with a thermometer, should be at least 165°F (74°C) in the center, indicating the cheese is fully melted and hot.
Is it possible to make individual servings? Yes, you can use small dinner rolls instead of one large loaf. Slice each roll in a crosshatch pattern without cutting through the bottom, stuff with cheese, brush with butter, and bake. The cooking time will be shorter, so start checking for doneness at around 10-12 minutes.
Additional Resources
For related recipes, consider exploring other shareable appetizers that complement this bread. Spinach and artichoke dip, baked brie in puff pastry, or a classic bruschetta bar are all fantastic options for a party spread. These dishes share the same communal, interactive spirit and can be prepared ahead of time, making your event planning seamless and stress-free.
Technique guides that will enhance your skills for this and other recipes include mastering knife skills for even cutting, learning the basics of infusing oils and butters, and understanding how different cheeses melt. These fundamental skills are transferable to countless other dishes in the kitchen, from pastas to roasted vegetables and beyond.
Ingredient information is key to elevating your cooking. Learning more about the different types of artisan breads available can help you choose the perfect loaf every time. Understanding the science of how cheese melts will ensure you pick the right varieties for any recipe. Knowledge about fresh herbs and how to store them will keep your garnishes vibrant and flavorful.
PrintHoliday Mozzarella and Garlic Stuffed Bread
Description
A festive, cheesy bread stuffed with gooey mozzarella and aromatic garlic, bringing warmth and joy to every bite.
Ingredients
For the Crust:
- 1 large loaf of Italian bread
- 8 oz fresh mozzarella cheese, sliced
- 4 cloves garlic, minced
- 1/4 cup butter, melted
- 1 tsp dried oregano
- 1/2 tsp red pepper flakes
- 2 tbsp fresh parsley, chopped
- Salt and black pepper to taste
Instructions
1. Prepare the Crust:
- Preheat oven to 375°F (190°C). Slice the bread horizontally, being careful not to cut all the way through.
- In a bowl, mix melted butter, minced garlic, oregano, red pepper flakes, salt, and pepper.
- Brush the garlic butter mixture generously inside the bread loaf.
- Layer the mozzarella slices evenly inside the bread.
- Close the loaf and wrap it in foil. Bake for 20 minutes.
- Unwrap, bake for another 5-10 minutes until cheese is bubbly and bread is golden. Sprinkle with parsley before serving.
Notes
You can customize the seasonings to taste.
I’m Shaykee—born in Morocco, seasoned across continents. From airplane galleys to home kitchens, I share the flavors and stories that shaped my journey.