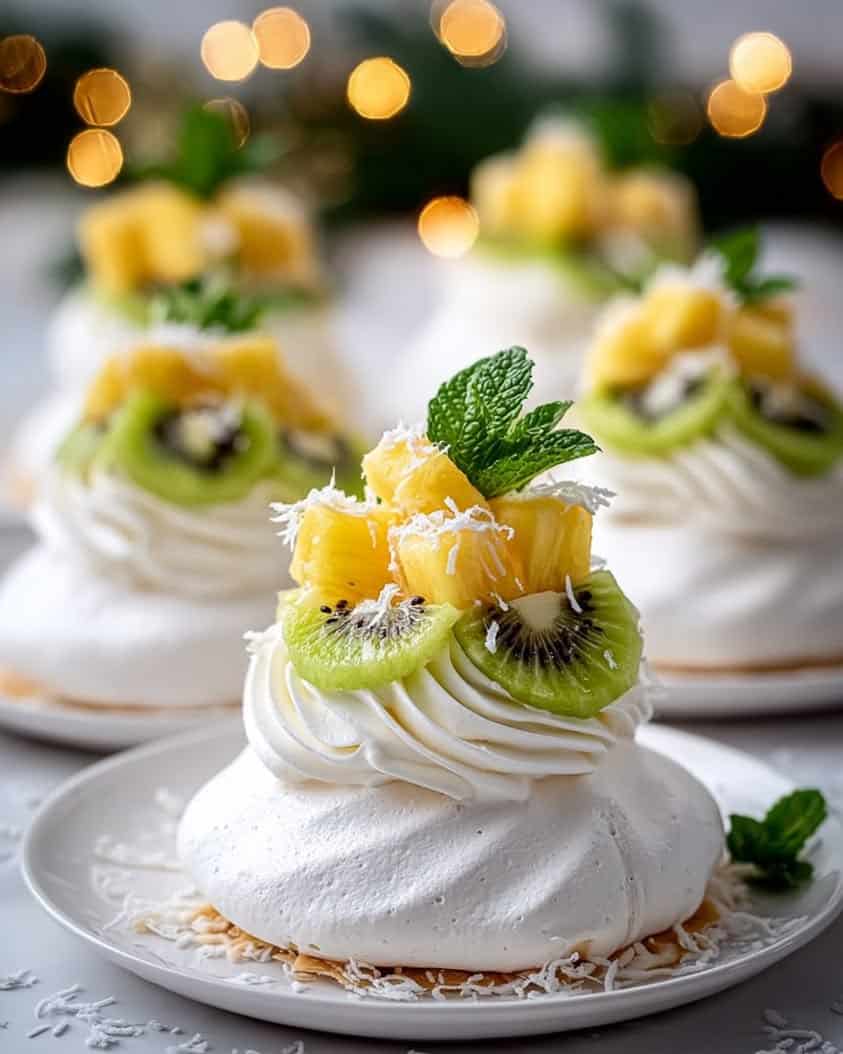
Crisp, Creamy, and Crowned with Exotic Fruit: Your Ultimate Tropical Dessert
Imagine a dessert that perfectly balances textures and flavors in every single spoonful. This stunning creation is crisp, creamy, and crowned with exotic fruit, offering a symphony of sensations that will transport your taste buds to a tropical paradise. Furthermore, it requires absolutely no baking, making it the perfect solution for warm weather entertaining or a quick, impressive treat. Consequently, you can assemble this beautiful dish in mere minutes, yet it looks and tastes like it came from a professional patisserie.
The magic of this dessert lies in its beautiful simplicity and the vibrant, fresh ingredients that make it so special. Each layer contributes a unique element, from the crunchy base to the velvety middle and the jewel-like fruit topping. Moreover, the combination of textures creates an unforgettable eating experience that is both refreshing and indulgent. Ultimately, this dessert proves that you do not need complex techniques to create something truly spectacular and memorable for your guests or family.
Creating a dessert that is crisp, creamy, and crowned with exotic fruit is an achievable goal for any home cook. This recipe is designed for success, using readily available ingredients and straightforward assembly instructions. Additionally, the visual appeal is undeniable, making it a fantastic choice for social media or a dinner party centerpiece. Therefore, whether you are a seasoned baker or a complete novice, this guide will help you master this elegant, no-bake treat with confidence and ease.
Quick Recipe Highlights
- Flavor Profile: This dessert delivers a harmonious blend of sweet, tangy, and tropical notes. The creamy layer offers a rich, vanilla-infused taste that perfectly complements the bright, juicy exotic fruits. Additionally, a hint of citrus zest often elevates the entire flavor experience.
- Texture: The experience begins with a crisp, buttery base, typically made from crushed biscuits or nuts. Subsequently, you encounter a luxuriously smooth and creamy middle layer. Finally, the tender, juicy pieces of exotic fruit provide a refreshing finish, creating a perfect textural journey.
- Aroma: As you prepare this dish, the air fills with the sweet scent of vanilla and fresh dairy. Furthermore, the tropical fruits release a fragrant, sunny aroma that is incredibly inviting. This combination creates an olfactory preview of the delicious dessert to come.
- Visual Appeal: The presentation is a feast for the eyes, featuring stark white or pale cream layers contrasted with the vibrant colors of the fruit topping. The result is a visually stunning parfait or trifle that looks both professional and artisanal. Consequently, it is as beautiful to look at as it is to eat.
- Skill Level Needed: This recipe is ideal for beginners, as it requires no baking or advanced culinary techniques. The primary skills involved are simple whipping, folding, and assembling. Therefore, even someone with minimal kitchen experience can achieve fantastic results.
- Special Equipment: You will need a set of mixing bowls, a whisk or electric hand mixer, and your chosen serving glasses or a large trifle dish. Fortunately, no specialized or expensive equipment is necessary, making this an accessible recipe for any kitchen.
Recipe Overview
- Difficulty Level: We classify this recipe as easy because it involves straightforward, no-cook steps. The process focuses on assembly rather than complex cooking methods, making it nearly foolproof. Additionally, there is plenty of room for personalization without risking the core structure of the dessert. Ultimately, it is a confidence-building recipe that delivers impressive results.
- Category: This dish falls squarely into the dessert category, perfect for concluding a meal. It can also serve as a sweet snack or a celebratory treat for special occasions. Its no-bake nature makes it particularly suitable for picnics and potlucks as well.
- Cuisine: While not tied to one specific tradition, this dessert draws inspiration from global tropical and European patisserie influences. It echoes the simplicity of an English trifle but uses the vibrant flavors of Southeast Asia and South America. This fusion approach creates a modern, internationally-inspired sweet dish.
- Cost: The cost is generally moderate, depending heavily on your choice of exotic fruits. Staples like dairy and biscuits are inexpensive, while fruits like passion fruit, mango, and dragon fruit can increase the budget. Overall, it offers a luxurious taste and appearance without a prohibitive price tag.
- Season: This dessert is perfect for spring and summer, when light, chilled sweets are most appealing. Furthermore, many exotic fruits are at their peak during these warmer months. It provides a refreshing and cool end to any warm-weather meal.
- Occasion: It is incredibly versatile, suitable for everything from a casual family dinner to a formal holiday gathering. It makes a wonderful centerpiece for a brunch or baby shower. Its elegance also makes it a fantastic choice for birthdays and anniversaries.
Why You’ll Love This Recipe
You will adore the incredible contrast of textures in every single bite. The journey begins with a satisfying crunch from the base, moves through an impossibly smooth and rich creamy center, and finishes with the soft, juicy burst of exotic fruit. This combination is not just delicious; it is a truly engaging sensory experience. Moreover, the interplay between the sweet cream and the tangy, tropical fruits prevents the dessert from ever feeling too heavy or cloying. It is the kind of treat that leaves you feeling refreshed and satisfied simultaneously.
The convenience factor of this no-bake dessert cannot be overstated. Without needing to turn on your oven, you can create a show-stopping masterpiece. This is a huge advantage during hot summer months or when you are short on time but still want to serve something impressive. Furthermore, you can assemble the components ahead of time, making party planning stress-free. Simply layer everything in your serving dishes just before your guests arrive for the freshest presentation and best texture.
From a nutritional perspective, this dessert offers more than just empty calories. The exotic fruit crown is packed with essential vitamins, antioxidants, and dietary fiber. Ingredients like mango and passion fruit are renowned for their high Vitamin C content, while the creamy layer provides a source of calcium and protein. By using quality ingredients, you can create a treat that feels indulgent while still contributing beneficial nutrients to your diet. It is a smarter choice for a sweet craving.
This dessert possesses incredible social and entertaining value. Its visually stunning appearance is guaranteed to draw compliments and spark conversation. It is a versatile recipe that can be scaled up for a crowd in a large trifle bowl or served in elegant individual portions. The “wow” factor is immense, making you look like a culinary rockstar with minimal effort. It is the perfect recipe to build your reputation as a fantastic and creative host.
Finally, this recipe is remarkably cost-effective and accessible. While the exotic fruits might seem fancy, the rest of the ingredients are simple pantry staples. You can often find more affordable frozen exotic fruit mixes that work perfectly for the topping. The recipe is also highly adaptable; you can use seasonal or on-sale fruits to keep costs down without sacrificing quality or flavor. It delivers a luxurious gourmet experience without the luxury price tag.
Historical Background and Cultural Significance
The concept of layered, creamy desserts has a rich and diverse history across many cultures. The English trifle, with its layers of sponge, custard, fruit, and cream, is a clear spiritual ancestor to this modern creation. Similarly, Italian tiramisu and French charlotte demonstrate a long-standing culinary fascination with combining soft, creamy elements with contrasting textures. These desserts were often developed as a way to create something elegant from relatively humble ingredients, showcasing the ingenuity of home cooks throughout history.
The cultural significance of this particular dessert is rooted in our modern, globalized food landscape. As international travel and trade expanded, so did access to once-rare tropical fruits. This recipe represents a fusion of European dessert techniques with the vibrant, sun-drenched flavors of Southeast Asia, Latin America, and other tropical regions. It is a celebration of global connectivity and the beautiful culinary creations that can emerge when different food traditions inspire one another.
The evolution of this recipe is a story of simplification and adaptation. While elaborate layered desserts were once the domain of professional chefs and wealthy households, the rise of convenient ingredients like pre-made biscuits and stabilized whipped cream formulas brought them into the mainstream. The no-bake trend of the mid-20th century further popularized these kinds of desserts, making them a staple of community cookbooks and family gatherings. This particular version is a refinement of that tradition, emphasizing fresh, high-quality components.
Regional variations of this concept are endless. In some areas, the base might be made from graham crackers or digestive biscuits, while in others, it could feature crushed nuts or even coconut. The creamy layer might be a classic custard, a cheesecake-style filling, or a simple whipped cream concoction. The fruit topping is where the most variation occurs, often reflecting local produce and preferences. From a Brazilian-inspired version with cupuaçu and açaí to a Southeast Asian style with lychee and rambutan, the basic framework is a canvas for global flavors.
Ingredient Deep Dive
Let us start with the base, typically made from crisp biscuits like shortbread or graham crackers. These biscuits have a history rooted in traditional baking, providing a sturdy, buttery foundation that contrasts with the soft layers above. From a nutritional standpoint, they contribute carbohydrates and fats, so for a healthier twist, you can use crushed nuts or oats. When selecting biscuits, choose plain, buttery varieties without strong flavors that could clash with the fruit. Store them in an airtight container to maintain their crunch before use.
The creamy layer often relies on heavy cream or cream cheese. Heavy cream, when whipped, introduces air and lightness, creating a cloud-like texture. Culturally, the use of whipped cream dates back centuries in European desserts. It provides a rich source of fat-soluble vitamins and energy. For the best results, ensure your cream and any bowls are very cold before whipping. If you need a dairy-free alternative, chilled full-fat coconut cream can be whipped to a similar consistency, though it will impart a coconut flavor.
Exotic fruits are the star of the show, the glorious crown. Fruits like mango, passion fruit, and dragon fruit are not just chosen for their vibrant colors but for their complex sweet-tart flavor profiles. Mangoes, for instance, are revered in South Asian culture and are a symbol of love. They are packed with vitamins A and C. When selecting mangoes, look for a slight give and a fragrant smell at the stem. Passion fruit should be wrinkled for maximum sweetness, and dragon fruit should be brightly colored with firm skin.
A touch of citrus zest or juice is a common supporting actor in this dessert. Lemon or lime zest brightens the entire dish, cutting through the richness of the cream and enhancing the fruit’s natural sweetness. Historically, citrus has been used for centuries to balance flavors in both sweet and savory dishes. Nutritionally, the zest is rich in antioxidants and essential oils. Always use unwaxed, organic fruit for zesting, and add it just before serving to preserve its vibrant aroma and flavor.
Common Mistakes to Avoid
- Using Warm Cream: Whipping cream that is not thoroughly chilled will not hold its volume. This results in a runny, soupy creamy layer that fails to provide structure. Always chill your cream, bowl, and beaters for at least 15 minutes before you begin.
- Soggy Base: Adding the creamy layer onto the biscuit base too soon can make the base lose its crisp texture. To prevent this, you can sometimes toss the crumbs with a tiny amount of melted butter to create a moisture barrier, or simply assemble the dessert close to serving time.
- Over-whipping the Cream: Whipping cream beyond stiff peaks causes it to become grainy and eventually turn into butter. Stop whipping as soon as the cream holds its shape on the whisk. The goal is soft, billowy peaks for a light texture.
- Choosing Under-ripe or Over-ripe Fruit: Under-ripe fruit will be tart and hard, while over-ripe fruit can be mushy and overly sweet. Select fruit that is just ripe for the perfect balance of flavor and texture. It should yield slightly to gentle pressure.
- Neglecting to Sweeten the Cream: Unsweetened whipped cream can taste bland against the sweet fruit. Always sweeten the cream lightly with powdered sugar, which dissolves easily, and add a splash of vanilla extract for depth of flavor.
- Improper Layering Order: The structure relies on the correct sequence: crisp base, then creamy layer, then fruit. Reversing these, or mixing them, ruins the intended textural experience. Follow the layering instructions precisely for the best result.
- Using Watery Canned Fruit: Canned fruit packed in syrup can make the dessert watery and overly sweet. If using canned fruit, drain it thoroughly and pat it dry with a paper towel. Preferably, use fresh or frozen-thawed fruit.
- Assembling Too Far in Advance: While components can be prepped ahead, the fully assembled dessert is best served within a few hours. Assembling too early risks the base softening and the fruit juices bleeding into the cream.
Essential Techniques
Whipping cream to soft peaks is a fundamental technique for this dessert. This process incorporates tiny air bubbles into the cream, increasing its volume and transforming its texture from liquid to a light, spreadable foam. To master it, use a chilled metal bowl and start at medium speed, gradually increasing to high as the cream thickens. The most common pitfall is over-whipping, which leads to a grainy, buttery consistency. Visual cues for success are when the cream holds its shape when the whisk is lifted, forming peaks that gently droop at the tips.
Folding is another critical technique used to combine the whipped cream with other ingredients without deflating it. This gentle motion preserves the air you worked so hard to incorporate. Use a large rubber spatula and cut through the center of the mixture, sliding along the bottom of the bowl and folding it over the top. Rotate the bowl a quarter turn and repeat. The pitfall here is stirring or beating, which will knock out the air and make the mixture dense. Success is achieved when the components are just combined, with no visible streaks remaining.
Preparing the exotic fruit crown requires proper washing, peeling, and cutting. Each fruit has its own method; for example, mangoes have a large, flat pit that you must slice around. The goal is to create uniform, bite-sized pieces for easy eating and an attractive presentation. The common mistake is cutting pieces too large or unevenly, which can make the dessert difficult to eat. Success means consistent, elegant pieces that showcase the fruit’s beautiful color and are a pleasure to eat with a spoon.
Pro Tips for Perfect Crisp, Creamy, and Crowned with Exotic Fruit
For an extra-crisp base, toast your biscuit or nut crumbs in a dry pan with a little sugar for a few minutes. This caramelizes the sugars slightly and deepens the flavor, adding another layer of complexity to the dessert. Let the crumbs cool completely before assembling to retain their crunch.
Stabilize your creamy layer by adding a tablespoon of instant pudding mix or cornstarch to the cream before whipping. This little secret helps the cream hold its shape for much longer, making the dessert ideal for making ahead or serving on a warm day without fear of collapse.
Elevate the flavor of your fruit by macerating it briefly before topping the dessert. Toss the chopped fruit with a teaspoon of sugar and a squeeze of lime juice. This draws out the natural juices, creating a light syrup that intensifies the fruit’s flavor and adds a professional touch.
Use a piping bag to apply the creamy layer for a truly stunning presentation. This gives you ultimate control, allowing you to create beautiful swirls and peaks that look elegant and intentional. It also helps to create a distinct barrier between the base and the fruit.
Add a hidden layer of flavor by incorporating a thin spread of fruit curd or jam between the base and the cream. A layer of passion fruit curd or mango puree will surprise and delight your guests, adding a burst of intense fruit flavor that complements the fresh topping.
Garnish with fresh herbs for a sophisticated finish. A small mint leaf, a basil sprig, or even edible flowers like borage or pansies add a touch of color and an aromatic element that makes the dessert look professionally crafted and thoughtfully composed.
Variations and Adaptations
Regional variations allow you to travel the world through your dessert bowl. For a Caribbean twist, use a base of crushed ginger snaps and top with pineapple, mango, and a sprinkle of toasted coconut. A Southeast Asian version might feature a creamy layer infused with pandan essence and crowned with lychee, rambutan, and longan. European influences could include an Amaretti cookie base and a topping of blood oranges and pomegranate arils. These adaptations celebrate local ingredients and flavor profiles while maintaining the core textural philosophy.
Seasonal adaptations ensure your dessert is always at its peak. In the winter, use citrus fruits like cara cara oranges, grapefruit, and mandarins for a bright, sunny topping during the colder months. Spring welcomes berries like strawberries, raspberries, and blueberries. Summer is the perfect time for stone fruits like peaches and nectarines alongside classic tropical options. Autumn variations can include roasted figs or pears with a hint of spice. Using what is seasonally available guarantees the best flavor and often a lower cost.
Dietary modifications make this dessert inclusive for everyone. For a gluten-free version, use certified gluten-free biscuits or a base of crushed nuts and seeds. A vegan adaptation is simple: whip chilled coconut cream and use agar-agar or cornstarch to stabilize it, then crown with fruit. For a lower-sugar option, sweeten the cream layer with a sugar substitute like monk fruit or stevia and rely on the natural sweetness of very ripe fruit. These changes ensure no one misses out on this delightful treat.
Serving and Presentation Guide
Plating techniques dramatically impact the visual appeal of this dessert. For individual servings, clear glasses or mason jars are ideal as they showcase the beautiful layers. When using a large trifle bowl, build the layers against the side of the glass for a dramatic effect. Always use a spoon or spatula to smooth each layer neatly before adding the next. The goal is to create distinct, horizontal stripes of color and texture that are visually striking and build anticipation for the first spoonful.
Garnishing is the final touch that elevates the presentation from homemade to haute cuisine. Beyond the main fruit crown, consider adding a dusting of powdered sugar, a drizzle of fruit coulis, or a few strategically placed whole berries or mint leaves. For a textural contrast, a sprinkle of toasted coconut flakes, chopped pistachios, or cacao nibs adds color and crunch. The key is to garnish with intention; less is often more. Each element should contribute to the overall flavor and aesthetic without cluttering the plate.
Traditional accompaniments are often minimal, allowing the dessert itself to be the star. However, a light, crisp biscuit on the side, such as a shortbread finger or a tuile, can provide an additional textural element. In some settings, a small shot of a complementary liqueur or dessert wine served alongside can be a sophisticated pairing. For a casual gathering, serving the dessert with a pot of fresh coffee or a selection of teas allows guests to customize their experience.
Wine and Beverage Pairing
Wine pairings should complement the dessert’s sweet, creamy, and fruity characteristics without overpowering it. A Moscato d’Asti, with its light effervescence and notes of peach and orange blossom, is a classic and safe choice. Alternatively, a German Riesling (Kabinett or Spätlese) offers a perfect balance of acidity and sweetness that can cut through the cream and mirror the fruit’s flavors. For a more decadent pairing, a glass of Sauternes or another botrytized dessert wine provides a rich, honeyed counterpoint to the tropical notes. The high acidity in these wines cleanses the palate between bites.
Non-alcoholic alternatives can be just as sophisticated. A sparkling elderflower cordial mixed with soda water offers floral notes that enhance the fruit. Iced hibiscus tea (agua de jamaica) provides a tart, cranberry-like flavor that contrasts beautifully with the sweet cream. For a creamy option, a virgin piña colada or a mango lassi echoes the tropical theme of the dessert. These beverages should be served well-chilled to provide a refreshing counterpoint to the rich layers of the dessert.
Coffee and tea pairings are a natural fit for this dessert. A light-roast coffee with bright, fruity notes can accentuate the exotic fruit crown. Alternatively, a rich, dark espresso provides a bitter contrast that highlights the sweetness of the cream and fruit. In terms of tea, a fragrant jasmine green tea complements the floral notes in fruits like lychee and passion fruit. A classic Earl Grey, with its bergamot citrus aroma, is another excellent choice that bridges the creamy and fruity elements seamlessly.
Storage and Shelf Life
Storage methods are crucial for maintaining the quality of this dessert. Always keep it covered tightly with plastic wrap or in an airtight container in the refrigerator. The ideal temperature is below 40°F (4°C) to keep the creamy layer stable and safe for consumption. Do not leave the dessert at room temperature for more than two hours, as this can promote bacterial growth in the dairy components and cause the base to become soggy. For the best texture and food safety, treat it as a perishable item.
Container recommendations depend on whether the dessert is assembled. If stored in individual portions, the serving glasses with covers are perfect. For a large trifle, a bowl with a tight-fitting lid is essential. If you have prepped components separately, store the base at room temperature in an airtight container, the creamy layer in a covered bowl in the fridge, and the chopped fruit in a separate container, also refrigerated. This component-based storage preserves the crispness of the base until the final assembly.
Signs of spoilage are important to recognize for food safety. If the creamy layer develops an off smell, a sour taste, or visible mold, discard the entire dessert immediately. The fruit topping may begin to brown or become excessively soft and watery as it passes its prime. Generally, the fully assembled dessert is best consumed within 24 hours. While it may still be safe to eat after two days, the textures will have degraded significantly, with a soft base and weeping cream.
Make Ahead Strategies
A practical prep timeline can turn this dessert into a stress-free entertainer’s dream. The day before serving, you can prepare the biscuit base and store it in an airtight container at room temperature. The fruit can also be washed, peeled, and chopped, then stored in a separate sealed container in the refrigerator. The creamy layer can be whipped and sweetened, then covered and chilled. This component-based approach means that on the day of your event, assembly takes mere minutes, and everything tastes incredibly fresh.
Storage between steps is key to maintaining quality. For the base, ensure it is completely cool and stored in a dry place to prevent it from absorbing ambient moisture. The creamy layer must be kept refrigerated at all times. If it weeps or separates slightly, a quick re-whisk with a fork can often bring it back together. The chopped fruit may release some juices; simply drain these off before assembling to prevent a soggy base. Keeping everything separate until the last possible moment guarantees the best possible texture in each component.
Quality impact assessment is important when making decisions about prepping ahead. The base will stay crisp for 1-2 days if stored properly. The creamy layer is best used within 24 hours of whipping. The fruit is most vibrant and fresh-tasting when cut no more than 6-8 hours before serving. Understanding these timelines allows you to plan your prep schedule effectively. The final assembly itself should ideally happen no more than 2-4 hours before serving to preserve the distinct textural contrasts that define this dessert.
Scaling Instructions
Halving the recipe is straightforward for smaller gatherings. Simply divide all ingredient quantities by two. The assembly process remains identical. Use smaller serving dishes, such as cocktail glasses or ramekins. The preparation time will be slightly reduced, but the chilling and setting times remain consistent. This is a perfect solution for a romantic dessert for two or a small family treat, ensuring you have minimal leftovers while still enjoying the full, luxurious experience.
Doubling or tripling the recipe for a crowd requires minor adjustments. Use a very large mixing bowl for whipping the cream, or whip it in batches to ensure proper aeration. A large trifle bowl or a clear glass punch bowl makes a stunning presentation for a doubled or tripled recipe. Be mindful that layering a very deep dessert can be tricky; ensure each layer is even and distinct. The preparation time will increase linearly, so plan accordingly. This scalability makes it an incredibly versatile recipe for any event size.
Equipment adjustments are necessary when scaling. For larger batches, an electric stand mixer is highly recommended for whipping the cream to save time and effort. You may also need additional mixing bowls for prepping components separately. When halving the recipe, a large balloon whisk and a strong arm can suffice for whipping the smaller volume of cream. Always ensure you have enough serving vessels that are appropriately sized for the scaled recipe, as the visual appeal is a major part of the dessert’s charm.
Nutritional Deep Dive
The macro breakdown of this dessert varies but generally provides a balance of carbohydrates, fats, and a small amount of protein. The biscuit base is the primary source of carbohydrates and often contains added sugars and fats. The creamy layer contributes the majority of the fat content, primarily saturated fat from the dairy, along with some protein. The fruit crown is almost purely carbohydrates in the form of natural sugars and dietary fiber. This combination provides a quick source of energy, making it a treat best enjoyed in moderation as part of a balanced diet.
Micronutrient analysis reveals that the true nutritional stars are the exotic fruits. Mango is exceptionally high in Vitamins A and C, which are crucial for immune function and vision. Passion fruit provides Vitamin C, fiber, and beneficial plant compounds like carotenoids and polyphenols. Dragon fruit offers Vitamin C, iron, and magnesium. The creamy layer provides calcium and Vitamin D if made with fortified dairy. While this is a dessert, it does contribute meaningful amounts of essential vitamins and minerals, especially when compared to more processed alternatives.
Health benefits are primarily linked to the fruit component. The vitamins and antioxidants support immune health and combat oxidative stress. The dietary fiber from both the fruit and the whole-grain options for the base promotes digestive health and can help regulate blood sugar levels by slowing the absorption of sugars. The fats from the cream help with the absorption of fat-soluble vitamins from the fruit. When consumed mindfully, this dessert can be part of a healthy lifestyle, offering satisfaction and nutrients in one package.
Dietary Adaptations
For a gluten-free version, the adaptation is simple and effective. Replace the standard biscuits with a certified gluten-free alternative, such as gluten-free shortbread, graham crackers, or even a nut-based crust made from almonds, pecans, or walnuts. Ensure that any added flavorings, like vanilla extract, are also certified gluten-free. This substitution has a minimal impact on the final texture and flavor, allowing those with celiac disease or gluten sensitivity to enjoy the dessert without compromise.
A dairy-free or vegan adaptation requires replacing the creamy layer. The best substitute is full-fat coconut cream that has been chilled overnight. Whip the solid part of the cream, leaving the watery liquid behind. Sweeten it with maple syrup or agave and stabilize it with a teaspoon of cornstarch if needed. For a tangy element similar to cream cheese, blended silken tofu or vegan cream cheese can be used. The result is a luxuriously creamy layer that is completely plant-based and equally delicious.
Low-carb and keto adaptations focus on modifying the base and sweeteners. Replace the biscuit base with a mixture of crushed nuts (like almonds or macadamias), coconut flour, and a keto-friendly sweetener like erythritol, bound with melted butter. For the creamy layer, use heavy cream (allowed on keto) and sweeten with a liquid stevia or monk fruit blend. Carefully select lower-carb fruits for the topping, such as berries (raspberries, blackberries) in moderation, and avoid high-sugar fruits like mango. This allows those on strict carbohydrate regimens to indulge.
Troubleshooting Guide
If you encounter a runny creamy layer, the issue is likely under-whipped cream or ingredients that were not cold enough. Unfortunately, you cannot re-whip a failed batch once the cream has warmed and collapsed. Your best solution is to treat it as a parfait sauce. Layer it as intended, understanding the texture will be softer, or freeze the entire dessert to create a semi-freddo-style treat. For next time, ensure everything is thoroughly chilled and whip until definite peaks form.
A soggy base is a common textural issue, usually caused by assembling too far in advance or using fruit with high water content. To rescue a dessert with a softening base, serve it immediately. For future attempts, create a moisture barrier by brushing the base with melted white or dark chocolate before adding the cream, or simply assemble no more than 2 hours before serving. Also, ensure your fruit is patted completely dry after washing and chopping.
If the flavor balance seems off, it can often be corrected. If it is too sweet, a sprinkle of flaky sea salt over the finished dessert can work wonders to balance the sweetness. If it is not sweet enough, a drizzle of honey or a fruit syrup over the top can compensate. A lack of complexity can be fixed with a dash of citrus zest (lemon or lime) or a spice like cardamom or cinnamon mixed into the base. Taste your components as you go to ensure a harmonious final product.
Recipe Success Stories
Community feedback for this dessert is overwhelmingly positive, with many home cooks expressing delight at its simplicity and impressive results. One reader shared how she made it for a last-minute dinner party and received more compliments on this than on her elaborate main course. Another mentioned that her children, who are typically picky eaters, devoured it and asked for it to be included in their birthday celebrations. These stories highlight the recipe’s reliability and its broad appeal across different age groups and occasions.
Variation successes from our readers are incredibly creative. One person created a “Christmas in July” version using a peppermint-infused creamy layer and a topping of red and green fruits like strawberries and kiwi. Another reader with a nut allergy successfully used crushed gluten-free pretzels for the base, adding a delightful salty-sweet dimension. A vegan follower raved about using aquafaba (chickpea water) whipped with sugar to create a vegan meringue-like layer. These adaptations show the recipe’s fantastic versatility and how it serves as a springboard for culinary creativity.
Reader suggestions have also helped refine the recipe over time. A common tip that emerged was to add a thin layer of grated white chocolate between the base and the cream for an extra flavor surprise. Another popular suggestion is to use a blowtorch to lightly caramelize the fruit topping on individual servings for a brûlée effect. Photographers in the community recommend shooting the dessert in natural morning light to best capture the vibrant colors of the fruit against the white cream. This collaborative spirit continues to make the recipe better and more user-friendly for everyone.
Frequently Asked Questions
Q: Can I use frozen fruit for the exotic fruit crown?
A: Absolutely, frozen fruit is a great option, especially when certain fruits are out of season. The key is to thaw the fruit completely in a strainer placed over a bowl in the refrigerator. This allows all the excess water to drain away. Pat the fruit dry with paper towels before using it to top your dessert. This prevents the dessert from becoming watery and diluting the flavors of the creamy layer.
Q: How far in advance can I assemble the entire dessert?
A: For the best texture, we recommend assembling the dessert no more than 2 to 4 hours before you plan to serve it. The base will begin to soften if it sits in contact with the creamy layer for too long. However, you can prepare all the components separately up to a day ahead. Store the base at room temperature, and the cream and chopped fruit in separate containers in the fridge. Then, quickly layer everything just before your guests arrive.
Q: My cream won’t whip. What am I doing wrong?
A: This is a common issue with a few potential causes. First, ensure your cream has a high enough fat content, ideally 35% or heavy whipping cream. Second, everything must be ice cold: the cream, the bowl, and the beaters. Chill them for at least 15-30 minutes. Third, avoid using a plastic bowl, as fat can cling to it; a metal or glass bowl is best. If it’s a humid day, that can also affect whipping, so work quickly in a cool kitchen.
Q: What are some good exotic fruit combinations?
A: The possibilities are endless. A classic trio is mango, kiwi, and passion fruit. For a red-themed dessert, try dragon fruit, strawberries, and pomegranate arils. A more complex combination could include star fruit, lychee, and guava. When choosing, think about color contrast, flavor balance (sweet vs. tart), and texture. Feel free to mix one or two common fruits like strawberries with one truly exotic fruit to keep it accessible yet special.
Q: Is there a way to make this dessert less sweet?
A: Yes, you can easily control the sweetness. Reduce or omit the sugar in the creamy layer, relying on the natural sweetness of the fruit. Choose fruits that are more tart than sweet, such as passion fruit, green mango, or berries like raspberries. You can also add a pinch of salt to the base or the cream to help balance the overall flavor profile and prevent it from being cloying.
Q: Can I make this dessert in one large dish instead of individual servings?
A: Definitely. A large clear glass
Print
Tropical Coconut Shrimp with Mango Salsa
Description
Crispy coconut-crusted shrimp served with a creamy dipping sauce and topped with a vibrant, exotic mango salsa.
Ingredients
For the Crust:
- 1 lb large shrimp, peeled and deveined
- 1 cup shredded coconut
- 1 cup panko breadcrumbs
- 2 eggs, beaten
- 1/2 cup all-purpose flour
- 1 ripe mango, diced
- 1/4 cup red bell pepper, finely chopped
- 2 tbsp fresh cilantro, chopped
- 1 tbsp lime juice
- 1/2 cup Greek yogurt
- 1 tbsp honey
- Salt and pepper to taste
- Vegetable oil for frying
Instructions
1. Prepare the Crust:
- In a bowl, combine diced mango, red bell pepper, cilantro, and lime juice to make the salsa. Set aside.
- Mix Greek yogurt and honey in a small bowl to create the creamy dipping sauce. Refrigerate until ready to serve.
- Set up a breading station with three shallow dishes: one with flour, one with beaten eggs, and one with a mix of shredded coconut and panko breadcrumbs.
- Dredge each shrimp in flour, dip in egg, then coat thoroughly with the coconut-panko mixture.
- Heat oil in a large skillet over medium heat. Fry shrimp in batches until golden brown and cooked through, about 2-3 minutes per side.
- Drain shrimp on paper towels and serve hot with the mango salsa and creamy yogurt sauce on the side.
Notes
You can customize the seasonings to taste.
I’m Shaykee—born in Morocco, seasoned across continents. From airplane galleys to home kitchens, I share the flavors and stories that shaped my journey.