Sinister, Swirled, and So Addictive Halloween Fudge: A Dark Delight
This sinister and swirled Halloween fudge recipe creates a dessert that looks almost too dramatic to eat. Imagine a slab of midnight-dark chocolate, dramatically streaked with crimson cherry veins and finished with an eerie, glittery top. This stunning confection captures the essence of Halloween in every bite. Furthermore, its rich flavor and stunning appearance make it the ultimate centerpiece for any spooky season gathering. Consequently, your guests will marvel at your culinary artistry.
Creating this dangerously addictive treat requires minimal effort for maximum impact. The process involves a simple stovetop melt-and-mix method, making it accessible for bakers of all skill levels. Moreover, the dramatic marbled effect comes from a clever swirling technique that looks professional but is surprisingly easy to master. This recipe proves that impressive Halloween treats do not need to be complicated or time-consuming. Ultimately, you will have a decadent dessert that tastes as incredible as it looks.
The combination of deep, dark chocolate and sweet, tangy cherry creates a complex flavor profile that keeps people coming back for more. Each piece offers a perfect balance between bitter and sweet, smooth and fruity. Additionally, the subtle crunch from the glittery sugar topping provides a delightful textural contrast to the creamy fudge base. This sinister and swirled Halloween fudge is not just a dessert; it is an experience. Therefore, prepare for recipe requests because this treat disappears quickly.
Quick Recipe Highlights
- Flavor Profile: This sinister and swirled Halloween fudge features an intense dark chocolate base that beautifully contrasts with sweet and tart cherry swirls. The deep cocoa notes mingle perfectly with the fruity cherry flavor. Additionally, a hint of vanilla rounds out the overall taste experience.
- Texture: The fudge itself is luxuriously smooth and creamy, melting effortlessly on the tongue. Meanwhile, the cherry swirls add a slightly firmer, fruitier bite. Finally, the edible glitter or sanding sugar on top provides a satisfying, delicate crunch.
- Aroma: As it sets, the rich, warm scent of premium dark chocolate fills your kitchen. The cherry component introduces a sweet, fruity fragrance that complements the deep cocoa notes. This aromatic combination is utterly irresistible and builds anticipation.
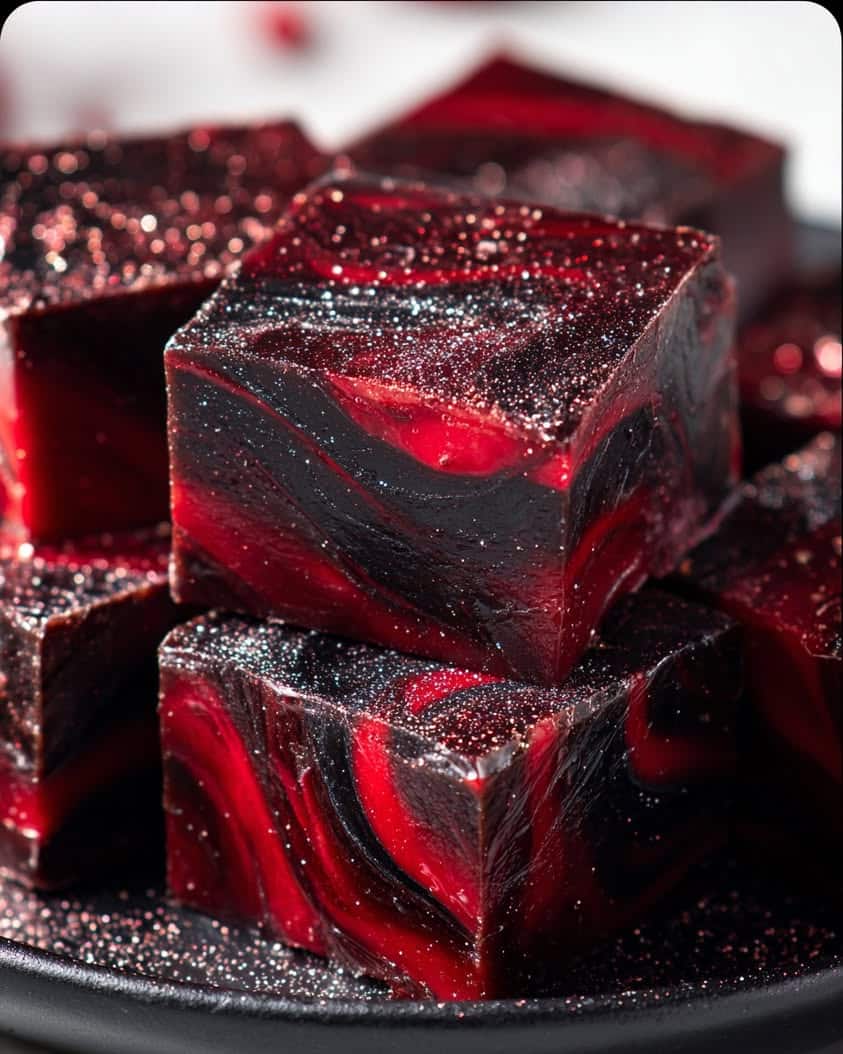
- Visual Appeal: The stark contrast between the dark chocolate and bright red cherry creates a dramatic, marbled effect. The glittery top catches the light, adding a magical, spellbinding quality. This visual drama makes it a perfect centerpiece for your Halloween table.
- Skill Level Needed: This is an beginner-friendly recipe that requires no special candy-making skills. The most complex technique involves swirling two components together. Consequently, even novice cooks can achieve stunning, professional-looking results with ease.
- Special Equipment: You only need basic kitchen tools: an 8×8 inch baking pan, a medium saucepan, and parchment paper. A spatula for stirring and a knife for slicing are also essential. No thermometer or fancy equipment is required for this easy fudge.
Recipe Overview
- Difficulty Level: This sinister and swirled Halloween fudge earns its easy rating because it uses a simple, no-fail condensed milk base. The process involves melting ingredients together rather than cooking a sugar syrup to a specific temperature. Consequently, it is virtually impossible to mess up, making it perfect for first-time fudge makers and busy hosts alike.
- Category: This recipe falls squarely into the dessert and candy categories. It is an ideal treat for holidays, parties, and potlucks. Moreover, it functions perfectly as a homemade edible gift during the spooky season and beyond.
- Cuisine: While fudge is a classic American confection, this particular recipe draws inspiration from the theatricality of holiday baking. The dark chocolate and cherry combination offers a sophisticated twist on a traditional favorite. Ultimately, it is a modern treat designed for festive celebration.
- Cost: Creating this sinister and swirled Halloween fudge is surprisingly budget-friendly. The main ingredients, like chocolate chips and sweetened condensed milk, are inexpensive pantry staples. Furthermore, a single batch yields a large number of pieces, making it a cost-effective choice for party catering.
- Season: This recipe is quintessentially autumnal and perfect for the Halloween season. Its dark, moody aesthetic aligns perfectly with the spooky holiday spirit. However, its delicious flavor makes it a welcome treat year-round, especially for chocolate lovers.
- Occasion: It is the ultimate dessert for Halloween parties, trick-or-treat gatherings, and haunted house events. Additionally, it makes a fantastic offering for bake sales, school events, or office parties during October. This fudge also serves as a wonderful project for a festive family baking day.
Why You’ll Love This Sinister and Swirled Halloween Fudge
The taste and texture appeal of this sinister and swirled Halloween fudge is immediately obvious. The luxurious, creamy base made from high-quality dark chocolate provides a deeply satisfying richness. Meanwhile, the sweet and slightly tart cherry swirls cut through the intensity, creating a perfectly balanced flavor profile. Every bite delivers a complex symphony of tastes and a contrast between smooth fudge and fruity veins. Consequently, this treat feels gourmet and indulgent, far surpassing any store-bought version.
From a convenience standpoint, this recipe is a true lifesaver for busy hosts. The entire process, from start to finish, takes about twenty minutes of active time. Moreover, it requires no special candy-making skills or precision thermometers, eliminating the common stress associated with fudge. You can easily prepare it a day or two in advance, allowing the flavors to meld perfectly. This make-ahead advantage frees up your valuable time on the day of your event.
While it is a dessert, this sinister and swirled Halloween fudge offers some nutritional considerations when enjoyed in moderation. Dark chocolate contains flavonoids and antioxidants, which are beneficial for heart health. Using a recipe that relies on the natural intensity of dark chocolate also means each small piece is incredibly satisfying. This can help with portion control, as a single piece is often enough to curb a sweet craving. Therefore, you can indulge your sweet tooth with a slightly better-for-you option.
The social and entertaining value of this fudge cannot be overstated. Its dramatic, professional appearance is guaranteed to draw compliments and spark conversation at any gathering. It serves as a fantastic edible centerpiece that enhances your party’s spooky theme. Furthermore, because it is finger food, it is easy for guests to grab and enjoy while mingling. Giving these as homemade gifts also creates a memorable and personal touch for friends, neighbors, and teachers during the Halloween season.
Finally, this recipe is remarkably cost-effective and accessible. The ingredient list is short and consists of items readily available at any standard grocery store. You do not need any expensive or specialized equipment to achieve perfect results. A single batch yields three dozen pieces, providing a high-volume output for a very low cost per piece. This makes it an economical choice for feeding a crowd without sacrificing quality or visual impact.
Historical Background and Cultural Significance
The origin of American fudge is somewhat murky, but most food historians believe it was first created in the late 19th century. The most popular story suggests it resulted from a botched batch of caramels, hence the name “fudge” as an exclamation of annoyance. However, this happy accident led to the birth of a beloved confection. By the 1880s, fudge recipes were already being sold by students at women’s colleges like Vassar, making it a popular social treat. This sinister and swirled Halloween fudge is a direct descendant of those early, simple recipes.
Fudge holds a significant place in American culinary culture, often associated with holidays, tourism, and family traditions. Many people have fond memories of watching fudge being poured and sliced in seaside candy shops or making it at home during the holidays. It represents a form of homemade comfort and celebration. This recipe taps into that nostalgic tradition while updating it for a modern, theatrical holiday. The Halloween twist makes it part of a newer tradition of spooky, creative treats that dominate the season.
The evolution of fudge recipes has been dramatic, moving from precise sugar-syrup concoctions to the simpler, foolproof methods we see today. The invention of sweetened condensed milk and the popularization of chocolate chips were major milestones. These ingredients democratized fudge-making, allowing home cooks to create creamy confections without specialized skills. This sinister and swirled Halloween fudge relies on this modern approach, prioritizing ease and reliability. The addition of marbling and decorative toppings reflects the current trend towards visually stunning, share-worthy foods.
Regional variations of fudge abound across the United States, often influenced by local ingredients and traditions. For instance, Mackinac Island in Michigan is famous for its cream-based fudge, while the South might incorporate pecans. This particular recipe does not hail from a specific region but instead from the creative spirit of holiday baking. The dark chocolate and cherry combination offers a more sophisticated, adult-oriented flavor profile. Consequently, it represents a contemporary, holiday-specific variation that continues the innovative spirit of fudge-making.
Ingredient Deep Dive
Dark Chocolate Chips form the foundation of this sinister and swirled Halloween fudge. Culturally, chocolate has a long history dating back to Mesoamerican civilizations, where it was consumed as a bitter drink. Nutritionally, high-quality dark chocolate with a high cocoa percentage is a source of iron, magnesium, and flavonoids. When selecting your chips, look for a brand with at least 60% cocoa solids for the best rich flavor. Store chocolate in a cool, dark place to prevent bloom. If you need a substitution, a high-quality dark chocolate bar chopped into small pieces will work perfectly.
Sweetened Condensed Milk is the key to this recipe’s creamy, no-fail texture. This shelf-stable dairy product was invented in the 19th century as a way to preserve milk without refrigeration. It provides a significant amount of calcium and protein, though it is also high in sugar. There is no real substitute that will provide the same chemical reaction and texture; however, for a dairy-free version, you can use canned coconut cream simmered with sugar until slightly reduced. Always check the can for dents or damage before purchasing and use it by the expiration date.
Maraschino Cherries create the dramatic crimson veins running through the fudge. These candied cherries are a modern invention, originally preserved in a liqueur called Marasca but now typically stored in a sugar syrup. They add a pop of sweet, fruity flavor and vibrant color. For the best results, drain them thoroughly and pat them dry with a paper towel to prevent excess liquid from affecting the fudge’s setting ability. If you prefer, you can use chopped dried tart cherries rehydrated in a little cherry juice for a less sweet, more natural alternative.
Butter adds richness and helps create a smooth, melt-in-your-mouth texture in the fudge. It also contributes to the firm yet tender final consistency. From a nutritional standpoint, butter provides fat-soluble vitamins like A and E. Use unsalted butter to control the overall saltiness of your dessert. For storage, keep butter tightly wrapped in the refrigerator. If you require a dairy-free version, a high-quality vegan butter substitute designed for baking will work well in this recipe, as the flavor of the chocolate is so dominant.
Vanilla Extract, while used in a small quantity, is essential for rounding out the flavors. It enhances the depth of the chocolate and complements the fruitiness of the cherries. Pure vanilla extract, derived from vanilla beans, offers a superior flavor profile compared to artificial imitations. There is no need to refrigerate vanilla extract; simply store it in a cool, dark cupboard. If you do not have vanilla, a tiny pinch of instant espresso powder can also be used to intensify the chocolate flavor without adding a coffee taste.
Common Mistakes to Avoid
- Not Lining the Pan: Skipping the parchment paper is a critical error. Without it, you will struggle to remove the fudge cleanly, resulting in broken pieces. Always line your pan with parchment, leaving an overhang on two sides for easy lifting.
- Insufficiently Drained Cherries: Adding wet cherries to the fudge mixture can introduce too much moisture. This excess liquid can prevent the fudge from setting properly. Consequently, always pat the cherries very dry with paper towels after draining.
- Overheating the Chocolate: Cooking the chocolate mixture for too long or on too high a heat can cause it to seize or become grainy. Gently melt the ingredients over low heat, stirring constantly, just until smooth. Remove it from the heat immediately once combined.
- Overmixing the Swirl: When you add the cherry mixture, resist the urge to mix it in completely. Overmixing will blend the two components into a homogenous pink color instead of creating dramatic veins. Instead, just a few gentle swirls with a knife is all you need.
- Rushing the Setting Time: Cutting into the fudge before it is fully set will create a messy, gooey situation. Patience is key. Allow the fudge to chill for the full recommended time, or even longer, until it is completely firm throughout.
- Using Low-Quality Chocolate: The flavor of your fudge is directly dependent on the quality of your chocolate chips. A waxy or low-cocoa chocolate will yield a less rich final product. Therefore, invest in a good brand of dark chocolate chips for the best taste.
- Ignoring the Knife Dip: For clean, professional cuts, you must dip your knife in hot water and wipe it dry between each slice. This simple step prevents the fudge from sticking and tearing, ensuring beautiful, sharp-edged pieces.
- Adding the Topping Too Late: If you wait until the fudge is partially set to add the glittery sanding sugar, it will not stick. Sprinkle your decorative topping on immediately after swirling, while the surface is still soft and tacky.
Essential Techniques
Gentle Melting is the most crucial technique for perfect fudge. This process involves combining the chocolate, condensed milk, and butter over low heat, stirring constantly until just melted. The importance of this method lies in preventing the chocolate from seizing or scorching, which would ruin the smooth texture. To master it, use a heavy-bottomed saucepan to distribute heat evenly and maintain a low flame. A common pitfall is rushing this step with high heat. You will know you have succeeded when the mixture is completely smooth, glossy, and free of lumps.
The Swirling Technique is what gives this sinister and swirled Halloween fudge its signature dramatic appearance. After spreading most of the dark fudge base into the pan, you dollop the reserved cherry-fudge mixture on top and drag a knife through it. This technique is important because it creates visual interest and pockets of contrasting flavor without fully combining the two elements. To master it, make confident, sweeping arcs with the tip of your knife without digging too deep. The pitfall is over-swirling, which muddies the contrast. Success is evident in clear, distinct veins of crimson against the dark background.
Proper Setting and Chilling is a technique that requires patience rather than skill. Once swirled, the pan of fudge must be transferred to the refrigerator to firm up completely. This step is vital for achieving the correct firm, sliceable texture that defines good fudge. To ensure success, place the pan on a level shelf in the fridge and do not disturb it for the full recommended time. The common mistake is attempting to cut the fudge too early. You will know it is ready when the top is firm to the touch and does not give under light pressure.
Pro Tips for Perfect Sinister and Swirled Halloween Fudge
Use a metal baking pan if possible, as metal conducts cold more efficiently than glass. This helps the fudge set faster and more evenly, resulting in a better texture. A light-colored metal pan is ideal to prevent the bottom from setting too quickly.
Chop your maraschino cherries into uniform, small pieces. This ensures they distribute evenly throughout the swirls and makes the fudge easier to cut. Larger chunks can cause the knife to snag and create uneven slices.
For an extra intense chocolate flavor, add a pinch of instant espresso powder to the melting mixture. The coffee will not be detectable as a separate flavor; instead, it will deepen and enhance the richness of the dark chocolate beautifully.
If your kitchen is very warm, let the fudge sit at room temperature for just 5-10 minutes after chilling before slicing. This slight warming prevents the fudge from being too hard and cracking when you press the knife through.
Experiment with different extracts for the cherry portion. A drop of almond extract (use sparingly, it’s potent) mixed with the cherries can create an amazing black forest cake flavor profile.
For a truly “glittery” top, use edible luster dust in addition to or instead of sanding sugar. You can apply it with a dry brush after the fudge is sliced for a sophisticated, shimmery effect.
To create a layered look, spread all of the dark fudge base into the pan first. Then, evenly spread the cherry-fudge mixture on top before doing your knife swirl. This can create more defined layers of flavor.
Always taste your dark chocolate chips before you begin. Since they are the primary flavor, you want to ensure you enjoy their taste profile. If they are too bitter for your liking, you can use semi-sweet chips instead.
Variations and Adaptations
Regional variations can inspire your own twist on this sinister and swirled Halloween fudge. For a Southern influence, replace the cherries with chopped toasted pecans and a dash of bourbon. A Rocky Road version, popular across the US, would incorporate mini marshmallows and chopped almonds into the base. For a taste of the tropics, use chopped dried pineapple and macadamia nuts with white chocolate swirls. These regional twists allow you to customize the fudge while maintaining the same easy preparation method and dramatic marbled appearance.
Seasonal adaptations make this recipe versatile beyond Halloween. For Christmas, use green food coloring in the white chocolate portion and swirl it with red cherries for a festive look. During Valentine’s Day, a raspberry swirl with pink sanding sugar creates a perfect romantic treat. For a Fourth of July celebration, create separate red (cherry), white (vanilla), and blue (blueberry) swirls. This adaptability ensures your go-to fudge recipe can be a hit all year round with just simple ingredient swaps.
Dietary modifications are straightforward with this recipe. For a gluten-free version, simply ensure your chocolate chips and other ingredients are certified gluten-free. To make it dairy-free, use dairy-free chocolate chips, vegan butter, and a can of full-fat coconut milk simmered with sugar until reduced by half instead of condensed milk. A sugar-free adaptation is possible using sugar-free chocolate chips and a sugar-free sweetened condensed milk alternative. These modifications ensure everyone can enjoy this delicious treat regardless of dietary restrictions.
Flavor variations are endless. Instead of cherry, try swirling in a mixture of peanut butter and powdered sugar for a chocolate-peanut butter combination. For a minty version, add peppermint extract to a portion of the base and swirl it with crushed candy canes on top. An orange-chocolate variation can be achieved by using orange extract and a bit of zest in the swirl. These flavor experiments keep the recipe exciting and allow you to tailor it to your personal preferences or those of your guests.
Serving and Presentation Guide
Plating techniques can elevate your sinister and swirled Halloween fudge from simple candy to a gourmet dessert. For individual servings, place each square on a small, dark-colored plate or a piece of parchment paper to make the colors pop. Alternatively, arrange an assortment of pieces on a tiered cake stand for a dramatic centerpiece at a party. Use precision and care when arranging the pieces, turning some to show off the best swirled sides. This attention to presentation makes the treat feel more special and intentional.
Garnishing ideas can enhance the spooky theme. Just before serving, you can dust the top with a light sprinkling of black cocoa powder or edible activated charcoal for a dusty, ancient tomb effect. A few strategically placed plastic spider rings or skeleton bones around the serving platter add instant Halloween fun. For a more elegant approach, garnish with fresh mint leaves or gold leaf flakes to contrast the dark chocolate. These simple additions require minimal effort but significantly boost the visual impact.
Traditional accompaniments for rich chocolate fudge include beverages that cut through the sweetness. A strong, black coffee or espresso provides a bitter contrast that cleanses the palate. A glass of cold milk is a classic and always welcome pairing. For adult gatherings, a dark rum or a cherry liqueur can complement the flavors in the fudge beautifully. Offering a variety of drink options ensures your pairing appeals to all your guests’ preferences.
Modern serving suggestions include deconstructing the fudge for a trendy dessert board. Crumble a few pieces over vanilla ice cream or Greek yogurt. You can also use small cookie cutters to cut the set fudge into Halloween shapes like bats, ghosts, or cats. Another idea is to skewer small cubes with fresh berries for a spooky dessert kebab. These creative presentations are highly shareable on social media and add a fun, interactive element to your dessert table.
Wine and Beverage Pairing
Wine pairings for this sinister and swirled Halloween fudge should complement its rich, sweet, and slightly tart profile. A late-harvest Zinfandel or Port is an excellent choice, as their inherent sweetness and berry notes harmonize with the cherry swirls. Alternatively, a Brachetto d’Acqui, a lightly sparkling red Italian wine, offers fruity flavors and bubbles that cleanse the palate between bites. The key is to select a wine that is at least as sweet as the dessert itself to avoid a bitter aftertaste. These pairings elevate the fudge into a sophisticated dessert course for adult gatherings.
Non-alcoholic alternatives provide delightful pairings for all ages. A tart cherry spritzer, made with cherry juice and sparkling water, echoes the cherry flavors in the fudge. Dark chocolate cold brew coffee or a mocha latte enhances the chocolate notes while providing a caffeine kick. For a creamy option, a chai tea latte offers warm spices that contrast nicely with the cool, smooth fudge. These beverages ensure that every guest, regardless of age or preference, has a perfect drink to enjoy with their treat.
Coffee and tea pairings are particularly well-suited to this rich dessert. A bold, black French roast coffee stands up to the intensity of the dark chocolate without being overwhelmed. An Earl Grey tea, with its bergamot orange notes, provides a fragrant, citrusy contrast that brightens the rich fudge. For a more adventurous pairing, try a smoky Lapsang Souchong tea, whose campfire-like notes create a fascinating flavor combination with the deep cocoa. Serving these hot beverages also adds a comforting, warming element to your Halloween festivities.
Storage and Shelf Life
Storage methods for your sinister and swirled Halloween fudge are straightforward but important for maintaining quality. Always store the fudge in an airtight container at cool room temperature or in the refrigerator. Place parchment paper between layers to prevent the pieces from sticking together. For best texture and flavor, consume the fudge within one to two weeks. Proper storage prevents the fudge from drying out or absorbing odors from other foods in your kitchen, ensuring every piece tastes as fresh as the first.
Temperature requirements depend on your climate and kitchen conditions. In a cool, dry environment (below 70°F), the fudge can be stored at room temperature. However, if your home is warm or humid, refrigeration is necessary to prevent softening or melting. The butter and condensed milk in the recipe make it susceptible to heat. Let refrigerated fudge sit at room temperature for 10-15 minutes before serving to allow the flavors to fully express themselves and the texture to soften slightly.
Container recommendations are key for preserving your fudge. A metal tin with a tight-fitting lid is ideal, as it protects from light and air exposure. Alternatively, a glass or plastic container with a secure seal works well. Do not use a container that is too large, as excess air space can cause the fudge to dry out. If you are gifting the fudge, decorative cookie tins or boxes lined with wax paper make beautiful and functional packaging.
Make Ahead Strategies
Prep timeline for this sinister and swirled Halloween fudge is incredibly flexible, making it an ideal make-ahead dessert. You can prepare the fudge completely up to one week before you need to serve it. The flavors actually improve and meld together after a day or two in the refrigerator. For the best organization, bake it on a weekend for a party the following weekend. This long lead time reduces stress and allows you to focus on other party preparations as your event approaches.
Storage between steps is not typically necessary, as the recipe comes together quickly. However, if you need to pause, you can prepare the two separate mixtures (the main dark chocolate base and the cherry portion) and keep them at room temperature for up to an hour. Do not refrigerate them at this stage, as they will harden and become difficult to swirl. This short-term holding period is useful if you get interrupted during the preparation process.
Quality impact assessment shows that this fudge holds up excellently when made in advance. The texture remains perfectly creamy, and the flavors deepen beneficially. The visual appeal does not diminish over time, especially if stored properly in an airtight container. The one element that can change is the glittery top, which may lose a small amount of its sparkle if the container is handled frequently. For this reason, you might consider adding a fresh sprinkle of sanding sugar just before serving if maximum visual impact is crucial.
Scaling Instructions
Halving the recipe is simple if you want a smaller batch. Use an 8×4 inch loaf pan instead of an 8×8 square pan. Precisely halve all the ingredients; for the sweetened condensed milk, this is easiest to do by weight (approximately 7 ounces). The preparation method and timing remain exactly the same. This smaller batch is perfect for smaller households or for testing the recipe before making a large quantity for a party. The setting time may be slightly faster due to the thinner layer in the pan.
Doubling or tripling the recipe requires minimal adjustments. Double or triple all ingredients uniformly. You will need to use a 9×13 inch pan for a double batch or multiple 8×8 pans for a triple batch. Use a larger saucepan to accommodate the increased volume, and expect the melting step to take a few minutes longer. The setting time in the refrigerator will remain approximately the same. Scaling up is an efficient way to make large quantities for gift-giving or big events without significantly increasing your active kitchen time.
Equipment adjustments are important when scaling the recipe. When doubling, ensure your saucepan is large enough to hold the ingredients comfortably without risk of boiling over. A heavy-bottomed Dutch oven can be a good alternative to a standard saucepan for large batches. If using multiple pans, ensure you have enough space in your refrigerator for them all to sit level. You may need to chill them in batches if refrigerator space is limited. These simple considerations prevent problems when increasing the recipe yield.
Nutritional Deep Dive
Macro breakdown for this sinister and swirled Halloween fudge shows it is an energy-dense treat. A typical piece contains a balance of carbohydrates from the sugar and dairy, fats from the chocolate and butter, and a small amount of protein from the milk and nuts if used. The primary source of calories is the combination of sugar and fat, which is characteristic of confections. While it is a dessert meant for enjoyment in moderation, understanding its macronutrient profile can help with mindful eating and portion control.
Micronutrient analysis reveals some beneficial components, primarily from the dark chocolate. Quality dark chocolate provides iron, magnesium, copper, and manganese. It also contains flavonoids, which are plant compounds with antioxidant properties. The cherries contribute a small amount of vitamin C and potassium. While not a health food, these micronutrients mean that when enjoyed consciously, this treat offers more than just empty calories. Choosing a dark chocolate with a high cocoa percentage maximizes these potential benefits.
Health benefits associated with the ingredients, particularly dark chocolate, are worth noting in context. Studies suggest that the flavonoids in dark chocolate may support heart health by improving blood flow and lowering blood pressure. The antioxidants can help combat oxidative stress in the body. However, these benefits are offset by the high sugar and saturated fat content in the recipe. Therefore, the key is to savor a small piece mindfully rather than consuming the batch indiscriminately.
Dietary Adaptations
Gluten-free adaptation is naturally simple for this sinister and swirled Halloween fudge. The standard recipe contains no flour or gluten-containing grains. However, you must verify that all packaged ingredients, especially the chocolate chips, are certified gluten-free, as cross-contamination can occur during manufacturing. This easy verification makes the recipe safe for those with celiac disease or gluten sensitivity without altering the method or final result.
Dairy-free adaptation requires more significant substitutions but is entirely achievable. Replace the dark chocolate chips with a high-quality dairy-free version. Use vegan butter instead of regular butter. For the sweetened condensed milk, you can make a substitute by simmering two cans of full-fat coconut milk with ½ cup of sugar until reduced by nearly half and thickened. This mixture will provide the necessary creaminess and sweetness. The final texture may be slightly softer but still delicious.
Vegan adaptation follows the dairy-free guidelines above. Ensure all chocolate is certified vegan, as some dark chocolates still contain milk products. The maraschino cherries are typically vegan, but check the label for honey or other animal-derived ingredients. With these swaps, you can create a plant-based version of this festive treat that everyone can enjoy. The swirling technique and setting process remain identical to the original recipe.
Troubleshooting Guide
Texture issues often stem from incorrect handling of the chocolate. If your fudge is grainy, the chocolate may have been overheated or the mixture stirred too vigorously after melting. For a too-soft fudge that doesn’t set, the likely cause is insufficient chilling time or excess moisture from poorly drained cherries. If the fudge is too hard or crumbly, it may have been chilled for too long or the chocolate to condensed milk ratio was off. Most texture problems can be resolved by ensuring precise measurements and following the chilling instructions exactly.
Flavor balance problems usually relate to the quality of ingredients or seasoning. If the fudge tastes too sweet, use a darker chocolate chip (70% or higher) next time. A bland chocolate flavor suggests your chocolate chips were of lower quality or you overheated the mixture, causing flavor loss. If the cherry flavor is overwhelming, use fewer cherries or chop them more finely. Remember that the flavor will continue to develop as the fudge sets, so judge the final taste after it has chilled completely.
Temperature problems can affect both the preparation and the final product. If your mixture seizes (becomes thick and clumpy) while melting, this is usually due to a small amount of moisture getting into the chocolate or overheating. Unfortunately, seized chocolate is difficult to salvage for fudge. If the finished fudge sweats or develops sugar bloom, it was likely exposed to temperature fluctuations or moisture. Store it in a consistently cool, dry environment to prevent this. Understanding these temperature sensitivities helps prevent common issues.
Recipe Success Stories
Community feedback on this sinister and swirled Halloween fudge has been overwhelmingly positive. Many home bakers report that it has become their go-to Halloween treat, with several mentioning they’ve made it for multiple years in a row. One baker shared that her children now demand it as part of their annual Halloween traditions, calling it “witch’s fudge.” Another noted that it was the first candy she ever successfully made from scratch, giving her the confidence to try more complex recipes. These stories highlight how accessible and memorable this recipe can be.
Variation successes show the recipe’s versatility. A baker from Texas shared her version using jalapeño-infused dark chocolate and dried cherries for a sweet-heat combination that was a huge hit at her party. Another reader created a “vampire bite” version by adding a drop of red food coloring to the entire base to make it pink and using white chocolate swirls instead. A parent modified it for a school party by using sunflower seed butter instead of cherry for a nut-free alternative. These creative adaptations demonstrate how the basic recipe serves as a perfect canvas for personalization.
Frequently Asked Questions
Can I use fresh cherries instead of maraschino cherries?
Unfortunately, fresh cherries will not work well in this recipe because they contain too much water, which will prevent the fudge from setting properly and could cause spoilage. Maraschino cherries are preserved and have a much lower water content, making them ideal for this application. If you prefer a less processed option, you can use dried tart cherries that have been briefly soaked in cherry juice to plump them up slightly before patting them dry thoroughly.
Why did my fudge turn out too soft?
Soft fudge typically results from insufficient chilling time, excess moisture, or inaccurate measurements. Ensure you drain and pat the cherries completely dry before using them. Verify that you are using the correct amounts of chocolate and condensed milk as specified. Most importantly, allow the fudge to chill for the full recommended time without disturbance. If your kitchen is particularly warm, you may need to chill it for an additional hour or two until completely firm throughout.
Can I freeze this fudge?
Yes, this fudge freezes exceptionally well for up to three months. Wrap the whole block or individual pieces tightly in plastic wrap, then place them in an airtight freezer bag or container to prevent freezer burn. Thaw the fudge overnight in the refrigerator before serving. Freezing may cause the glittery topping to lose some of its sparkle, so you might want to add a fresh sprinkle after thawing for maximum visual appeal.
What can I use instead of sanding sugar for the glittery top?
If you cannot find sanding sugar, several alternatives create a beautiful effect. Edible luster dust applied with a dry brush gives a sophisticated shimmer. Crushed hard candy or clear rock sugar can provide sparkle. For a colored effect, you can crush freeze-dried raspberries into
Print
Sinister Swirled Cherry Fudge
Description
Dark as midnight with crimson cherry veins and a glittery top, this fudge is the perfect Halloween treat.
Ingredients
For the Crust:
- 3 cups semi-sweet chocolate chips
- 1 can (14 oz) sweetened condensed milk
- 1/4 cup unsalted butter
- 1 tsp vanilla extract
- 1/2 cup dried cherries, chopped
- 1/4 cup red candy melts
- 1 tbsp edible black glitter or black sanding sugar
Instructions
1. Prepare the Crust:
- Line an 8×8 inch baking pan with parchment paper.
- In a saucepan over low heat, melt chocolate chips, condensed milk, and butter, stirring until smooth.
- Remove from heat and stir in vanilla extract and dried cherries.
- Pour mixture into prepared pan and spread evenly.
- Melt red candy melts and drizzle over fudge, then swirl with a knife.
- Sprinkle edible black glitter or sanding sugar over the top.
- Refrigerate for at least 2 hours until firm, then cut into squares.
Notes
You can customize the seasonings to taste.
I’m Shaykee—born in Morocco, seasoned across continents. From airplane galleys to home kitchens, I share the flavors and stories that shaped my journey.