Warm Baked Pears: An Elegant Dessert with Honey and Blue Cheese
Imagine pulling a tray of warm baked pears from your oven, their sweet aroma filling your kitchen with the promise of a truly special treat. This recipe for warm baked pears with berries, honey, walnuts, and blue cheese is a masterpiece of contrasting flavors and textures. It transforms simple, wholesome ingredients into a dish that feels both rustic and incredibly sophisticated. Furthermore, it’s one of those rare culinary creations that works beautifully as a light dessert, a stunning appetizer, or even a decadent brunch item. The process is remarkably straightforward, making gourmet results accessible to home cooks of any skill level.
The magic of these warm baked pears lies in their beautiful balance. Sweet, tender fruit melds with the rich, tangy punch of blue cheese, while toasted walnuts provide a satisfying crunch and a honey glaze adds a glossy, floral sweetness. Meanwhile, the burst of fresh berries introduces a bright, acidic note that cuts through the richness. This dish is a true celebration of seasonal produce, offering a cozy warmth perfect for autumn and winter, yet feeling light and fresh enough for a spring or summer gathering. Ultimately, it’s a versatile recipe that will become a trusted favorite in your entertaining repertoire.
Quick Recipe Highlights
- Flavor Profile: This dish offers a sophisticated dance of sweet and savory. The natural sweetness of the warm baked pears and honey contrasts exquisitely with the sharp, tangy blue cheese. Additionally, the berries provide a burst of bright acidity that ties all the elements together harmoniously.
- Texture: You will experience a delightful textural journey. The pears become meltingly soft and tender, while the walnuts offer a crucial, satisfying crunch. Consequently, the creamy cheese and juicy berries create a luxurious mouthfeel that is both complex and deeply pleasing.
- Aroma: As the pears bake, your kitchen will fill with a warm, comforting, and sweetly spiced fragrance. The scent of caramelizing honey and cinnamon is unmistakably inviting. Moreover, the nutty aroma of toasting walnuts adds a deeply savory layer to the olfactory experience.
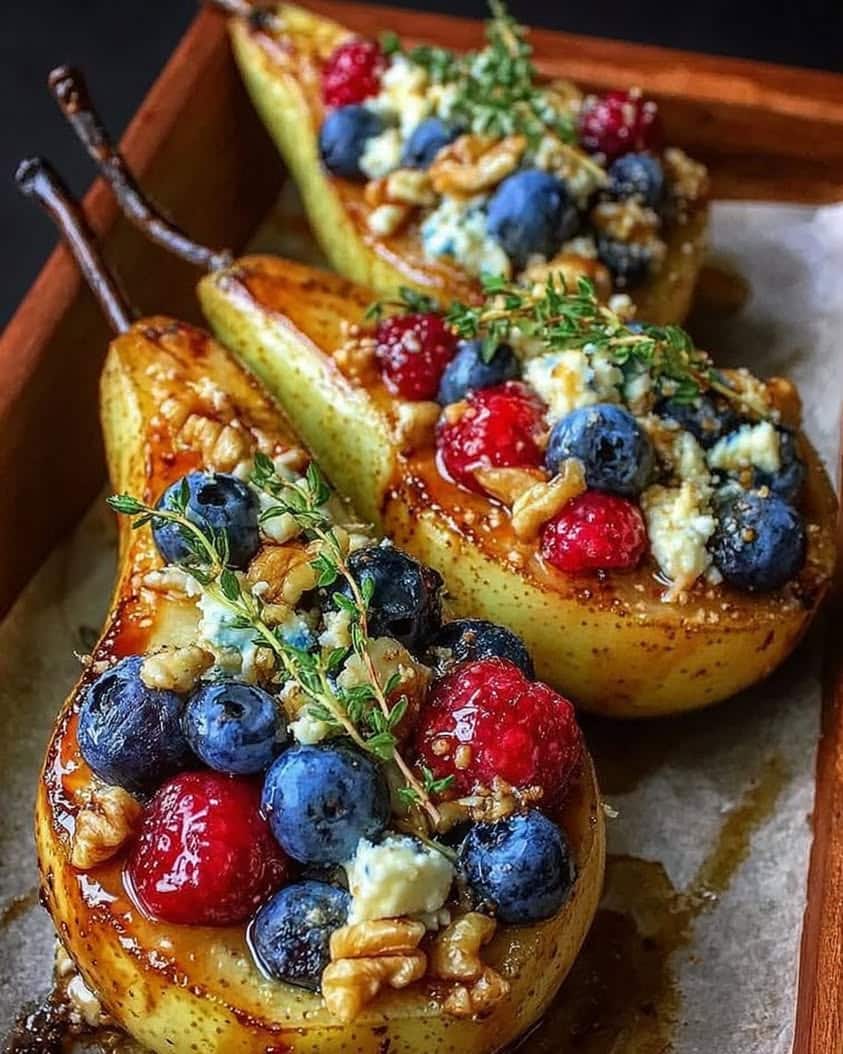
- Visual Appeal: This dish is a feast for the eyes, featuring beautiful golden-brown pears. The vibrant red of the berries and the green-blue veins of the cheese create a stunning color contrast. Therefore, it looks as impressive on the plate as it tastes.
- Skill Level Needed: This is an exceptionally beginner-friendly recipe. The techniques involve simple slicing and arranging. Basically, if you can use a knife and an oven, you can achieve a restaurant-quality result with ease.
- Special Equipment: You need only very basic kitchen tools. A baking dish, a small bowl for mixing, and a spoon are sufficient. Ultimately, no fancy or specialized equipment is required to create this elegant dish.
Recipe Overview
- Difficulty Level: We classify this recipe as easy because it involves minimal technical skill. The steps are straightforward, primarily requiring you to combine ingredients and bake them. There is no complex knife work or intricate cooking methods involved, making it perfect for a novice cook or a busy weeknight.
- Category: This versatile dish comfortably fits into multiple categories. It shines as a light dessert, a sophisticated appetizer, or a special addition to a cheese board. Furthermore, it can even serve as a unique side dish for a holiday meal, demonstrating its incredible flexibility.
- Cuisine: While not tied to one specific tradition, this recipe draws inspiration from modern American and European farmhouse cooking. It emphasizes high-quality, simple ingredients prepared in a way that highlights their natural flavors. The combination of fruit, nuts, and cheese is a classic trope found in many culinary cultures, from French to Italian.
- Cost: This is a relatively inexpensive dish to prepare, especially when pears are in season. Pears, berries, and walnuts are generally affordable. Meanwhile, a small amount of blue cheese goes a long way in terms of flavor, making this a cost-effective way to create a gourmet experience.
- Season: This recipe is truly wonderful in the fall and winter when pears are at their peak. However, with the availability of berries year-round, you can enjoy it in any season. It provides warmth in the cooler months and a fresh, fruity option when the weather is warmer.
- Occasion: It is perfect for everything from a quiet romantic dinner to a large holiday feast. Serve it as a starter for Thanksgiving or Christmas. Alternatively, it makes an impressive, simple dessert for a dinner party where you want to spend less time in the kitchen and more time with your guests.
Why You’ll Love This Warm Baked Pears Recipe
First and foremost, the taste and texture appeal is undeniable. Each forkful delivers a complex symphony of sensations. The warm, soft pear practically melts in your mouth, while the crunchy walnuts provide a satisfying resistance. Simultaneously, the creamy, pungent blue cheese creates a rich counterpoint to the sweet honey and tart berries. This interplay of sweet and savory, soft and crunchy, is what makes this dish so memorably delicious. Consequently, it satisfies multiple cravings at once, offering a deeply sophisticated flavor profile that feels both comforting and exciting.
From a convenience standpoint, this recipe is a true winner. The preparation is incredibly simple and requires only a handful of steps. You can have the pears prepped and in the oven in about ten minutes. Furthermore, the baking time is mostly hands-off, allowing you to focus on other parts of your meal or simply relax. This makes it an ideal choice for entertaining, as it minimizes last-minute stress. Ultimately, you achieve a dish that looks and tastes like it came from a professional kitchen with minimal effort and time investment.
Nutritionally, these warm baked pears offer a host of advantages. Pears are an excellent source of dietary fiber and vitamin C. Walnuts contribute healthy omega-3 fatty acids and protein. Meanwhile, berries are packed with antioxidants. Even the blue cheese, in moderation, provides calcium. This combination creates a dessert or appetizer that is not only delicious but also offers more nutritional value than a standard sugary treat. You can feel good about serving this to your family and friends, knowing you are providing a wholesome yet indulgent experience.
The social and entertaining value of this dish is exceptionally high. Its stunning visual presentation is guaranteed to draw compliments from your guests. It serves as a fantastic conversation starter, especially for those who may be hesitant about the fruit-and-cheese combination. Moreover, its versatility means you can adapt it to fit any menu or theme. Whether you are hosting a formal sit-down dinner or a casual cocktail party, these warm baked pears will fit right in and elevate the entire dining experience.
Finally, the cost-effectiveness and accessibility of the ingredients make this a recipe you will return to again and again. You do not need to hunt for rare or expensive components. Most of the items are pantry staples or easily found at any local grocery store. By using seasonal fruit, you can further reduce the cost. This accessibility means that creating a gourmet, restaurant-quality dish is within everyone’s reach, regardless of their budget or shopping resources.
Historical Background and Cultural Significance
The practice of baking fruit dates back centuries and spans numerous cultures, serving as a simple method to enhance natural sweetness before the widespread availability of refined sugar. While the specific combination of pears, blue cheese, and walnuts feels modern, its roots are deeply embedded in European peasant traditions. Farmhouses would often combine preserved fruits with local cheeses and foraged nuts to create hearty, satisfying dishes. Consequently, this recipe is a contemporary refinement of a very old, very practical approach to cooking with what was readily available and in season.
Culturally, the pairing of fruit and cheese is a cornerstone of many culinary traditions. In France, a cheese course often follows the main meal and frequently includes fresh or preserved fruits. Similarly, in Italy, it is common to enjoy pears with Parmigiano-Reggiano or other strong cheeses. The addition of honey draws from ancient Greek and Roman culinary practices, where honey was the primary sweetener. Therefore, this dish for warm baked pears is a melting pot of Mediterranean and Western European food customs, elegantly brought together in a single, harmonious preparation.
The evolution of this specific recipe mirrors the rise of modern gastronomy and the farm-to-table movement. As chefs and home cooks began to re-emphasize quality, local ingredients, simple dishes that showcased these components gained popularity. The warm baked pear is a perfect example: it takes a few excellent ingredients and does very little to them, allowing their inherent qualities to shine. This represents a shift away from overly complicated recipes back to a purer, more ingredient-driven style of cooking that feels both timeless and contemporary.
Regional variations of baked fruit dishes are found across the globe. In the American South, baked apples with brown sugar and oats are a classic. In the Middle East, baked quince or figs with spices and honey are common. The specific use of blue cheese points towards regions known for their cheese production, such as Roquefort in France or Stilton in England. This recipe for warm baked pears is a versatile template that you can adapt based on your local produce and culinary preferences, continuing the long tradition of regional interpretation.
Ingredient Deep Dive
Let us start with the star of the show: the pears. For this recipe, choosing the right variety is crucial for success. Bosc or Anjou pears are highly recommended because they hold their shape beautifully during baking. Their firm texture softens to a tender, but not mushy, consistency. From a nutritional standpoint, pears are a powerhouse of fiber, particularly in their skin, and provide a good dose of Vitamin C and potassium. When selecting pears, look for fruit that is firm but gives slightly at the neck. Avoid any with significant bruising. Store them at room temperature until ripe, then refrigerate to slow further ripening.
Blue cheese brings the essential savory, tangy element that makes this dish so unique. Culturally, blue cheeses like Gorgonzola, Roquefort, or Stilton have centuries-old histories, often aged in specific caves to develop their characteristic mold veins. Nutritionally, it is a concentrated source of calcium and protein, though it is also high in sodium and saturated fat, so a little goes a long way. When selecting a blue cheese, opt for a variety that is creamy yet crumbly. You can store it tightly wrapped in parchment paper and then plastic wrap in the refrigerator for up to two weeks. For a milder flavor, use Gorgonzola Dolce; for a stronger punch, a Roquefort is excellent.
Walnuts are the textural heroes, providing the necessary crunch. Historically, walnuts are one of the oldest tree foods, cultivated for thousands of years and revered in ancient Persia and Rome. They are incredibly nutritious, offering one of the best plant-based sources of Omega-3 fatty acids, which are vital for brain health. They are also rich in antioxidants. Always select walnuts that feel heavy for their size and are not rubbery. To maximize their flavor, toast them lightly before use. Store walnuts in an airtight container in the refrigerator or freezer to prevent their oils from turning rancid.
Honey acts as the natural sweetener and glaze, creating a beautiful caramelized coating on the warm baked pears. Its use predates recorded history, and it has been a prized commodity in every culture that kept bees. Honey contains trace enzymes, minerals, and vitamins, and some varieties have antimicrobial properties. For this recipe, a mild, floral honey like clover or orange blossom works wonderfully without overpowering the other ingredients. Raw, local honey can offer additional health benefits. Always store honey at room temperature in a sealed container. If it crystallizes, simply place the jar in warm water to liquefy it again.
Finally, the berries provide a burst of freshness and color. While this recipe often uses mixed berries, each type has its own story. Raspberries and blackberries are aggregate fruits, and strawberries are members of the rose family. Berries are celebrated for their incredibly high antioxidant content, particularly vitamin C and various phytochemicals. When selecting fresh berries, look for vibrant color and a firm, plump appearance without moisture or mold in the container. If using frozen berries, there is no need to thaw them before adding to the recipe. For the best flavor and nutritional value, always choose organic when possible.
Common Mistakes to Avoid
- Using Overripe Pears: This is a critical error. Overly soft pears will turn to mush in the oven, losing their shape and creating a watery dish. Instead, always select pears that are firm-ripe for the best texture and presentation in your warm baked pears.
- Skipping the Toasting of Walnuts: Raw walnuts can have a slightly bitter flavor and lack the deep, nutty aroma that toasting provides. Taking the extra five minutes to toast your walnuts in a dry skillet or the oven dramatically enhances the overall flavor profile of the dish.
- Overcrowding the Baking Dish: If you pack the pears too tightly into the dish, they will steam rather than bake. This prevents proper caramelization and can lead to a soggy result. Ensure the pear halves are in a single layer with a little space between them for the best outcome.
- Using a Strong, Overpowering Honey: A very dark, robust honey like buckwheat can dominate the other delicate flavors. For a balanced dish, opt for a lighter, floral honey such as clover or acacia that will sweeten without competing with the cheese and fruit.
- Adding the Blue Cheese Too Early: If you place the blue cheese on the pears before baking, it will melt entirely and lose its distinct texture and sharp flavor. The correct method is to add it after baking, allowing it to soften slightly from the residual heat but remain identifiable.
- Neglecting to Baste the Pears: The honey-butter mixture in the bottom of the pan is liquid gold. If you do not baste the pears with this mixture during baking, you miss out on creating a beautifully glazed, evenly sweetened exterior. Basting is key for a professional finish.
- Baking at the Wrong Temperature: A temperature that is too low will stew the pears, while a temperature that is too high may burn the honey before the pears are tender. Sticking to a moderate 375°F (190°C) ensures the pears cook through and caramelize perfectly.
- Forgetting to Season: Even a sweet dish benefits from a pinch of salt to heighten all the flavors. Similarly, a dash of black pepper can add a surprising and delightful complexity that makes the sweet and savory elements pop.
Essential Techniques
Mastering the pear preparation is your first crucial step. The goal is to create stable, even halves that will bake uniformly. First, slice the pear vertically from stem to bottom. Then, use a small spoon or a melon baller to carefully scoop out the core and seeds, creating a small, neat well. This well is perfect for holding the filling and ensures every bite is balanced. Avoid scooping too deeply, as you want to maintain the pear’s structural integrity. A properly prepared pear half will hold its shape throughout the baking process, resulting in a beautiful final presentation.
Understanding the baking process is fundamental to achieving the perfect texture. Baking at 375°F (190°C) allows the pears to soften and become tender without burning the delicate honey glaze. The heat gently breaks down the pears’ pectin and fiber, converting their starches into sugars and intensifying their natural sweetness. The visual cue for doneness is a easily pierced with a knife or fork, indicating they are soft all the way through. Meanwhile, the edges should appear golden brown, and the honey glaze should be bubbly and caramelized. This technique transforms the raw, crisp fruit into a warm, succulent centerpiece.
The art of balancing flavors is the soul of this dish. It relies on the counterpoint between sweet (pears, honey, berries) and savory (blue cheese, walnuts). The technique is not to overpower one with the other but to allow each component to shine in harmony. When assembling, ensure each pear half gets a bit of each element. The final touch of flaky sea salt after baking is a professional technique that lifts the entire dish, making the sweetness taste sweeter and the cheese taste richer. This deliberate layering of flavors is what elevates the recipe from simple to sublime.
Pro Tips for Perfect Warm Baked Pears
Choose pears that are just barely ripe. They should be firm with only a slight give at the stem. This ensures they hold their shape during the baking process and do not become mushy. A Bosc or Anjou pear is your best bet for structure and flavor.
Always toast your walnuts beforehand. Spread them on a baking sheet and toast for 5-7 minutes at 350°F until fragrant. This simple step deepens their nutty flavor and adds a crucial layer of complexity and crunch to the final dish.
Do not skip the basting. Use a spoon to drizzle the hot honey-butter juices from the pan over the pears every 10 minutes during baking. This creates an incredibly glossy, flavorful glaze and ensures the pears do not dry out, guaranteeing a moist result.
Let the baked pears rest for 5 minutes before serving. This allows the flavors to meld together and the fruit to firm up slightly, making them easier to handle and plate. The residual heat will perfectly soften the blue cheese without causing it to melt away entirely.
Experiment with different blue cheeses. A creamy Gorgonzola Dolce offers a mild, approachable flavor, while a bold Stilton or Roquefort provides a more intense experience. Matching the cheese to your audience’s palate can customize the dish perfectly.
Add a splash of acidity. A small drizzle of balsamic reduction or a squeeze of lemon juice over the finished dish just before serving can brighten all the flavors and cut through the richness, adding another dimension to the taste profile.
Variations and Adaptations
For regional variations, you can take this recipe on a world tour. For a French twist, use Roquefort cheese and add a sprinkle of herbes de Provence to the honey glaze. An Italian version might feature Gorgonzola and a final drizzle of aged balsamic vinegar. Meanwhile, for an American fall variation, incorporate a pinch of pumpkin pie spice into the filling and use pecans instead of walnuts. These small changes can completely transform the character of the dish while maintaining its core structure and appeal.
Seasonal adaptations are simple and effective. In the autumn, use chopped apples alongside or instead of pears, and add dried cranberries to the berry mix. For a winter holiday version, a splash of brandy or rum in the honey glaze adds warmth. During the spring, fresh strawberries and mint make a bright, refreshing combination. In the summer, ripe peaches or nectarines can be prepared in the exact same way, showcasing the best produce each season has to offer and keeping the recipe exciting year-round.
Dietary modifications are straightforward. For a vegan version, substitute the honey with maple syrup or agave nectar and use a high-quality vegan blue cheese alternative or simply omit it. For a gluten-free diet, this recipe is naturally compliant as written. To make it nut-free, replace the walnuts with toasted pumpkin seeds (pepitas) for a similar crunch. If you are watching your sugar intake, reduce the amount of honey by half and rely more on the natural sweetness of the ripe, warm baked pears themselves.
Serving and Presentation Guide
Plating techniques can elevate this humble dish to a restaurant-level experience. For individual servings, place one or two warm baked pear halves in the center of a shallow bowl or plate. Drizzle the pan juices artistically around the plate. Alternatively, for a family-style presentation, arrange all the pears on a beautiful platter, scatter the berries and walnuts over the top, and crumble the blue cheese generously. Using a platter with a contrasting color, like a dark slate or a white ceramic, makes the vibrant colors of the dish pop visually.
Garnishing is the final touch that adds freshness and color. A few fresh mint or thyme leaves sprinkled over the top provide a lovely green accent and an aromatic hint. A light dusting of powdered sugar can add a touch of elegance for a dessert presentation. For a textural garnish, consider adding some extra raw, finely chopped walnuts for an additional crunch. Remember, the goal of a garnish is to complement the dish, not overwhelm it, so a light hand is always best.
Consider your accompaniments carefully. If serving as a dessert, a scoop of vanilla bean ice cream or a dollop of lightly sweetened whipped cream is sublime. As an appetizer, it pairs wonderfully with a simple arugula salad dressed with a lemon vinaigrette. For a cheese board presentation, surround the warm pears with slices of crusty baguette, water crackers, and perhaps some cured meats like prosciutto. These additions turn the pears into the centerpiece of a more substantial offering, perfect for grazing and social gatherings.
Wine and Beverage Pairing
Selecting the right wine can enhance the sweet and savory notes of the warm baked pears beautifully. A classic pairing is a Sauternes or another late-harvest dessert wine, whose honeyed sweetness mirrors the glaze on the pears. Conversely, the acidity and effervescence of a Prosecco or Champagne cut through the richness of the cheese wonderfully. For a red wine lover, a lighter-bodied, low-tannin red like a Pinot Noir can work surprisingly well, especially if the dish is served as an appetizer. The key is to choose a wine that has either complementary sweetness or contrasting acidity to balance the dish’s flavors.
For non-alcoholic alternatives, consider options with complexity. A sparkling apple cider provides sweetness and bubbles that cleanse the palate. Iced ginger tea offers a spicy kick that complements the warmth of the baked fruit. Alternatively, a simple glass of chilled, dry hard cider (non-alcoholic versions are available) mimics the profile of a sparkling wine perfectly. These beverages ensure that all your guests, regardless of their preference, can enjoy a drink that pairs harmoniously with the sophisticated flavors of the meal.
If you prefer coffee or tea, certain varieties make excellent partners. A medium-roast coffee with low acidity and notes of caramel or nut would not compete with the pears. For tea, an Earl Grey’s bergamot flavor can be a delightful contrast, or a simple Chamomile tea would provide a soothing, floral companion to the dessert. Serve these hot beverages after the meal or alongside, depending on your custom. The goal is to choose a warm drink that supports, rather than overpowers, the delicate balance of fruit, cheese, and honey.
Storage and Shelf Life
Proper storage is essential for maintaining quality and safety. Allow any leftover warm baked pears to cool completely to room temperature before storing. Do not leave them out for more than two hours. Transfer the pears and any berries and juices to an airtight container. They can be stored in the refrigerator for up to 3 days. It is best to store the blue cheese and walnuts separately if possible, adding them fresh when you reheat the pears to preserve their distinct textures.
Reheating requires care to avoid a mushy texture. The best method is to place the pears in an oven-safe dish and warm them in a 350°F (175°C) oven for about 10 minutes, or until heated through. You can also use an air fryer for a quicker reheat that helps re-crisp the edges. Avoid using a microwave, as it will steam the pears and make them soft and watery. Always add the cold blue cheese and fresh walnuts after reheating to keep their flavors and textures intact.
Freezing is not generally recommended for this dish. The high water content of the pears and berries means they will become very soft and release a lot of liquid upon thawing, resulting in a compromised texture. The dairy in the blue cheese also does not freeze well and can become grainy. Therefore, it is best to enjoy your warm baked pears fresh or within a few days of refrigeration. If you must freeze, expect a significant change in quality and plan to use the thawed product in a smoothie or compote rather than serving it as a standalone dish.
Make Ahead Strategies
You can significantly streamline your preparation by completing several steps in advance. The pears can be halved and cored up to a day ahead. To prevent browning, toss them lightly with lemon juice and store them in an airtight container in the refrigerator. The honey-butter glaze can also be mixed and kept at room temperature. Furthermore, you can toast the walnuts and wash the berries a day in advance, storing them separately. This advance prep means that when you are ready to serve, you simply need to assemble the components and bake, reducing active kitchen time to just a few minutes.
When assembling ahead of time, avoid combining all the ingredients on the baking dish until you are ready to bake. You can arrange the lemon-juice-treated pears in the dish, cover it tightly with plastic wrap, and refrigerate. Keep the honey-butter mixture in a separate container. Do not add the berries or cheese until the baking stage. This prevents the pears from sitting in the syrup and becoming soggy and ensures the berries do not break down and release too much water before cooking. This staged assembly is the key to a perfect make-ahead dish.
For the best quality, we recommend a “partial make-ahead” approach. Prepare the pears and glaze the day before, but bake them fresh before your event. The baking time is short enough that it will not disrupt your hosting duties. The wonderful aroma of the warm baked pears in the oven will also act as a delightful welcome for your guests. After baking, let them rest for five minutes, then add the blueberries and cheese. This strategy guarantees you serve the dish at its absolute peak of flavor and texture, with minimal last-minute effort.
Scaling Instructions
Scaling this recipe up or down is remarkably straightforward due to its simple structure. For a smaller serving, simply halve all the ingredients. Use two pears to serve two people, one tablespoon of honey, and so on. The baking time may be slightly reduced, so start checking for doneness around the 20-minute mark. Use a smaller baking dish to ensure the honey-butter mixture does not spread too thin and burn. This makes the recipe perfect for a romantic dinner for two without any complicated calculations or wasted leftovers.
When doubling or tripling the recipe for a larger crowd, you need to consider your equipment. Do not overcrowd the pears; instead, use multiple baking dishes or a very large roasting pan to ensure the pears bake evenly and caramelize properly. You may need to increase the baking time by 5-10 minutes, but again, rely on the visual and textural cues for doneness rather than the clock alone. Stir the berries partway through baking if you are using a very large tray to ensure they heat evenly. Scaling up works beautifully, making this an ideal dish for holiday feasts and parties.
One important note when scaling: the ratio of wet to dry ingredients remains constant, but the behavior of the honey glaze in the oven can change. In a very full pan, the glaze might not reduce and caramelize as quickly. Conversely, in a half-empty pan, it can burn. Keep a close eye on the process and rotate the pans if you are using more than one. The fundamental techniques remain the same, but a watchful eye is your best tool when adjusting the recipe size for your warm baked pears.
Nutritional Deep Dive
This dish offers a surprisingly well-rounded nutritional profile. A single serving provides a good source of dietary fiber from the pears and berries, which aids in digestion and promotes satiety. The walnuts contribute healthy unsaturated fats, including omega-3 alpha-linolenic acid (ALA), which is beneficial for heart and brain health. Meanwhile, the blue cheese adds protein and a significant amount of calcium, though it also brings sodium and saturated fat. The honey, while a sugar, is a natural sweetener that contains trace amounts of enzymes and antioxidants. Overall, it is a dessert that provides more than just empty calories.
From a micronutrient perspective, you are getting a powerful boost. Pears are a source of vitamin C and potassium. Berries are famously high in antioxidants like anthocyanins, which combat oxidative stress. Walnuts are rich in manganese and copper. Even the blue cheese provides riboflavin (Vitamin B2) and Vitamin B12. This combination means that while you are indulging in a delicious treat, you are also feeding your body a variety of essential vitamins and minerals that support overall health and well-being.
For those mindful of calorie intake, portion control is simple. One pear half constitutes a reasonable serving, especially when served as part of a larger meal. To lighten the dish further, you can reduce the amount of honey and butter in the glaze by up to a third without a major impact on flavor. The bulk of the dish comes from low-calorie, high-fiber fruits, making it a satisfying choice that does not typically lead to overconsumption. It is a dessert you can enjoy without derailing your health goals.
Dietary Adaptations
For a vegan adaptation, this recipe is very easy to modify. Replace the honey with an equal amount of maple syrup or agave nectar to maintain the sweet glaze. The butter can be substituted with a high-quality vegan butter or even coconut oil. For the blue cheese, you can either omit it entirely or use a store-bought vegan blue cheese alternative if you can find one. The resulting dish will still have the wonderful contrast of warm, sweet fruit and crunchy nuts, making it suitable for a plant-based diet.
To make this recipe gluten-free, you are in luck, as it is naturally compliant. None of the core ingredients—pears, berries, honey, walnuts, or blue cheese—contain gluten. However, always double-check the labels on pre-packaged items like blue cheese, as very occasionally anti-caking agents or other additives might contain gluten. As long as you use pure, whole ingredients, this is a safe and delicious option for anyone with celiac disease or gluten sensitivity.
For a dairy-free version, the main adjustment is omitting the blue cheese. While you lose the savory element, the dish is still delightful with just the pears, berries, honey, and walnuts. To reintroduce a creamy, tangy component, you can drizzle the finished dish with a little dairy-free yogurt thinned with lemon juice. Another option is to use crumbled, marinated tofu with a bit of miso to mimic the umami depth of the cheese. This adaptation allows those with dairy allergies or lactose intolerance to enjoy the core experience of the warm baked pears.
Troubleshooting Guide
If your pears are not softening, the most likely cause is that they were not ripe enough to begin with. Very hard pears will take much longer to bake and may never achieve that meltingly soft texture. Solution: Continue baking in 5-minute increments until a knife pierces them easily. To prevent this, always select pears that yield slightly to pressure at the neck. Another cause could be an oven that runs cool; use an oven thermometer to verify the temperature is accurate.
If the honey glaze burns before the pears are cooked, your oven temperature is likely too high. Solution: Immediately cover the dish loosely with aluminum foil to prevent further browning and reduce the oven temperature by 25°F. Next time, ensure you are baking at a moderate 375°F and that the pears are arranged in a single layer, not piled on top of each other, which can cause the glaze to pool and burn.
If the finished dish is too watery, it could be due to two factors. First, the pears may have been overripe and released too much juice. Second, frozen berries were used and added too much liquid during baking. Solution: For serving, use a slotted spoon to plate the pears and berries, and drizzle with just a little of the pan juice. You can also pour the extra juices into a small saucepan and simmer them for a few minutes to reduce and thicken into a more syrupy consistency.
Recipe Success Stories
We have received wonderful feedback from our community of home cooks who have tried this recipe. One reader, Sarah from Colorado, shared that she made these warm baked pears for a book club meeting and they were an instant hit. She mentioned that her friends, who were initially skeptical about the blue cheese, were completely converted after the first bite. She followed the pro tip toasting the walnuts and said it made a world of difference. Her story is a testament to how this dish can surprise and delight even the most hesitant eaters.
Another success story comes from Mark, who adapted the recipe for a vegan Thanksgiving. He used maple syrup and omitted the cheese, serving it alongside a dairy-free ice cream. He reported that it was the standout dessert of the night, satisfying both vegan and non-vegan guests alike. His adaptation proves the incredible versatility of the recipe framework. He also noted that preparing the pears the day before was a lifesaver on the busy holiday, confirming the effectiveness of the make-ahead strategies we recommend.
Photography tips from our readers have also been inspiring. Many have found that natural daylight is the best way to capture the gorgeous golden color of the baked pears. A dark, rustic background like a wooden cutting board or a slate slab makes the colors of the berries and cheese pop. Several readers have suggested taking a photo immediately after adding the blue cheese, as the contrast between the warm pear and the cold, crumbly cheese is visually striking. These small tips can help you capture the beauty of your culinary creation.
Frequently Asked Questions
Can I use other types of pears?
Absolutely. While Bosc and Anjou are recommended for their firmness, you can use Bartlett or Comice pears if you prefer. Just be aware that softer pears will bake more quickly and may not hold their shape as well, so reduce the baking time and check for doneness earlier to avoid mushiness.
What can I use instead of blue cheese?
If you are not a fan of blue cheese, you can substitute it with other bold cheeses. Goat cheese (chèvre) is a fantastic alternative, offering a similar tangy creaminess. A sharp, aged cheddar, crumbled feta, or even shaved Manchego would also work well, providing a salty, savory counter
Print
Baked Pears with Berries, Honey, Walnuts & Blue Cheese
Description
A sweet and savory dessert featuring tender baked pears topped with fresh berries, crunchy walnuts, and crumbled blue cheese, all drizzled with honey.
Ingredients
For the Crust:
- 4 ripe pears, halved and cored
- 1 cup mixed berries (fresh or frozen)
- 1/2 cup walnuts, chopped
- 1/4 cup honey
- 1/4 cup crumbled blue cheese
- 1 tablespoon lemon juice
- 1 teaspoon cinnamon
- 2 tablespoons unsalted butter, melted
Instructions
1. Prepare the Crust:
- Preheat oven to 375°F (190°C). Arrange pear halves cut-side up in a baking dish.
- Brush pears with melted butter and lemon juice, then sprinkle with cinnamon.
- Scatter mixed berries and walnuts around and over the pears. Drizzle with honey.
- Bake for 25-30 minutes, until pears are tender and berries are bubbling.
- Remove from oven, top with crumbled blue cheese, and serve warm.
Notes
You can customize the seasonings to taste.
I’m Shaykee—born in Morocco, seasoned across continents. From airplane galleys to home kitchens, I share the flavors and stories that shaped my journey.