Creamy, Crustless Pumpkin Pie: The Ultimate No-Fuss Fall Dessert
Imagine the rich, comforting flavor of a classic pumpkin pie, but with a silky-smooth texture that melts on your tongue. This creamy, crustless pumpkin pie delivers exactly that experience, all without the fuss of making or rolling out a pastry crust. Essentially, it is a luxurious pumpkin custard baked to perfection, offering a gluten-free dessert that feels both indulgent and surprisingly simple. The aroma of warm spices like cinnamon, ginger, and nutmeg will fill your kitchen, creating an instant sense of autumnal coziness that is perfect for any gathering.
Furthermore, this recipe is a game-changer for busy bakers and those with dietary restrictions. By eliminating the crust, you not only save significant prep time but also create a naturally gluten-free dessert that everyone can enjoy. The focus shifts entirely to the lush, velvety filling, which is lightly sweetened and deeply spiced. Consequently, each bite is pure pumpkin bliss, unencumbered by a sometimes-soggy bottom crust. It is the ideal solution for a last-minute holiday contribution or a weeknight treat that satisfies your seasonal cravings.
Ultimately, this creamy, crustless pumpkin pie celebrates the essence of fall in the most straightforward way possible. It is humble yet elegant, simple yet deeply flavorful. Whether served in neat slices or scooped into bowls like a pudding, this dessert promises to become a new favorite. It proves that sometimes, the best recipes are those that strip away complexity to highlight the beautiful, fundamental flavors we all love.
Quick Recipe Highlights
- Flavor Profile: This creamy, crustless pumpkin pie features a perfect harmony of sweet, earthy pumpkin and warm autumnal spices. Notes of cinnamon and ginger shine through, complemented by the deep, caramel-like sweetness of brown sugar. The result is a beautifully balanced dessert that is not overly cloying.
- Texture: The texture is the star here—incredibly smooth, rich, and custardy without being eggy. It sets firmly yet remains lush and creamy on the palate, similar to a baked cheesecake or flan. Without a crust, the mouthfeel is uniformly velvety from edge to center.
- Aroma: As it bakes, your kitchen will be enveloped in the quintessential scent of fall. The warm, inviting aromas of pumpkin pie spice, vanilla, and baking pumpkin create an olfactory experience that is as delightful as the dessert itself.
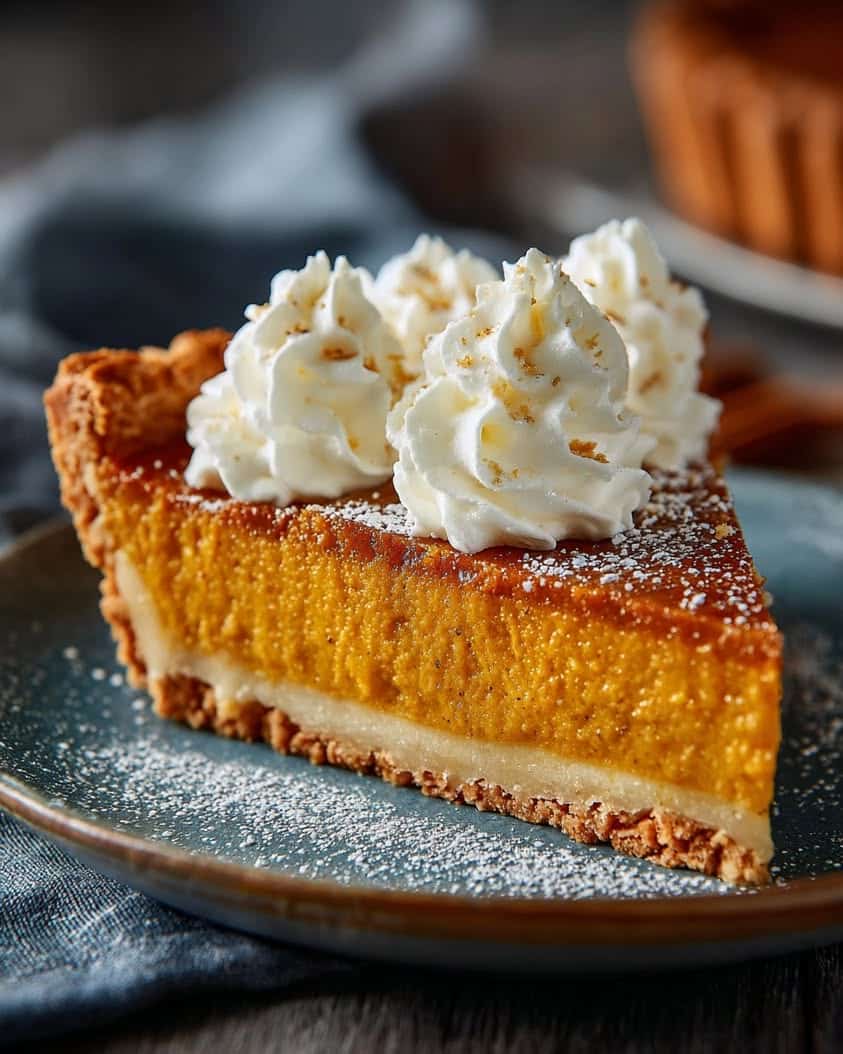
- Visual Appeal: This pie presents a beautiful, uniform burnt-orange surface that may develop slight cracking, signaling its custardy nature. It looks elegant when garnished with a dollop of whipped cream and a sprinkle of cinnamon or toasted pecans.
- Skill Level Needed: This is a beginner-friendly recipe requiring only basic mixing and baking skills. There is no need for pastry expertise, making it accessible for novice cooks and a reliable, stress-free option for experienced bakers.
- Special Equipment: You only need standard kitchen tools: a mixing bowl, whisk, 9-inch pie dish, and oven. A blender or food processor can ensure an ultra-smooth filling, but a vigorous whisk by hand works perfectly.
Recipe Overview
- Difficulty Level: This creamy, crustless pumpkin pie is rated “Easy” because it involves no complex techniques. The process is essentially mixing wet ingredients and baking. There is no risk of overworking dough or blind-baking a crust. Therefore, it is virtually foolproof for bakers of any level.
- Category: This dessert falls squarely into the categories of pies, custards, and gluten-free baking. It can also be considered a holiday or seasonal dessert, perfect for Thanksgiving, Christmas, or any autumn celebration.
- Cuisine: While pumpkin pie is deeply rooted in American culinary tradition, specifically associated with Thanksgiving, this crustless version is a modern adaptation. It draws from the same flavor heritage while adapting to contemporary dietary preferences and simplified cooking styles.
- Cost: This is an extremely cost-effective dessert. Canned pumpkin puree and common pantry spices keep the price low. Compared to pies requiring butter, flour, and nuts for a crust, this version saves money while delivering premium flavor.
- Season: This recipe is ideal for fall and winter, aligning with pumpkin harvest season and major holidays. However, thanks to year-round canned pumpkin availability, you can enjoy this cozy, creamy, crustless pumpkin pie any time a comfort food craving strikes.
- Occasion: Perfect for Thanksgiving dinner, potlucks, Friendsgiving, or a cozy family dessert. Its gluten-free nature makes it inclusive for gatherings. It is also excellent for casual weeknights when you want a special treat without much effort.
Why You’ll Love This Recipe
First and foremost, the taste and texture of this creamy, crustless pumpkin pie are utterly irresistible. The filling is luxuriously smooth, with a custard-like consistency that is rich but not heavy. Each bite delivers the perfect blend of sweet pumpkin and warm spice, offering classic holiday flavor in a more refined format. Because there is no crust to compete with, the filling’s delicate flavor profile shines through beautifully. You will find yourself savoring the pure, unadulterated essence of pumpkin pie in its most creamy form.
Additionally, the convenience factor is a major win. This recipe comes together in about 15 minutes of active prep time. You simply whisk the ingredients together and pour them into a dish. There is no chilling dough, rolling it out, or crimping edges. This makes it an ideal last-minute dessert when you are short on time but still want to impress. Moreover, cleanup is a breeze since you only use one mixing bowl and a pie dish.
From a nutritional perspective, this crustless version offers some advantages. By omitting the traditional butter and flour crust, you automatically reduce the calorie and carbohydrate count per serving. The recipe is naturally gluten-free, catering to a wider audience. Pumpkin itself is a nutritional powerhouse, packed with vitamin A, fiber, and antioxidants. While still a dessert, this pie allows you to enjoy a treat with a slightly better nutritional profile.
For social and entertaining value, this pie is a superstar. Its gluten-free nature means you can serve it confidently at mixed-diet gatherings without needing a separate dessert. The elegant, simple presentation feels both homey and sophisticated. Guests will appreciate the creamy texture and deep flavor, often asking for the recipe because they cannot believe something so delicious could be so simple to make.
Finally, the cost-effectiveness and accessibility are unbeatable. The ingredients are pantry staples for most bakers, especially during the fall. Canned pumpkin puree is inexpensive and available everywhere. You do not need any special flours or alternative crust ingredients. This creamy, crustless pumpkin pie delivers maximum flavor and satisfaction for minimal financial investment, making it a recipe you will return to again and again.
Historical Background and Cultural Significance
The story of pumpkin pie in America begins long before the first Thanksgiving. Native American tribes cultivated pumpkins and squashes for thousands of years. They would roast or boil pumpkins for eating. European colonists adapted these native gourds, often filling hollowed-out pumpkins with milk, honey, and spices before baking them in ashes. This method was a precursor to the pie we know today. However, these early preparations were quite different from the smooth, custard-based pie we enjoy now.
Pumpkin pie became cemented as a cultural icon through its association with Thanksgiving. While not explicitly mentioned in accounts of the 1621 harvest feast, by the early 19th century, pumpkin pie had become a symbol of American abundance and autumn harvest. Cookbooks from the 1800s featured recipes for pumpkin pie, often with a pastry crust. The pie represented domestic comfort, seasonal change, and national identity. Consequently, it evolved from a practical way to preserve fruit into a cherished ritual food.
The evolution of the recipe saw a shift from sliced pumpkin in a crust to the smooth, spiced filling we recognize. The invention of canned pumpkin puree in the late 1920s by Libby’s revolutionized the process, making pumpkin pie accessible year-round and eliminating the labor of cooking and straining fresh pumpkin. This convenience helped standardize the recipe. The modern “custard” style, using eggs and evaporated or sweetened condensed milk, became the gold standard for its creamy texture and reliable set.
Regional variations have always existed. Some New England recipes included molasses, while others used maple syrup. The crustless version, however, is a more contemporary innovation. It responds to modern dietary needs like gluten-free eating and a desire for simpler, less fussy recipes. This creamy, crustless pumpkin pie is a direct descendant of that long culinary history, stripping the concept back to its flavorful core—the spiced pumpkin custard—and celebrating it in its purest form.
Ingredient Deep Dive
Canned Pumpkin Puree: This is the heart of the pie. Importantly, ensure you buy 100% pure pumpkin puree, not pumpkin pie filling, which has added sugars and spices. Pumpkin puree is made from steamed and mashed Dickinson pumpkins, which have a smoother texture and sweeter flavor than carving pumpkins. It is rich in beta-carotene, an antioxidant that converts to vitamin A. For best results, store unopened cans in a cool pantry. Once opened, transfer to an airtight container and refrigerate for up to a week. You can substitute with homemade puree, but ensure it is thick and not watery.
Evaporated Milk: This shelf-stable canned milk is key to the pie’s creamy, rich texture without making it too heavy. Evaporated milk is fresh milk with about 60% of the water removed, then homogenized and sterilized. It provides protein and calcium, contributing to the custard’s firm set. It has a slightly caramelized flavor that enhances the pie’s depth. Do not confuse it with sweetened condensed milk, which would make the pie overly sweet. For a dairy-free version, full-fat canned coconut milk is an excellent substitute, adding a subtle tropical note.
Eggs: Eggs are the structural backbone of this crustless pie. They bind the ingredients and, through coagulation during baking, transform the liquid filling into a firm, sliceable custard. They also contribute to the rich, velvety mouthfeel. Use large eggs at room temperature for best incorporation. The proteins in the eggs set the pie, so baking until just set is crucial. For an egg-free version, commercial egg replacers designed for baking can work, though the texture may be slightly less firm.
Brown Sugar & Spices: Brown sugar, with its molasses content, provides a deep, caramel-like sweetness that pairs perfectly with pumpkin. It also contributes to a softer texture. The classic spice blend—cinnamon, ginger, nutmeg, and cloves—is non-negotiable for authentic flavor. Cinnamon offers warm sweetness, ginger provides a slight bite, nutmeg adds nutty depth, and cloves contribute a pungent warmth. For the freshest flavor, grind whole nutmeg yourself. You can use a pre-mixed pumpkin pie spice, but adjusting individual spices allows you to customize the flavor profile to your liking.
Common Mistakes to Avoid
- Using Pumpkin Pie Filling: This is the most common error. Pumpkin pie filling contains added sugar, spices, and thickeners. Using it will throw off the recipe’s balance, making the pie too sweet and altering the texture. Always double-check the can label for “100% Pure Pumpkin.”
- Overmixing the Filling: While you want a smooth batter, excessive whisking after adding the eggs can incorporate too much air. This can lead to a puffy, soufflé-like texture that may collapse and crack excessively as it cools. Mix just until the ingredients are fully combined.
- Not Tempering the Eggs: If you add cold eggs directly to a warm pumpkin mixture (if you heated your ingredients), you risk scrambling them. Always whisk the eggs first, then gradually stream in the warm mixture while whisking constantly to gently raise their temperature.
- Overbaking the Pie: The goal is a set but still slightly jiggly center. Overbaking causes the proteins in the eggs to tighten too much, squeezing out moisture and leading to a rubbery texture and large cracks. The pie will continue to set as it cools on the counter.
- Skipping the Resting Time: Cutting into the pie while it is still warm will result in a messy, soupy slice. The custard needs time to fully set its structure as it cools. For clean slices, chill the pie for at least 4 hours, though overnight is ideal.
- Using the Wrong Size Dish: A 9-inch pie dish is standard. Using a smaller dish will make the filling too deep, requiring longer baking and risking a soggy center. A larger dish will make the filling too shallow, leading to overbaking and dryness.
- Not Greasing the Pie Dish: Even though there is no crust to stick, greasing the dish ensures easy release and clean serving. Use butter, cooking spray, or a light coating of oil to prevent the custard from bonding to the glass or ceramic.
- Substituting Fresh Pumpkin Incorrectly: If using homemade puree, you must drain it thoroughly. Fresh pumpkin contains much more water than canned. Spread the puree on a kitchen towel and squeeze out excess liquid, or simmer it in a pan to reduce, to avoid a watery pie.
Essential Techniques
Blending for Ultimate Smoothness: While whisking by hand works, using a blender or food processor guarantees a flawlessly silky filling. This technique fully incorporates the eggs and breaks down any potential fibrous bits in the pumpkin puree. The key is to blend just until smooth; over-blending can incorporate too much air. Pour the filling directly from the blender pitcher into the pie dish for minimal mess. This method is especially helpful if your brown sugar has any small lumps.
The “Jiggle Test” for Doneness: This is the critical visual cue for perfect baking. About 5-10 minutes before the recipe’s stated bake time is up, gently shake the oven rack. The edges of the pie should look completely set, while the center (about a 3-inch circle) should have a consistent, gentle jiggle—like Jell-O—not a loose, watery slosh. The residual heat will finish cooking the center as it cools. Removing the pie at this point prevents overbaking, which is the primary cause of cracking and a rubbery texture.
Cooling in Stages: Proper cooling is essential for texture and to prevent cracking from thermal shock. First, let the pie cool on a wire rack on the counter for 1-2 hours. This allows it to set slowly and evenly. Then, transfer it to the refrigerator to chill completely, uncovered initially to avoid condensation, then covered with plastic wrap. This gradual temperature drop helps the custard structure stabilize, resulting in a creamier mouthfeel and clean slices.
Pro Tips for Perfect Creamy, Crustless Pumpkin Pie
For an extra layer of flavor, toast your spices in a dry skillet for 30-60 seconds before adding them to the filling. This wakes up their essential oils and intensifies their aroma and taste.
Always use room temperature eggs and evaporated milk. Cold ingredients do not blend as seamlessly and can cause the mixture to separate, leading to a less homogeneous filling.
Place your pie dish on a preheated baking sheet in the oven. This provides more consistent bottom heat and makes it much easier to handle when performing the jiggle test.
If you see small bubbles on the surface after pouring the filling, pop them with a toothpick or the tip of a knife. This helps achieve a smoother top on your finished pie.
For the cleanest cuts, dip your sharp knife in hot water and wipe it clean between each slice. The heat helps the knife glide through the creamy custard without dragging or tearing.
If you prefer a crack-free top, bake the pie in a water bath. Wrap the outside of the pie dish in foil, place it in a larger pan, and add hot water halfway up the sides of the pie dish. This gentle, moist heat promotes even cooking.
Let the pie sit at room temperature for 20-30 minutes before serving after refrigeration. This takes the harsh chill off and allows the flavors and creamy texture to fully express themselves.
Variations and Adaptations
Regional Variations: Southern versions might include a tablespoon of bourbon or dark rum for depth. A New England twist could use maple syrup to replace half the brown sugar. For a dairy-rich variation reminiscent of early American cooking, substitute heavy cream for the evaporated milk.
Seasonal Adaptations: In winter, add a hint of cardamom or allspice to the spice blend. For a summer-friendly version, consider baking the pie in individual ramekins and serving them chilled with fresh berry compote, transforming it into a cool pumpkin custard.
Dietary Modifications: For a vegan creamy, crustless pumpkin pie, use full-fat coconut milk, flax eggs, and coconut sugar. A keto version can be made with erythritol, extra eggs for structure, and coconut cream, though the flavor profile will shift slightly.
Flavor Variations: Infuse the evaporated milk by heating it with a few tablespoons of loose chai tea, then straining, for a chai-spiced pie. Add ½ cup of finely chopped toasted pecans or walnuts directly into the filling for added texture and nutty flavor.
Texture Modifications: For an even denser, richer texture similar to pumpkin cheesecake, blend in 4 ounces of softened cream cheese. For a lighter, fluffier texture, separate the eggs, whip the whites to soft peaks, and fold them in last.
Presentation Alternatives: Bake the filling in a square 8×8 dish and cut into elegant bars. Pour into mason jars for single-serve baked custards. Or, for a stunning presentation, bake in a decorative fluted tart pan (grease it very well) for a beautiful shape without the work of pastry.
Serving and Presentation Guide
Plating Techniques: For a classic look, slice the chilled pie into neat wedges using a hot, wet knife. Use a pie server or thin spatula to lift each slice onto a dessert plate. For a more modern, deconstructed approach, you can scoop the creamy filling into bowls, resembling a luxurious pumpkin pudding.
Garnishing Ideas: A dollop of freshly whipped cream is traditional and adds a lovely textural contrast. For elegance, pipe rosettes around the edge. Sprinkle with a pinch of cinnamon, grated nutmeg, or pumpkin pie spice. Toasted pecans, walnuts, or pepitas add crunch. A drizzle of caramel sauce or a dusting of powdered sugar can elevate the visual appeal.
Traditional Accompaniments: Whipped cream is the quintessential partner. For a homemade touch, whip heavy cream with a touch of vanilla and powdered sugar. A small scoop of vanilla ice cream melting over the warm pie is a decadent alternative. A side of lightly sweetened cranberry sauce offers a tart counterpoint.
Modern Serving Suggestions: Serve with a side of salted caramel for dipping. Crumble gingersnap cookies or amaretti biscuits over the top for a “deconstructed crust” effect. Pair with a small espresso or a glass of dessert wine for an adult-oriented finish to a meal.
Temperature Considerations: This pie is best served chilled but not ice-cold. Remove it from the refrigerator 20-30 minutes before serving to allow the flavors to bloom and the texture to soften slightly from a firm chill to a perfect creamy consistency.
Portion Control Tips: Because this pie is rich and satisfying, a standard slice (1/8 of a 9-inch pie) is ample. For larger gatherings or as part of a dessert buffet, consider cutting the pie into 12 smaller, bite-sized slices. Using a smaller serving utensil can also help manage portion size intuitively.
Wine and Beverage Pairing
Wine Pairings: The sweet, spicy notes of this creamy, crustless pumpkin pie pair beautifully with dessert wines. A late-harvest Riesling or Gewürztraminer, with their inherent sweetness and floral notes, complement the spices without overpowering them. For a richer pairing, try a cream sherry or a tawny port; their nutty, caramel flavors mirror the brown sugar in the pie. If you prefer red wine, a light, low-tannin Beaujolais can work surprisingly well.
Non-Alcoholic Alternatives: Sparkling apple cider is a festive and family-friendly choice that echoes autumn flavors. A chai tea latte, served warm or iced, doubles down on the spice profile. For a simpler option, a glass of cold milk is a classic and comforting partner to the creamy dessert.
Coffee/Tea Pairings: A medium-roast coffee with notes of caramel or nut pairs excellently. Avoid very dark, bitter roasts. For tea, a spiced chai or a creamy Earl Grey latte are perfect matches. The bergamot in Earl Grey provides a lovely aromatic contrast to the pumpkin and warm spices.
Temperature Considerations: Serve dessert wines slightly chilled. Port and sherry are best at cool room temperature. Coffee and tea should be hot to provide a warm contrast to the chilled pie, while iced versions offer a refreshing counterpoint.
Serving Suggestions: Offer a small pour of dessert wine (2-3 ounces) in a proper glass alongside the pie. For coffee or tea, serve in a cup that allows the aroma to be enjoyed. Always provide water as well to cleanse the palate between bites of the rich, creamy dessert.
Storage and Shelf Life
Storage Methods: Once completely cooled, cover the pie tightly with plastic wrap or transfer slices to an airtight container. You can also use a pie carrier with a dome lid. The key is to prevent the pie from absorbing other refrigerator odors and from drying out.
Temperature Requirements: This pie must be stored in the refrigerator at all times due to its dairy and egg content. Do not leave it at room temperature for more than 2 hours to prevent bacterial growth. The ideal fridge temperature is 40°F or below.
Container Recommendations: Storing the whole pie in its original baking dish, covered with plastic, is simplest. For individual slices, use a shallow airtight container, separating layers with parchment paper to prevent them from sticking together.
Signs of Spoilage: Discard the pie if you notice an off or sour smell, significant changes in texture (excessive weeping or slime), or visible mold. While slight condensation on the wrap is normal, a pool of liquid in the dish is a sign of breakdown.
Reheating Instructions: This pie is best served cold. However, if you prefer it slightly warm, place an individual slice on a microwave-safe plate and heat for 10-15 seconds only. Overheating will make the custard watery. You can also warm a whole pie in a 275°F oven for 10-15 minutes.
Freezing Guidelines: This pie freezes well for up to 2 months. Wrap the whole cooled pie or individual slices tightly in plastic wrap, then in foil. Thaw overnight in the refrigerator. Note that the texture may become slightly more dense after freezing, but the flavor will remain excellent.
Make Ahead Strategies
Prep Timeline: This pie is an ideal make-ahead dessert. You can prepare the filling, pour it into the dish, cover, and refrigerate it unbaked for up to 24 hours before baking. This allows the spices to meld and any air bubbles to settle, potentially leading to an even smoother texture. Alternatively, bake the pie completely 1-2 days before serving.
Storage Between Steps: If storing the unbaked filling, press plastic wrap directly onto the surface to prevent a skin from forming. Keep the dish level in the fridge. When ready to bake, give the filling a very gentle stir, then proceed with the recipe. You may need to add 5-10 minutes to the bake time if the filling is very cold.
Quality Impact Assessment: Baking the pie 1-2 days in advance often improves the flavor, as the spices have more time to permeate the custard. The texture remains excellent. The main visual change may be slight moisture on the surface (weeping), which is easily blotted with a paper towel before serving.
Assembly Tips: For the freshest presentation, bake the pie ahead but add garnishes like whipped cream, nuts, or a drizzle of sauce just before serving. This keeps textures distinct and visually appealing.
Reheating Guidelines: As a custard, reheating a whole baked pie is not generally recommended, as it can compromise texture. Serve it chilled. If you must, use the gentle oven method described in the storage section.
Fresh Element Additions: Any crunchy garnishes like toasted nuts or brittle should be added at the last minute to maintain their crunch. Whipped cream can be piped on up to an hour before serving if kept refrigerated.
Scaling Instructions
Halving the Recipe: To make a smaller pie, simply divide all ingredient quantities by two. Use a 7-inch pie dish or a standard loaf pan. Reduce the baking time significantly—start checking for doneness at 25-30 minutes. The texture and flavor will be identical, just in a smaller yield.
Doubling or Tripling: This recipe doubles and triples beautifully for a crowd. Multiply all ingredients consistently. Mix the filling in batches if your blender or bowl is not large enough. Bake in multiple standard pie dishes rather than one giant dish to ensure even cooking. You may need to rotate the dishes in the oven halfway through baking.
Equipment Adjustments: When scaling up, ensure you have enough mixing capacity. A large stockpot can serve as a mixing bowl for a triple batch. When baking multiple pies, use the upper and lower oven racks and swap their positions midway through baking for even browning.
Timing Modifications: For multiple pies, the baking time per pie may increase slightly due to the oven being more full. Add 5-10 minutes to the original bake time and rely on the jiggle test for each individual pie. They may not all finish at the exact same moment.
Storage Considerations: Scaling up means you will have more leftovers. Ensure you have adequate refrigerator space for cooling and storing multiple pies. Consider freezing a portion of the baked pies immediately after cooling for longer-term storage.
Nutritional Deep Dive
Macro Breakdown: A serving of this creamy, crustless pumpkin pie provides a balance of carbohydrates, protein, and fat. The primary carbs come from the pumpkin and brown sugar, offering energy. The eggs and evaporated milk contribute quality protein, essential for the custard’s structure and for satiety. The fats, from the egg yolks and milk, carry flavor and create the rich, creamy mouthfeel. Omitting the butter-laden crust significantly reduces the overall saturated fat and calorie count compared to traditional pie.
Micronutrient Analysis: This dessert is a notable source of Vitamin A, thanks to the beta-carotene in pumpkin, which supports vision and immune health. It also provides calcium from the evaporated milk, along with smaller amounts of iron, potassium, and B vitamins from the eggs and pumpkin. The spices, while used in small quantities, contain antioxidants and anti-inflammatory compounds.
Health Benefits: Beyond vitamins, pumpkin is a good source of fiber, which aids digestion. The protein from eggs helps stabilize blood sugar compared to purely sugary desserts. Using spices like cinnamon has been associated with potential benefits for blood sugar regulation and antioxidant intake.
Dietary Considerations: This recipe is naturally gluten-free. It contains dairy (evaporated milk) and eggs, common allergens. The sugar content places it in the dessert category, so it should be enjoyed in moderation as part of a balanced diet.
Portion Analysis: One-eighth of a 9-inch pie is a standard serving. This portion provides satisfying flavor and richness without being overly large. For those monitoring intake, cutting the pie into 12 slices creates a smaller, more moderate dessert portion while still allowing everyone a taste.
Weight Management Tips: To enjoy this pie as part of a weight-conscious plan, focus on the portion size. Serve with a light dollop of whipped cream instead of a heavy scoop. You can also reduce the brown sugar by 2-3 tablespoons; the spices and pumpkin will still provide plenty of flavor.
Dietary Adaptations
Gluten-Free: This recipe is naturally gluten-free as written. Always check labels on canned pumpkin and evaporated milk to ensure no gluten-containing additives were used in processing, though this is extremely rare.
Dairy-Free: Substitute the evaporated milk with an equal amount of full-fat canned coconut milk. This swap adds a subtle coconut flavor that pairs wonderfully with pumpkin and spice. For a neutral flavor, use an unsweetened, creamy oat milk or cashew milk beverage, though the pie may be slightly less rich.
Vegan: Use the coconut milk substitution above. Replace the three large eggs with a flax egg mixture (3 tbsp ground flaxseed mixed with 9 tbsp water, let sit 10 mins) or a commercial vegan egg replacer equivalent to 3 eggs. The texture will be softer but still sliceable when well-chilled.
Low-Carb/Keto: Replace the brown sugar with a keto-friendly brown sugar substitute like Swerve Brown. Use extra eggs (4 or 5 total) to help the structure without the carbs from sugar. Substitute the evaporated milk with heavy cream or canned coconut cream. Note that pumpkin itself contains carbs, so portion size will be very small on a strict keto diet.
Paleo: Use coconut sugar instead of brown sugar, full-fat coconut milk instead of evaporated milk, and ensure all spices are pure. This adaptation makes the pie free of grains, refined sugar, and dairy, aligning with paleo guidelines.
Low-FODMAP: Pumpkin is low-FODMAP in servings of 1/3 cup or less. Ensure your serving size is within this limit. Use pure maple syrup instead of brown sugar, as it is low-FODMAP in moderate amounts. Lactose-free evaporated milk or coconut milk can be used. Spices are generally fine in typical culinary amounts.
Refined Sugar-Free: Substitute the brown sugar with an equal amount of pure maple syrup or coconut sugar. The flavor will be slightly different but still delicious. Reduce any other liquid in the recipe by a tablespoon if using a liquid sweetener.
Troubleshooting Guide
Texture is Watery or Doesn’t Set: This is usually caused by underbaking or excess moisture. Ensure you bake until the center jiggles uniformly, not sloshes. If using fresh pumpkin, drain it thoroughly. Next time, try adding one extra egg yolk for more binding power. A watery pie can still be enjoyed as a pudding.
Pie is Rubbery or Eggy: Overbaking is the culprit. The eggs have coagulated too tightly. Use an oven thermometer to verify your oven temperature isn’t running hot. Rely on the jiggle test and remember the pie sets further as it cools. The flavor is still good, but the texture is compromised.
Top Cracked Excessively: Cracking occurs from rapid temperature change or overbaking. Avoid opening the oven door frequently. Cool the pie gradually on a rack, not on a cold stovetop. Small cracks are normal for custards and can be covered with whipped cream. For a flawless top, use a water bath.
Filling Separated or Curdled: This can happen if ingredients were not properly blended or if the oven temperature was too high, causing the eggs to “break.” Always blend or whisk thoroughly until perfectly smooth. Ensure your oven is calibrated correctly. The pie is still safe to eat but the texture will be grainy.
Sticking to the Pan: Even without a crust, greasing the dish is essential. If it sticks, carefully run a thin, flexible silicone spatula or knife around the edge. Dip the bottom of the dish in hot water for 30 seconds to loosen the custard from the bottom.
Flavor is Bland: The spices may be old. Ground spices lose potency after about 6 months. Use fresh spices and consider toasting them. Also, ensure you are using enough salt—it enhances all the other flavors. A pinch more salt or a splash of vanilla extract can brighten a finished pie.
Recipe Success Stories
Community feedback on this creamy, crustless pumpkin pie has been overwhelmingly positive. Many home cooks report it has become their new go-to Thanksgiving dessert, especially for mixed-diet families. One reader shared, “My gluten-free mother-in-law actually cried when she realized she could eat the ‘real’ pie this year.” Stories like this highlight how a simple recipe can make celebrations more inclusive and joyful for everyone at the table.
Variation successes are frequently celebrated. A baker from Vermont successfully substituted maple syrup for all the brown sugar and reported a fantastic, deeply autumnal flavor. Another used the recipe as a base for mini pies baked in a muffin tin, perfect for her children’s school party. These adaptations show the recipe’s wonderful flexibility and how it inspires creativity in the kitchen.
Reader suggestions have also improved the recipe. Several recommended the water bath method for a crack-free surface
Print
Creamy, Crustless Pumpkin Pie
Description
A smooth, rich pumpkin pie without the fuss of a crust—perfect for a quick, gluten-free dessert.
Ingredients
For the Crust:
- 1 (15 oz) can pumpkin puree
- 1 (14 oz) can sweetened condensed milk
- 2 large eggs
- 1 teaspoon ground cinnamon
- 1/2 teaspoon ground ginger
- 1/4 teaspoon ground nutmeg
- 1/4 teaspoon salt
- 1 teaspoon vanilla extract
- Whipped cream for serving (optional)
Instructions
1. Prepare the Crust:
- Preheat oven to 425°F (220°C). Grease a 9-inch pie dish.
- In a large bowl, whisk together pumpkin puree, sweetened condensed milk, eggs, cinnamon, ginger, nutmeg, salt, and vanilla until smooth.
- Pour the mixture into the prepared pie dish and smooth the top.
- Bake for 15 minutes, then reduce oven temperature to 350°F (175°C) and bake for 30-35 minutes, or until the center is set.
- Let cool completely on a wire rack, then refrigerate for at least 2 hours before serving. Top with whipped cream if desired.
Notes
You can customize the seasonings to taste.
I’m Shaykee—born in Morocco, seasoned across continents. From airplane galleys to home kitchens, I share the flavors and stories that shaped my journey.