Chickpea & Feta Wrap with Veggies & Yogurt Sauce: Your Perfect Healthy Lunch Solution
This chickpea and feta wrap is the ultimate solution for anyone seeking a quick, nutritious, and delicious meal. Imagine creamy chickpeas, tangy feta cheese, and crisp vegetables all bundled in a soft tortilla with a zesty yogurt sauce. This wrap delivers a perfect balance of flavors and textures that will satisfy your hunger and delight your taste buds. Furthermore, it requires absolutely no cooking, making it an ideal choice for busy weekdays, hot summer afternoons, or whenever you need a refreshing, no-fuss lunch.
Moreover, this recipe is incredibly versatile and forgiving. You can easily customize the ingredients based on what you have in your refrigerator. The combination of protein-packed chickpeas and creamy feta creates a satisfying base, while the fresh vegetables add a wonderful crunch. The lemon-herb yogurt sauce ties everything together with a bright, tangy finish. Consequently, this wrap feels both indulgent and wholesome, proving that healthy eating does not have to be boring or complicated.
Ultimately, this chickpea and feta wrap is more than just a meal; it is a testament to simple, fresh ingredients coming together to create something truly special. It is perfect for a desk lunch, a picnic in the park, or a light dinner. Once you try this easy recipe, it will undoubtedly become a regular in your meal rotation. Get ready to enjoy a lunch that is both effortless and exceptionally tasty.
Quick Recipe Highlights
- Flavor Profile: This wrap features a vibrant combination of tangy feta cheese and earthy chickpeas, perfectly complemented by a zesty yogurt sauce with fresh lemon and herbs. The result is a savory, slightly salty, and refreshing taste experience that is incredibly moreish.
- Texture: You will enjoy a delightful contrast of creamy mashed chickpeas, soft feta crumbles, and the crisp, fresh snap of diced cucumbers and bell peppers. The soft tortilla wrap holds everything together, creating a satisfying and multi-textured bite every time.
- Aroma: The fresh aroma of chopped dill and a squeeze of lemon juice from the yogurt sauce is immediately inviting. Additionally, the earthy scent of the chickpeas mingles with the sharp, salty notes of the feta, creating a fresh and appetizing fragrance.
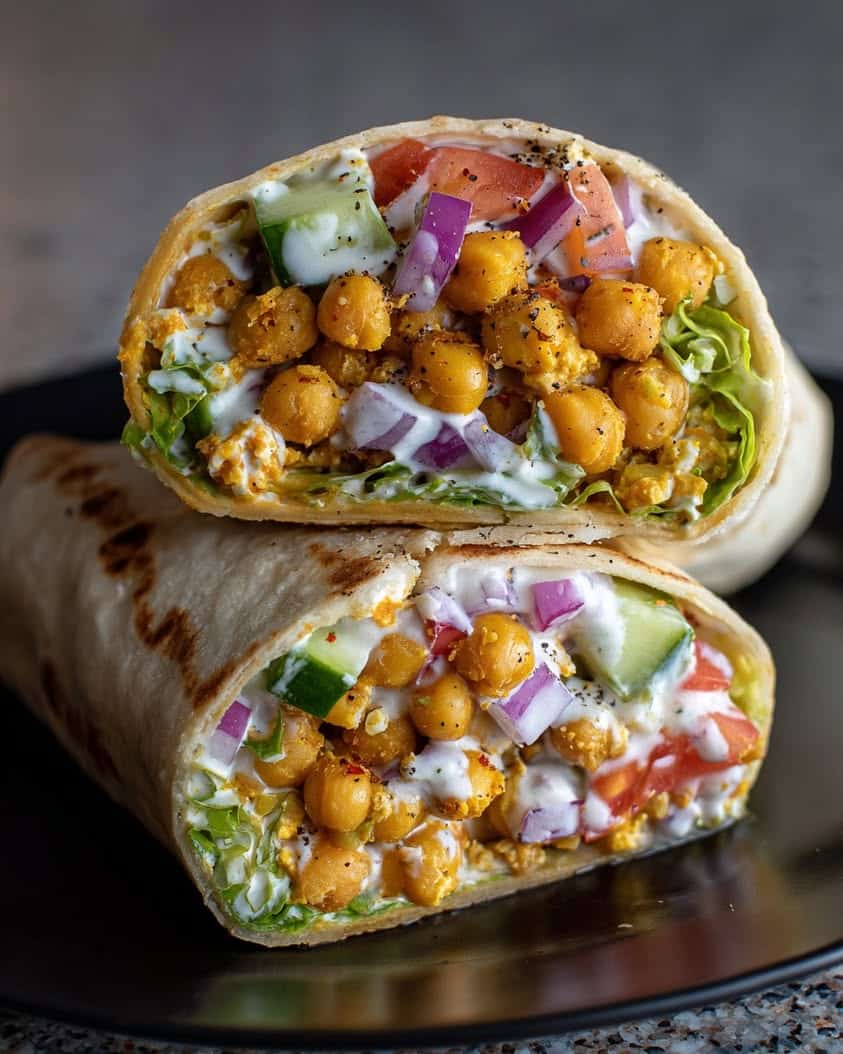
- Visual Appeal: This wrap is a feast for the eyes with its bright white feta, pale yellow chickpeas, and vibrant green and red vegetables. When sliced, the cross-section reveals a beautiful mosaic of colors and textures that looks professionally made.
- Skill Level Needed: This is a beginner-friendly recipe requiring zero cooking skills. The only techniques involved are simple mixing, mashing, and rolling. Therefore, it is perfect for kitchen novices or anyone needing a guaranteed-success meal.
- Special Equipment: You need only basic kitchen tools: a mixing bowl, a fork for mashing, and a knife for chopping. No blenders, food processors, or fancy gadgets are required, making this recipe highly accessible.
Recipe Overview
- Difficulty Level: We classify this chickpea and feta wrap as exceptionally easy because it involves no heat application or complex techniques. The steps are straightforward: chop, mix, and assemble. Consequently, it is virtually foolproof and suitable for all ages and skill levels, from children helping in the kitchen to adults after a long workday.
- Category: This recipe fits perfectly into several meal categories, including lunch, light dinner, and snack. It is also an excellent candidate for make-ahead meal prep, as the filling can be prepared days in advance. Furthermore, it serves as a fantastic vegetarian main course for any casual gathering.
- Cuisine: While wraps are a modern, global phenomenon, the flavors in this recipe are inspired by Mediterranean and Middle Eastern cuisines. The use of chickpeas, feta, yogurt, and fresh herbs like dill is classic to these regions. However, the presentation as a handheld wrap gives it a contemporary, fusion twist that appeals to a wide audience.
- Cost: This is an incredibly budget-friendly meal. Canned chickpeas, tortillas, and seasonal vegetables are all low-cost staples. Feta cheese and yogurt are also relatively inexpensive, especially when purchased in larger quantities. Overall, you can create a restaurant-quality, healthy lunch for a fraction of the cost of eating out.
- Season: This chickpea and feta wrap is truly a year-round recipe. It is particularly refreshing during the spring and summer months when you crave cool, no-cook meals. Conversely, during fall and winter, it provides a bright, vitamin-packed boost that contrasts with heavier seasonal comfort foods.
- Occasion: It is ideal for busy weekday lunches, leisurely weekend picnics, and post-workout refueling. Additionally, it makes a great party food; simply slice the wraps into pinwheels for an easy, crowd-pleasing appetizer that everyone can enjoy.
Why You’ll Love This Chickpea and Feta Wrap
First and foremost, the taste and texture appeal of this wrap is undeniable. The creamy, mashed chickpeas provide a hearty, satisfying base that contrasts beautifully with the salty, crumbly feta. Each bite also delivers a fresh crunch from the diced vegetables, while the zesty yogurt sauce adds a tangy, herbal moisture that binds everything together. This symphony of flavors and textures is both complex and comforting, making it a meal you will crave repeatedly. It is a far cry from a sad, soggy sandwich; this is a vibrant, exciting eating experience.
From a convenience standpoint, this recipe is a true lifesaver. Since there is no cooking involved, you can have a gourmet-quality lunch ready in about fifteen minutes. The assembly process is simple and meditative, making it a pleasant break in a hectic day. Moreover, the entire meal comes together in one bowl with minimal cleanup. This makes it perfect for those mornings when you are rushing out the door but still want to pack a nutritious homemade lunch. You can even assemble the filling the night before for an even faster grab-and-go option.
Nutritionally, this chickpea and feta wrap is a powerhouse. Chickpeas are an excellent source of plant-based protein and fiber, which promote satiety and stable energy levels. The fresh vegetables contribute essential vitamins and antioxidants, supporting overall health. Meanwhile, the yogurt sauce offers a dose of probiotics and protein. Feta cheese adds calcium and flavor without being overly heavy. This combination makes for a balanced meal that fuels your body without weighing you down, unlike many heavy, processed lunch alternatives.
For social and entertaining value, this wrap is incredibly versatile. It is easy to double or triple the recipe to feed a crowd, making it perfect for potlucks or casual parties. You can set up a “wrap bar” with the fillings and sauces separated, allowing guests to build their own creations. This interactive element is always a hit. Furthermore, because it is vegetarian, it caters to a wide range of dietary preferences, ensuring that everyone has a delicious option to enjoy.
Finally, the cost-effectiveness and accessibility of this recipe cannot be overstated. The ingredients are common, affordable, and available at nearly any grocery store. You are using simple, whole foods to create a meal that feels special and restaurant-worthy. Compared to buying a similar wrap from a cafe or deli, making it at home saves you a significant amount of money. This allows you to enjoy a healthy, delicious lunch regularly without straining your budget, proving that eating well does not have to be expensive.
Historical Background and Cultural Significance
The story of the chickpea and feta wrap is a modern tale of global culinary fusion. While the wrap format is a relatively recent invention, popularized in Western fast-casual cuisine, its core ingredients have deep, ancient roots. Chickpeas, for instance, are one of the earliest cultivated legumes, with origins dating back over 7,000 years to the Middle East. They have been a staple food across the Mediterranean, India, and the Middle East for millennia, valued for their nutrition, versatility, and long shelf life. The humble chickpea is the foundation upon which this contemporary recipe is built.
Culturally, feta cheese is the star of Greek cuisine and holds a Protected Designation of Origin status in the European Union. Traditionally made from sheep’s milk or a blend with goat’s milk, feta has been produced in Greece for centuries. Its briny, tangy flavor and crumbly texture are iconic. Similarly, yogurt-based sauces, often flavored with garlic, lemon, and herbs like dill, are prevalent in Turkish and Levantine cooking, known as cacık or tzatziki. These elements combine to give the wrap its distinct Mediterranean character.
The evolution of this recipe mirrors the way we eat today. The concept of a handheld, portable meal wrapped in flatbread is ancient, seen in dishes like the Mexican burrito or the Middle Eastern shawarma. However, the specific combination of chickpeas, feta, and a yogurt sauce in a tortilla is a product of modern health-conscious and fusion food trends. It represents a desire for meals that are simultaneously convenient, nutritious, and globally inspired. This wrap is a perfect example of how traditional flavors can be repackaged for a contemporary lifestyle.
Regional variations of this concept are endless. In the Middle East, you might find a similar filling in a pita pocket. In Greece, these ingredients could be served as a salad. The tortilla wrap itself is a nod to the Americas. This fluidity and adaptability are what make the recipe so enduring and popular. It is not bound by strict tradition but is instead a celebration of delicious ingredients from different cultures coming together in a harmonious and practical way.
Ingredient Deep Dive
Chickpeas: Also known as garbanzo beans, chickpeas are a culinary cornerstone across the globe. Historically, they were first cultivated in the Levant and have been a vital source of nutrition for ancient civilizations. Nutritionally, they are a powerhouse, packed with plant-based protein, dietary fiber, complex carbohydrates, and essential minerals like iron, magnesium, and folate. When selecting canned chickpeas, look for brands with low sodium and no added preservatives. For storage, drain and rinse them thoroughly, then keep any leftovers in an airtight container in the refrigerator for up to three days. As a substitution, you can use canned white beans or even lentils for a similar texture and protein content.
Feta Cheese: Feta is a brined curd cheese with a history deeply intertwined with Greek culture. Its name literally means “slice,” and its production methods are protected by law. This cheese provides a significant source of calcium, phosphorus, and protein, along with beneficial fatty acids. Choose a block of feta stored in brine for the best flavor and texture, as pre-crumbled feta often contains anti-caking agents. Store leftover feta in its brine in the refrigerator. For a dairy-free version, you can substitute with firm, marinated tofu or a vegan feta alternative made from almonds or coconut oil.
Greek Yogurt: Greek yogurt is strained to remove whey, resulting in a thicker, creamier product with more protein than regular yogurt. It has been a staple in Balkan and Middle Eastern diets for centuries. It is rich in probiotics for gut health, calcium for bones, and protein for muscle repair. Opt for plain, full-fat or 2% Greek yogurt for the creamiest sauce; non-fat versions can be watery. Always check that it is plain, as flavored yogurts will alter the taste of your sauce. Store it in its original container in the fridge. For a dairy-free sauce, unsweetened coconut or soy yogurt are excellent alternatives.
Fresh Dill: Dill has been used both as a culinary herb and a medicine since ancient times in Europe and Asia. It offers a bright, slightly anise-like flavor that is quintessential in many Eastern European and Scandinavian dishes. It contains small amounts of vitamins A and C, and its essential oils may have antioxidant properties. Select bunches with vibrant green, feathery fronds and avoid any that are wilted or yellowing. To store, wrap the stems in a damp paper towel and place them in a plastic bag in the refrigerator. If you cannot find fresh dill, fresh parsley, mint, or even a teaspoon of dried dill weed can be used in a pinch.
Common Mistakes to Avoid
- Not Draining and Rinsing Chickpeas: Forgetting to rinse canned chickpeas will leave a starchy, sometimes metallic-tasting liquid on them. This can make your filling gloopy and negatively impact the overall flavor. Always drain them in a colander and rinse thoroughly under cold water until it runs clear.
- Over-mashing the Chickpeas: While you want a creamy base, completely pulverizing the chickpeas creates a pasty texture. You should aim for a rough mash where some whole chickpeas remain for a more interesting mouthfeel. Use a fork or potato masher and stop when the mixture just holds together.
- Using Watery Vegetables: Vegetables like cucumbers and tomatoes release a lot of water. If you do not seed and dice them properly, this moisture will make your wrap soggy, especially if you plan to store it. Always remove the seeds from cucumbers and pat diced vegetables dry with a paper towel.
- Skimping on Seasoning: Chickpeas and yogurt are fairly neutral canvases. Failing to season the filling and sauce adequately will result in a bland wrap. Be generous with salt, pepper, and lemon juice. Taste the mixture as you go and adjust the seasoning to your preference.
- Overfilling the Tortilla: It is tempting to pack in as much filling as possible, but this is a recipe for disaster. An overstuffed wrap is difficult to roll and will likely burst open with the first bite. Use a moderate amount of filling, leaving a clear border around the edges for a secure seal.
- Using Cold, Stiff Tortillas: Straight-from-the-fridge tortillas are often stiff and prone to cracking when you try to roll them. Briefly warming your tortilla in a dry skillet or for a few seconds in the microwave makes it pliable and much easier to work with without tearing.
- Neglecting the Sauce Seal: When assembling, spread a thin layer of the yogurt sauce directly onto the tortilla before adding the chickpea filling. This creates a “glue” that helps the final roll hold its shape and prevents the filling from sliding out.
- Rolling Incorrectly: Do not just fold the sides and roll. For a tight, secure wrap, fold the bottom flap up over the filling, then fold in the sides snugly before rolling it away from you tightly. This burrito-style method ensures a neat, contained package.
Essential Techniques
Mashing Chickpeas: Properly mashing the chickpeas is crucial for the texture and structural integrity of your wrap. You want to achieve a consistency that is cohesive enough to hold together but still has some texture. Using a fork or potato masher, press down on the chickpeas until about two-thirds are broken down. The remaining whole chickpeas will provide pleasant bursts of texture. A common pitfall is using a food processor, which can quickly turn the mixture into a hummus-like paste that is too smooth and wet. The visual cue for success is a mixture that clumps together when pressed but still shows distinct pieces of chickpea.
Creating an Emulsified Sauce: A smooth, well-combined yogurt sauce is key to a unified flavor profile. The technique involves thoroughly whisking the yogurt with lemon juice and olive oil until the sauce is homogenous and slightly creamy. This emulsification ensures the oil is incorporated and won’t separate. Why is this important? A broken sauce will have pockets of sharp lemon or oily residue. To master it, start by whisking the yogurt alone to loosen it, then slowly stream in the lemon juice while whisking constantly. Finally, add the olive oil and herbs. The sauce should be smooth, pale, and able to coat the back of a spoon.
The Tight Wrap Roll: Rolling a tight, secure wrap is the final essential technique to prevent a messy eating experience. First, warm your tortilla to make it pliable. Place your filling in the lower third of the tortilla, leaving a two-inch border at the bottom. Fold that bottom edge up and over the filling, tucking it in snugly. Then, fold the left and right sides inward toward the center. Finally, using your fingers to hold the folds in place, roll the wrap firmly away from you until it is completely sealed. The common pitfall is rolling too loosely. A successful roll will feel firm and hold its shape without any filling spilling out the ends.
Pro Tips for Perfect Chickpea and Feta Wraps
Toast Your Spices: For a deeper, more complex flavor, gently toast any dried spices like cumin or oregano in a dry pan for 30-60 seconds before adding them to the chickpea mixture. This simple step unlocks their essential oils and dramatically enhances the overall taste of the filling.
Let the Filling Rest: After you mix the chickpea filling, let it sit in the refrigerator for at least 15 minutes. This allows the flavors to meld together and the chickpeas to absorb the seasonings. Consequently, your wrap will taste more cohesive and flavorful than one assembled immediately.
Add a Leafy Barrier: Place a large, sturdy lettuce leaf or a handful of spinach directly onto the tortilla before adding the chickpea filling. This creates a moisture barrier that helps prevent the tortilla from becoming soggy, especially if you are making the wrap several hours in advance.
Press Your Wrap: If you have time, wrap your finished creation tightly in parchment paper or foil and let it rest for a few minutes, seam-side down. This brief resting period allows the wrap to “set,” making it easier to slice cleanly in half without everything falling out.
Customize Your Crunch: While cucumbers and bell peppers are standard, feel free to experiment with other crunchy elements. Thinly sliced radishes, jicama, or even apple can add a surprising and delightful crunch and a touch of sweetness that pairs wonderfully with the salty feta.
Acidity is Key: Do not underestimate the power of the lemon juice. It brightens the entire dish and cuts through the richness of the feta and yogurt. Always use fresh lemon juice rather than bottled for the best, most vibrant flavor. Taste your sauce and filling and add more lemon if it tastes flat.
Variations and Adaptations
Regional Variations: You can easily take this wrap on a world tour by switching up the flavors. For a Mexican-inspired version, use black beans instead of chickpeas, add corn and avocado, and swap the yogurt sauce for a lime-cilantro crema. For a Middle Eastern twist, add a spoonful of tahini to the yogurt sauce and include ingredients like chopped Kalamata olives and sumac. An Indian-style wrap could feature chickpeas mashed with curry powder, mango chutney, and a raita-style yogurt sauce with mint and cucumber.
Seasonal Adaptations: Embrace the produce of each season. In the spring, add fresh peas and asparagus tips. Summer calls for ripe cherry tomatoes and fresh basil. For autumn, incorporate roasted sweet potato cubes and a sprinkle of smoked paprika. During winter, use heartier vegetables like shredded Brussels sprouts or kale, massaged with a little lemon juice to soften them.
Dietary Modifications: This recipe is naturally vegetarian, but it is simple to make vegan by omitting the feta and using a dairy-free yogurt. For a gluten-free wrap, use your favorite gluten-free tortilla or large lettuce leaves like romaine or collard greens as the wrapper. To lower the carbohydrates, serve the filling as a salad in a bowl, omitting the tortilla entirely.
Flavor Variations: The basic formula is a perfect canvas for experimentation. Add heat with a dash of hot sauce, sriracha, or chopped jalapeños. Introduce sweetness with a handful of dried cranberries or raisins. For an umami boost, mix in a tablespoon of sun-dried tomato paste or capers. Smoked feta cheese can also add a wonderful depth of flavor.
Texture Modifications: If you prefer a different texture profile, consider toasting the chickpeas with spices for a crispy element before adding them to the wrap. You can also use quinoa or couscous as a base mixed with the chickpeas for a grain-based filling. Adding toasted nuts like pine nuts or slivered almonds will provide a satisfying crunch.
Presentation Alternatives: Instead of a large wrap, you can make mini pinwheels for a party appetizer. Simply spread the filling on a tortilla, roll it up very tightly, and slice it into one-inch pieces. For a deconstructed approach, serve the chickpea filling in a bowl topped with the vegetables, crumbled feta, and a drizzle of the sauce, with tortilla wedges on the side for dipping.
Serving and Presentation Guide
Plating Techniques: For the most appealing presentation, slice your wrap cleanly in half on a sharp diagonal. Arrange the two halves on a plate with the cut sides facing up to showcase the colorful interior. You can fan them out slightly or place them side-by-side. For a more rustic look, wrap the bottom half in a piece of parchment paper or a branded deli paper, which also makes it easier to handle and keeps the plate clean.
Garnishing Ideas: A simple garnish elevates the wrap from homemade to professional. Drizzle a little extra yogurt sauce over the plate in a zigzag pattern. Sprinkle the plate with a few extra fresh dill fronds, a pinch of paprika, or some microgreens. A wedge of lemon on the side not only looks nice but also allows diners to add an extra fresh squeeze if desired.
Traditional Accompaniments: In the Mediterranean spirit, classic side dishes pair beautifully with this wrap. A simple side salad of mixed greens with a lemon vinaigrette is a natural fit. A small bowl of olives, marinated artichoke hearts, or roasted peppers also complements the flavors perfectly. For a heartier meal, a cup of lentil soup or avgolemono (Greek lemon chicken soup) would be delightful.
Modern Serving Suggestions: For a contemporary lunch board, deconstruct the wrap. Serve the chickpea filling in a small bowl, the vegetables in another, and the sauce in a third, with warm tortillas and lettuce cups on the side, allowing everyone to build their own. This is especially fun for families or casual gatherings. Pair it with baked sweet potato fries or a quinoa salad for a modern, healthy meal.
Temperature Considerations: This wrap is best served cold or at room temperature. Avoid leaving it in direct sunlight or a warm environment for too long, as the yogurt sauce can spoil. If you are serving it outdoors, keep it in a cooler or an insulated lunch bag until ready to eat to maintain food safety and optimal texture.
Portion Control Tips: One wrap makes a satisfying single serving for lunch. If you are serving it as part of a larger spread or as an appetizer, consider making smaller, slider-sized wraps. For those watching their calorie intake, you can use a low-carb tortilla and increase the ratio of vegetables to chickpeas and feta in the filling.
Wine and Beverage Pairing
Wine Pairings: The bright, tangy flavors of this wrap call for wines with good acidity. A crisp, dry Greek white wine like Assyrtiko is a fantastic regional pairing that complements the feta and lemon notes beautifully. Alternatively, a New Zealand Sauvignon Blanc with its citrus and herbaceous character will mirror the flavors in the yogurt sauce. For a rosé option, choose a dry Provencal rosé that is light and refreshing without being sweet, which would clash with the savory elements.
Non-Alcoholic Alternatives: Sparkling water with a squeeze of lemon or lime is a simple and cleansing choice. For something more crafted, an iced herbal tea like mint or lemon verbena is wonderfully refreshing. A cucumber-mint spa water or a ginger-lemonade would also pair excellently, enhancing the fresh, vibrant qualities of the meal without overpowering it.
Coffee and Tea Pairings: While not a traditional pairing for lunch, if you are enjoying this wrap for a brunch or late meal, a light roast coffee with bright, citrusy notes would be complementary. For tea, a green tea like Sencha or a Moroccan mint tea would be lovely. The clean, slightly astringent finish of these teas helps cleanse the palate between bites of the creamy filling.
Temperature Considerations: All beverages served with this cold wrap should be well-chilled. Iced teas, cold white wines, and sparkling waters are ideal. Serving drinks at the proper temperature ensures they refresh the palate and enhance the dining experience, rather than feeling heavy or warming.
Serving Suggestions: Present your chosen beverage in a tall, elegant glass with plenty of ice. A slice of lemon or a sprig of fresh mint as a garnish ties the drink visually to the food. If serving wine, a standard white wine glass is perfect as it allows the aromas to concentrate, amplifying the pairing experience.
Storage and Shelf Life
Storage Methods: The best way to store an assembled wrap is to wrap it tightly in parchment paper and then in plastic wrap or aluminum foil, or place it in a reusable, airtight container. The parchment paper helps absorb excess moisture and prevents the tortilla from becoming gummy. Always store the wrap in the refrigerator, never at room temperature, due to the dairy-based sauce.
Temperature Requirements: This wrap must be kept refrigerated at or below 40°F (4°C). It is not suitable for leaving out on a counter for extended periods. If you are packing it for lunch, use an insulated lunch bag with a cold pack to maintain a safe temperature until you are ready to eat.
Container Recommendations: A rectangular glass or BPA-free plastic container that fits the wrap snugly without crushing it is ideal. This prevents it from rolling around and getting damaged. If you are prepping multiple wraps for the week, you can store the components separately: the chickpea filling, the chopped veggies, and the sauce in their own small containers.
Signs of Spoilage: Discard the wrap if you notice any off smells, such as a sour or unpleasant odor. Visible mold is an obvious sign of spoilage. If the texture of the yogurt sauce becomes watery and separated beyond normal, or if the vegetables become excessively slimy, it is time to throw it out. When in doubt, remember the adage: when in doubt, throw it out.
Reheating Instructions: This wrap is designed to be eaten cold and is not recommended for reheating. Reheating would wilt the fresh vegetables, melt the feta into an oily mess, and likely cause the wrap to become soggy and unappetizing. Enjoy it straight from the refrigerator for the best texture and flavor.
Freezing Guidelines: Freezing is not recommended for the assembled wrap. The high water content in the vegetables and yogurt sauce will form ice crystals, and upon thawing, the wrap will become extremely soggy and watery. The texture of the tortilla will also become rubbery and unpalatable. It is best enjoyed fresh or refrigerated for a short period.
Make Ahead Strategies
Prep Timeline: You can efficiently prepare this recipe in stages. The chickpea filling and yogurt sauce can be made up to 3 days in advance and stored separately in airtight containers in the refrigerator. The vegetables can be washed and chopped 1-2 days ahead. However, for the best texture, assemble the wraps no more than a few hours before you plan to eat them to prevent sogginess.
Storage Between Steps: Store the chickpea filling in a sealed container; its flavor often improves after a day. Keep the yogurt sauce in its own container with a layer of plastic wrap directly on the surface to prevent a skin from forming. Store pre-chopped vegetables in a separate container lined with a paper towel to absorb excess moisture.
Quality Impact Assessment: Making the components ahead has a positive impact on flavor, as it allows the chickpeas to marinate in the lemon and herbs. The primary risk is textural: the vegetables may lose a slight bit of crunch over time, and the assembled wrap can become soft if made too far in advance. The trade-off for convenience is often worth it for the enhanced flavor.
Assembly Tips: When you are ready to assemble, give the filling and sauce a quick stir. If the filling seems dry, add a teaspoon of water or extra lemon juice to loosen it. Warm your tortillas briefly to make them pliable. Assemble the wraps just before you need them, or if for meal prep, use the “leafy barrier” tip with lettuce to maintain the tortilla’s integrity.
Fresh Element Additions: If you are making the filling days ahead, consider adding certain ingredients only at the last minute for maximum freshness and crunch. For instance, you could mix the base chickpea mash ahead of time and fold in the diced cucumbers and bell peppers right before assembling the wrap. This guarantees the perfect crisp texture in every bite.
Scaling Instructions
Halving the Recipe: Halving this recipe is straightforward. Simply use half a can of chickpeas, 2 ounces of feta, and proportionally reduce all other ingredients. The method remains exactly the same. This is perfect for a single serving or a light lunch for two. You may find it easier to mash the smaller quantity of chickpeas with a fork in a bowl rather than trying to use a larger masher.
Doubling or Tripling: This recipe scales up beautifully for a crowd. Double or triple all ingredients uniformly. Use a larger mixing bowl to comfortably combine the increased volume of chickpea filling. When making a large batch of the yogurt sauce, whisk it in a separate bowl to ensure it is perfectly emulsified before combining it with the other components. This is an excellent option for party platters or family meals.
Equipment Adjustments: The only equipment adjustment needed when scaling up is the size of your mixing bowl. For a double batch, a medium-sized bowl is sufficient. For tripling or more, use a large salad bowl. You do not need any special tools; the same fork or potato masher will work, it will just take a few extra minutes to mash the larger quantity of chickpeas.
Timing Modifications: The prep time will increase slightly when scaling up, but not linearly. Chopping a larger quantity of vegetables will take a few more minutes, and mashing more chickpeas will add a bit of time. However, the process remains efficient. For a double batch, expect to add only 5-7 extra minutes to your prep time.
Storage Considerations: When making a large batch, it is even more crucial to store the components separately if you do not plan to serve them all at once. Store the bulk of the chickpea filling and sauce in large containers, and only assemble the number of wraps you need immediately. This prevents the tortillas from becoming soggy in the refrigerator and allows you to enjoy fresh wraps over several days.
Nutritional Deep Dive
Macro Breakdown: One serving of this chickpea and feta wrap provides a well-balanced macronutrient profile. The chickpeas and whole-wheat tortilla contribute complex carbohydrates for sustained energy. Chickpeas and Greek yogurt are excellent sources of protein, essential for muscle repair and satiety. The feta cheese and olive oil provide healthy fats, which aid in nutrient absorption and help you feel full. This balance prevents the blood sugar spikes and crashes associated with carbohydrate-heavy lunches.
Micronutrient Analysis: This meal is rich in essential vitamins and minerals. Chickpeas are a great source of iron, magnesium, and B vitamins. The fresh vegetables, particularly bell peppers and cucumbers, are loaded with Vitamin C, which boosts immunity and aids iron absorption. Feta cheese provides a significant amount of calcium and phosphorus for bone health. The fresh dill and lemon juice also contribute small amounts of antioxidants and phytonutrients that support overall wellness.
Health Benefits: The combination of high fiber from the chickpeas and vegetables and protein from the chickpeas, yogurt, and feta promotes digestive health and keeps you feeling full for hours. This can aid in weight management by reducing the need for snacking. The probiotics in the yogurt support a healthy gut microbiome, which is linked to improved immunity and mood. The monounsaturated fats from the olive oil are heart-healthy and anti-inflammatory.
Dietary Considerations: This wrap is naturally vegetarian. For those on a gluten-free diet, simply use a GF tortilla. It can be modified to be vegan as noted earlier. The recipe is relatively low in sugar, with the only natural sugars coming from the vegetables. For those watching their sodium intake, you can use low-sodium canned chickpeas and reduce the amount of feta cheese.
Portion Analysis: One wrap constitutes a satisfying and complete lunch portion. The caloric density is moderate, making it an excellent choice for a main meal. If you are looking to reduce calories, you can use a low-carb tortilla, increase the vegetable-to-chickpea ratio, or use a light feta cheese. Conversely, for a more calorie-dense meal for active individuals, adding a quarter of an avocado is a perfect way to include healthy fats and extra calories.
Dietary Adaptations
Gluten-Free: Adapting this recipe for a gluten-free diet is incredibly simple. The only ingredient that contains gluten is the standard tortilla. Substitute it with
Print
Chickpea & Feta Wrap with Veggies & Yogurt Sauce
Description
A quick and flavorful Mediterranean-inspired wrap filled with spiced chickpeas, crisp vegetables, tangy feta, and a creamy yogurt sauce.
Ingredients
For the Crust:
- 1 can (15 oz) chickpeas, drained and rinsed
- 1/2 cup crumbled feta cheese
- 1/2 cup plain Greek yogurt
- 1 tablespoon lemon juice
- 1 teaspoon dried oregano
- 1/2 teaspoon garlic powder
- 1/4 teaspoon smoked paprika
- Salt and black pepper to taste
- 4 large whole wheat tortillas
- 1 cup shredded lettuce
- 1/2 cup diced cucumber
- 1/2 cup diced tomatoes
- 1/4 cup sliced red onion
Instructions
1. Prepare the Crust:
- In a medium bowl, combine chickpeas, oregano, garlic powder, smoked paprika, salt, and pepper. Mash lightly with a fork.
- In a small bowl, mix Greek yogurt, lemon juice, and a pinch of salt to make the yogurt sauce.
- Warm the tortillas slightly in a dry skillet or microwave.
- Spread a spoonful of yogurt sauce onto each tortilla. Top with the seasoned chickpeas, feta, lettuce, cucumber, tomatoes, and red onion.
- Fold the sides of the tortilla inward, then roll tightly to form a wrap. Serve immediately or wrap in foil for later.
Notes
You can customize the seasonings to taste.
I’m Shaykee—born in Morocco, seasoned across continents. From airplane galleys to home kitchens, I share the flavors and stories that shaped my journey.