The Edible Ornament Bomb: A Show-Stopping Holiday Dessert Centerpiece
Creating a stunning holiday dessert centerpiece just got incredibly simple with this edible ornament bomb. This festive no-bake treat combines the joyful spirit of Christmas with the irresistible allure of cookies and chocolate. Imagine the delight on your guests’ faces when you present this beautiful, glittering sphere that looks almost too good to eat. Furthermore, it serves as a fantastic conversation starter for any holiday gathering.
The beauty of this edible ornament bomb lies in its versatility and ease of preparation. You can customize it with your favorite cookies and candies while maintaining that professional, polished look. As a result, even novice bakers can achieve spectacular results that will impress family and friends. This dessert truly captures the magic of the season in every delicious bite.
Moreover, this Christmas dessert requires minimal effort for maximum impact. The process involves simple assembly rather than complex baking techniques. Consequently, you can focus on enjoying the holiday festivities instead of stressing in the kitchen. This edible ornament bomb guarantees a memorable addition to your Christmas table that everyone will adore.
Quick Recipe Highlights
- Flavor Profile: This edible ornament bomb delivers a rich chocolate experience balanced with sweet cookie crunch. The white chocolate coating provides a creamy contrast to the textured interior. Additionally, festive sprinkles add bursts of color and subtle sweetness.
- Texture: Experience a delightful combination of crispy cookie pieces and smooth, creamy chocolate binding. The outer shell gives way to a satisfyingly crunchy interior. Meanwhile, the decorative elements add visual and textural interest.
- Aroma: The scent of melting chocolate and vanilla fills your kitchen with holiday warmth. As the chocolate sets, it releases its characteristic rich fragrance. Consequently, your home will smell like a festive bakery.
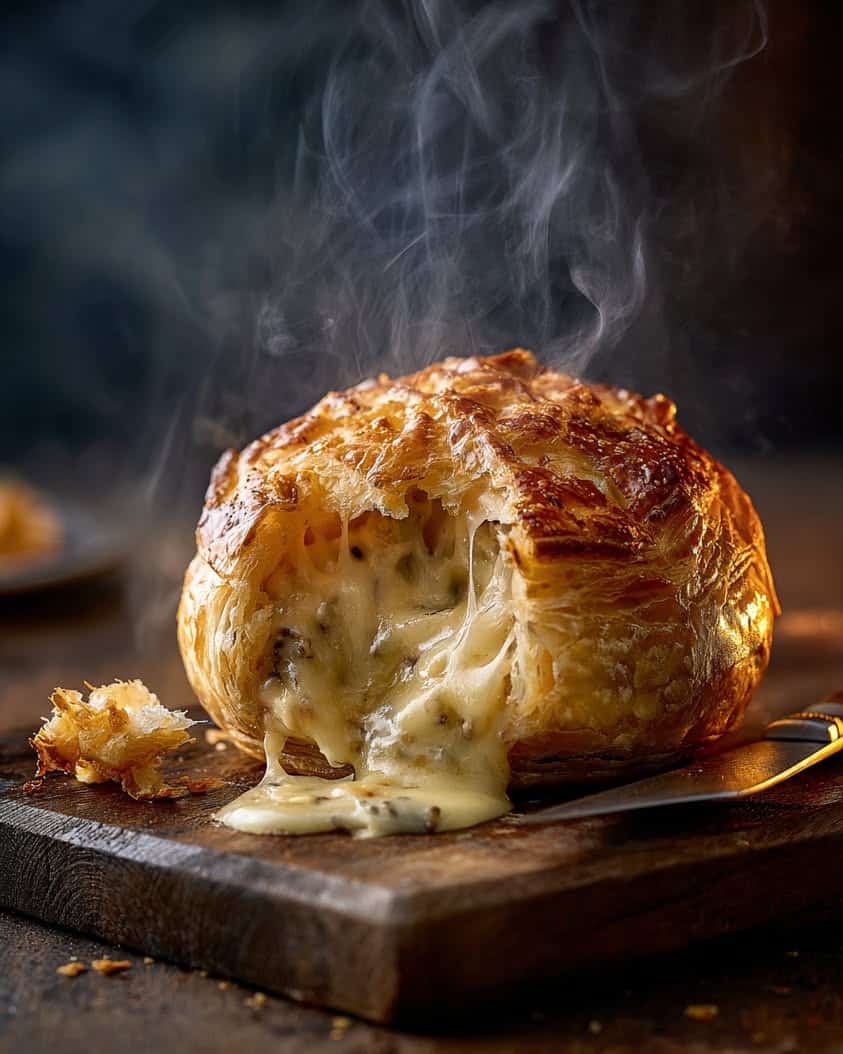
- Visual Appeal: This stunning sphere resembles a classic Christmas ornament with its smooth surface and colorful decorations. The glittery sprinkles catch the light beautifully. Therefore, it makes an impressive centerpiece for any holiday table.
- Skill Level Needed: This recipe requires basic kitchen skills and no special baking expertise. The techniques involve simple melting and assembling processes. Accordingly, even children can help with the decoration stage.
- Special Equipment: You will need a medium-sized balloon and a heatproof bowl for melting chocolate. Additionally, parchment paper and a baking sheet ensure easy cleanup. Otherwise, standard kitchen utensils work perfectly.
Recipe Overview
- Difficulty Level: This edible ornament bomb ranks as easy because it involves straightforward assembly rather than complex techniques. The most challenging aspect involves carefully coating the balloon with chocolate. However, with patience and the right temperature chocolate, anyone can achieve success.
- Category: This creation falls squarely into the dessert category, perfect for holiday celebrations and special occasions. It also works wonderfully as a edible craft project. Furthermore, it serves as an impressive party centerpiece.
- Cuisine: While not tied to a specific cultural tradition, this dessert draws inspiration from modern holiday baking trends. It incorporates universal favorite flavors like chocolate and cookies. Consequently, it appeals to diverse palates and age groups.
- Cost: This festive treat proves remarkably budget-friendly since it uses simple, accessible ingredients. The chocolate and cookies represent the main expenses. Meanwhile, decorations can be customized based on what you have available.
- Season: This edible ornament bomb shines brightest during the winter holiday season, particularly Christmas. The festive appearance and flavors evoke traditional celebrations. However, you could adapt the colors for other occasions throughout the year.
- Occasion: Perfect for Christmas dinners, holiday parties, cookie exchanges, and family gatherings. It also makes a wonderful edible gift for neighbors and friends. Additionally, it adds magic to Christmas Eve celebrations.
Why You’ll Love This Edible Ornament Bomb
First and foremost, this edible ornament bomb delivers spectacular visual impact with surprisingly minimal effort. The gorgeous spherical shape and festive decorations create instant holiday cheer on any dessert table. Moreover, the combination of textures and flavors satisfies both children and adults alike. The crisp cookie pieces suspended in smooth chocolate provide a delightful eating experience that keeps people coming back for more.
From a practical perspective, this Christmas dessert requires no baking and very little active kitchen time. You can prepare it during naptime or after the kids go to bed. Consequently, it fits perfectly into busy holiday schedules. The make-ahead nature means one less thing to worry about when guests arrive.
Nutritionally speaking, while this is definitely a treat, you can control the ingredients to some extent. Using quality dark chocolate adds antioxidants, and you can incorporate whole-grain cookies for added fiber. Additionally, portion control comes naturally since you break pieces from the larger sphere.
Socially, this edible ornament bomb becomes the star of any holiday gathering. The dramatic presentation encourages sharing and conversation. Furthermore, the process of breaking into the chocolate sphere creates a fun, interactive dessert experience that guests will remember long after the holidays.
Economically, this dessert proves far more affordable than store-bought specialty holiday treats. You likely have many ingredients already in your pantry. Therefore, you can create an impressive centerpiece without the premium price tag of bakery items.
Historical Background and Cultural Significance
The concept of edible decorations has deep roots in holiday traditions across cultures. For centuries, people have incorporated food into their festive decorations, from gingerbread houses to cookie ornaments. This edible ornament bomb represents a modern evolution of this tradition, combining the visual appeal of Christmas ornaments with the pleasure of dessert. The spherical shape directly references classic Christmas tree decorations that have been part of Western holiday traditions since the 19th century.
Culturally, Christmas desserts often feature symbolic shapes and festive presentations. The ornament shape connects directly to tree decorating rituals that families enjoy together. This edible version extends that tradition to the dessert table, creating continuity throughout holiday celebrations. The breaking of the sphere mirrors other holiday food traditions like breaking bread or sharing a festive pudding.
The evolution of this recipe reflects broader trends in modern dessert presentation. As social media has influenced food aesthetics, home cooks seek impressive-looking desserts that are achievable without professional training. This edible ornament bomb perfectly meets that demand by transforming simple ingredients into a spectacular presentation. The technique of using balloons as molds has become increasingly popular in recent years for creating perfect spherical desserts.
Regional variations might include different cookie types based on local traditions. For example, German bakers might incorporate lebkuchen, while Italian cooks could use panettone pieces. The basic concept remains adaptable across cultural holiday traditions. This flexibility ensures the recipe can be personalized while maintaining its essential festive character.
Ingredient Deep Dive
Chocolate forms the foundation of this edible ornament bomb, both structurally and flavor-wise. Chocolate has a rich history dating back to ancient Mesoamerican civilizations, where it was consumed as a bitter beverage. European adaptation added sweetness, transforming it into the treat we know today. Nutritionally, quality dark chocolate contains flavonoids with antioxidant properties and may support heart health.
When selecting chocolate for this project, choose high-quality baking chocolate or chocolate chips specifically designed for melting. Avoid chocolate chips meant for cookies, as they contain stabilizers that can affect melting consistency. Store chocolate in a cool, dark place away from strong odors. If your chocolate develops bloom (white streaks), it’s still safe to eat but may not melt as smoothly.
Cookies provide the textural contrast and additional flavor dimensions in this edible ornament bomb. The history of cookies traces back to 7th century Persia, with Christmas cookies becoming particularly popular in Europe during the Renaissance. Nutritionally, cookies contribute carbohydrates for energy, and you can choose varieties with nuts for added protein or whole grains for fiber.
Select cookies that maintain some crunch even when mixed with chocolate. Traditional shortbread, biscotti, or crisp butter cookies work beautifully. Avoid overly soft or cake-like cookies that might become soggy. Store cookies in airtight containers until ready to use. For substitutions, gluten-free cookies work equally well, provided they have the necessary structural integrity.
The decorative elements, while seemingly minor, contribute significantly to the visual appeal. Sprinkles and edible glitter have their origins in traditional confectionery decoration techniques dating back centuries. These elements add festive color and subtle textural variation without overwhelming the primary flavors.
Choose decorations that complement your overall color scheme. Edible glitter provides that magical shimmer, while sprinkles add pops of color. Store decorations in a cool, dry place to prevent clumping. For natural alternatives, consider crushed freeze-dried berries or finely chopped nuts for color and texture.
Common Mistakes to Avoid
- Using chocolate that is too hot when coating the balloon will cause the balloon to pop. Always test chocolate temperature on the outside of the balloon first. Furthermore, ensure the chocolate has cooled slightly but remains fluid.
- Overfilling the balloon creates an unstable base that may tip during setting. Fill balloons to a moderate size for best results. Additionally, place them in cups or bowls for support while the chocolate sets.
- Rushing the setting process by placing chocolate in the refrigerator can cause condensation. This moisture makes the chocolate sticky and affects the finish. Instead, allow chocolate to set at cool room temperature.
- Not crushing cookies sufficiently results in pieces that are too large to suspend properly in chocolate. Aim for pea-sized pieces for ideal distribution. However, avoid turning them into fine crumbs, which lose textural appeal.
- Applying decorations after the chocolate has fully set causes them to not adhere properly. Sprinkle decorations while the chocolate is still tacky. Consequently, they will embed securely in the surface.
- Removing the balloon too aggressively can crack the chocolate sphere. Gently deflate the balloon and peel it away slowly. If resistance occurs, use a sharp knife to carefully separate any stuck areas.
- Using low-quality chocolate that doesn’t temper properly results in a soft, messy final product. Invest in good quality chocolate specifically meant for melting. This ensures a crisp, professional-looking shell.
- Neglecting to line your work surface makes cleanup difficult and can damage the finished ornament. Always use parchment paper or a silicone mat. This also prevents the chocolate from sticking to surfaces.
Essential Techniques
Melting chocolate properly forms the foundation of this edible ornament bomb success. Use a double boiler or microwave at reduced power, stirring frequently to ensure even heating. Chocolate burns easily, so maintain gentle, indirect heat throughout the process. The ideal melted chocolate should be smooth, glossy, and fluid without being excessively hot. If chocolate seizes or becomes grainy, add a small amount of neutral oil to restore smoothness.
Coating the balloon requires a delicate touch and proper chocolate consistency. First, ensure your balloons are clean, dry, and inflated to a manageable size. Hold the balloon by the knot and dip the bottom into the chocolate, then spoon chocolate over the sides to create an even coating. Rotate the balloon slowly to distribute the chocolate evenly. The coating should be substantial enough to hold its structure but not so thick that it takes forever to set.
Adding decorations at the perfect moment ensures they adhere properly without sinking into the chocolate. Work quickly after applying the chocolate coating, while the surface is still tacky but not completely liquid. Hold the balloon over a plate to catch falling sprinkles, gently pressing them into place if necessary. For intricate designs, apply decorations in sections rather than trying to cover the entire surface at once.
Pro Tips for Perfect Edible Ornament Bomb
Chill your balloons briefly before coating them with chocolate. This helps the chocolate set more quickly upon contact. However, ensure they are completely dry before dipping.
Create a stable workstation by placing inflated balloons in cups or small bowls. This prevents rolling and ensures even coating distribution. Furthermore, it reduces the risk of accidental tipping.
Add a teaspoon of coconut oil to your melting chocolate for improved fluidity and shine. This creates a smoother coating that applies more evenly. Additionally, it helps prevent the chocolate from becoming too thick.
Practice balloon removal on a test piece first if you’re concerned about cracking. This builds confidence before handling your finished creation. Consequently, you’ll understand the amount of pressure needed.
Incorporate different cookie textures for more interest. Combine crisp shortbread with crunchy biscotti pieces. The varied textures create a more dynamic eating experience.
Use a pastry brush to fill any thin spots in the chocolate coating. This ensures uniform thickness throughout the sphere. Moreover, it prevents weak areas that might crack later.
Coordinate your decoration colors with your overall table setting. This creates a cohesive visual presentation. Your edible ornament bomb will look professionally designed.
Variations and Adaptations
Regional variations can transform this edible ornament bomb to reflect local holiday traditions. Incorporate Italian flavors using crushed amaretti cookies and orange zest. Alternatively, create a German version with lebkuchen pieces and spices. For a Mexican twist, add cinnamon and a hint of chili powder to the chocolate. These adaptations maintain the festive spirit while celebrating specific culinary traditions.
Seasonal adaptations extend this recipe beyond Christmas celebrations. Create pastel-colored spheres for Easter using white chocolate and spring-themed sprinkles. For Halloween, use orange-colored chocolate and crushed candy corn. Valentine’s Day calls for red and pink decorations with heart-shaped cookie pieces. The basic technique remains constant while decorations evolve with the calendar.
Dietary modifications make this dessert accessible to various eating preferences. For gluten-free versions, use certified gluten-free cookies. Dairy-free adaptations work beautifully with high-quality vegan chocolate. Nut-free options simply require careful cookie selection. These adjustments ensure everyone can enjoy this festive treat regardless of dietary restrictions.
Flavor variations allow for endless creativity with your edible ornament bomb. Incorporate mint extract for a cool contrast to rich chocolate. Add espresso powder to intensify the chocolate flavor. Citrus zests provide bright, fresh notes that cut through the sweetness. Spices like cinnamon, nutmeg, or cardamom introduce warm holiday aromas.
Texture modifications create different sensory experiences. Include chopped nuts for additional crunch. Marshmallows provide soft, chewy contrast. Freeze-dried fruits contribute both color and unique crispness. Cereal pieces offer light, airy texture against the dense chocolate.
Presentation alternatives include creating multiple smaller ornaments rather than one large sphere. Hang these from ribbons as edible tree decorations. Alternatively, make half-spheres that serve as edible bowls for ice cream or mousse. These variations maintain the festive appeal while offering different serving options.
Serving and Presentation Guide
Plating techniques dramatically enhance your edible ornament bomb presentation. Place the sphere on a cake stand surrounded by fresh holly or pine branches. For a modern look, use a sleek black slate board. Traditionalists might prefer a vintage cake plate. The elevated presentation draws attention to your beautiful creation while making serving easier.
Garnishing ideas extend beyond the initial decorations. Dust the serving plate with powdered sugar “snow” for winter whimsy. Create a chocolate drizzle pattern around the base for professional flair. Fresh berries add color and freshness that contrasts with the rich chocolate. Edible flowers provide an elegant, sophisticated touch for formal gatherings.
Traditional accompaniments include vanilla ice cream, which melts beautifully over the broken chocolate pieces. Whipped cream adds lightness to the rich dessert. For coffee lovers, serve with espresso or strong coffee to balance the sweetness. These classic pairings complement rather than compete with your edible ornament bomb.
Modern serving suggestions might include individual dessert plates with broken pieces artfully arranged. Create a dessert buffet where guests can break their own pieces from the sphere. For interactive fun, provide small mallets for dramatic breaking. These approaches make the dessert experience more engaging and memorable.
Temperature considerations affect both texture and flavor. Serve at cool room temperature for optimal chocolate snap and flavor release. If the room is very warm, brief refrigeration may be necessary. However, remove from refrigeration at least 15 minutes before serving to restore ideal texture.
Portion control becomes intuitive with this presentation. Guests naturally take manageable pieces rather than oversized slices. For larger gatherings, create multiple smaller spheres to ensure everyone gets to experience the dramatic breaking moment. This approach maintains the specialness of the presentation while accommodating more people.
Wine and Beverage Pairing
Wine pairings should complement rather than overwhelm the rich chocolate and cookie flavors. Port stands as the classic choice, its sweetness balancing the bitter notes in dark chocolate. Cabernet Sauvignon provides structured tannins that cut through the richness. For white wine lovers, a late-harvest Riesling offers honeyed notes that harmonize with the sweet components. Always consider the specific chocolate type when selecting pairings.
Non-alcoholic alternatives provide sophisticated options for all guests. Sparkling cider mimics the effervescence of champagne without alcohol. Chai tea offers warming spices that echo holiday flavors. Rich hot chocolate makes an indulgent companion, especially when spiced with cinnamon or orange. These beverages maintain the festive spirit while accommodating various preferences.
Coffee and tea pairings work exceptionally well with this edible ornament bomb. Espresso provides bitter counterpoint to the sweet chocolate. English breakfast tea offers a clean palate cleanser between bites. For something special, try orange-infused coffee that picks up citrus notes in the dessert. The caffeine also helps balance the potential richness.
Temperature considerations ensure optimal beverage enjoyment. Serve hot drinks piping hot to contrast the cool chocolate. Cold beverages should be properly chilled. For wines, follow traditional serving temperature guidelines. Proper temperatures maximize both the dessert and beverage experiences.
Serving suggestions include offering a selection of paired beverages rather than just one option. Label each choice with suggested pairing notes. Provide appropriate glassware for each beverage type. These touches elevate the overall dining experience and show thoughtful planning.
Storage and Shelf Life
Storage methods preserve both the appearance and texture of your edible ornament bomb. Store in a single layer in an airtight container at cool room temperature. Avoid refrigeration unless absolutely necessary, as condensation can damage the chocolate’s appearance. For longer storage, place in a cool, dark pantry away from strong odors.
Temperature requirements maintain the ideal chocolate texture. The optimal storage temperature ranges between 60-68°F (15-20°C). Avoid temperature fluctuations that cause chocolate bloom. In warm climates, air-conditioned rooms provide the best environment. Never store near ovens, stovetops, or direct sunlight.
Container recommendations include cardboard boxes for breathability or plastic containers with tight-fitting lids. Line containers with parchment paper to prevent sticking. For gift-giving, decorative tins work beautifully while providing protection. Always ensure containers are completely dry before use.
Signs of spoilage include unusual odors, discoloration, or soft texture. Properly stored chocolate lasts several weeks, but the cookie pieces may become stale over time. If using fresh ingredients, consume within one week for optimal quality. When in doubt, visually inspect before serving.
Reheating instructions generally don’t apply to this dessert, as it’s meant to be served at room temperature. If the chocolate becomes too soft, brief cooling restores texture. Never microwave the finished ornament, as this will destroy its shape and decoration.
Freezing guidelines allow for extended storage up to three months. Wrap tightly in multiple layers of plastic wrap, then place in an airtight container. Thaw slowly in the refrigerator, then bring to room temperature before serving. This prevents condensation from forming on the chocolate surface.
Make Ahead Strategies
Prep timeline flexibility makes this edible ornament bomb ideal for busy holidays. The complete sphere can be made up to three days in advance if stored properly. Alternatively, prepare components ahead and assemble the day before serving. This staggered approach spreads the work while ensuring freshness.
Storage between steps maintains ingredient quality. Store crushed cookies in airtight containers at room temperature. Melted chocolate can be prepared ahead and gently rewarmed when needed. Prepared decorations should be measured and ready for quick application. Organization streamlines the final assembly process.
Quality impact assessment helps determine the optimal make-ahead schedule. The chocolate shell maintains its texture beautifully for several days. Cookie pieces may soften slightly but remain pleasantly crunchy. Decorations stay vibrant when protected from humidity. Overall, the dessert holds up remarkably well when prepared in advance.
Assembly tips for make-ahead preparation include working in a cool kitchen to prevent chocolate softening. Allow adequate setting time before moving or storing. For best results, complete decoration before storage rather than adding elements later. These practices preserve the professional appearance.
Reheating guidelines don’t apply to the finished product, but component preparation benefits from proper technique. Gently rewarm chocolate in short bursts if it thickens too much. Never overheat, as this affects both flavor and working consistency. Patience during preparation ensures perfect results.
Fresh element additions can enhance make-ahead versions. Add final dustings of edible glitter just before serving for maximum sparkle. Fresh garnishes around the base provide last-minute freshness. These quick touches make advance-prepared desserts look freshly made.
Scaling Instructions
Halving the recipe works beautifully for smaller gatherings. Use a smaller balloon and reduce all ingredients proportionally. The technique remains identical, though setting time may decrease slightly. This adaptation prevents waste while maintaining the dramatic presentation. Consider creating two small spheres rather than one large one for visual impact.
Doubling or tripling requires careful organization and workspace management. Work in batches to maintain chocolate at the proper temperature. Ensure you have adequate space for multiple spheres to set undisturbed. Stagger assembly to accommodate workspace limitations. These preparations prevent rushed work that compromises quality.
Equipment adjustments become necessary when scaling recipes. For multiple spheres, invest in additional balloons and ensure adequate baking sheet space. Use larger melting vessels to accommodate increased chocolate volumes. Having extra decorating supplies on hand prevents mid-process shortages. Proper equipment planning ensures smooth execution.
Timing modifications account for increased volume. Allow extra time for each sphere’s coating and decoration. Factor in additional setting time if working in a warm kitchen. For large batches, consider assembling over several days. Realistic timing prevents stress and ensures attention to detail.
Storage considerations expand with recipe scaling. Ensure adequate container space for multiple finished spheres. Label creations if making different variations. Plan serving logistics for transporting or displaying multiple pieces. Advanced planning ensures organized presentation.
Nutritional Deep Dive
Macro breakdown varies based on specific ingredients but generally includes carbohydrates from cookies and chocolate, fats from chocolate and any nuts, and minimal protein. The exact proportions depend on your cookie selection and chocolate type. Dark chocolate typically contains less sugar than milk chocolate varieties. Being aware of these components helps with dietary planning.
Micronutrient analysis reveals that quality dark chocolate provides iron, magnesium, copper, and manganese. Cookies may contribute B vitamins depending on their flour composition. Nuts, if included, add vitamin E and selenium. While this is a treat rather than a health food, understanding its nutritional profile provides context.
Health benefits primarily come from the dark chocolate components, specifically flavonoids with antioxidant properties. These compounds may support cardiovascular health when consumed in moderation. The psychological benefits of enjoying special occasion foods also contribute to overall wellbeing. Balance remains key to incorporating treats into a healthy lifestyle.
Dietary considerations include potential allergens like gluten, dairy, and nuts. These can be addressed through careful ingredient selection. The recipe naturally contains significant sugar and saturated fat, so portion awareness benefits those monitoring these nutrients. Understanding these factors helps individuals make informed choices.
Portion analysis becomes intuitive with this presentation since guests break off manageable pieces. Typically, a serving represents approximately one-eighth of the sphere. This natural portion control prevents overindulgence while allowing everyone to enjoy the experience. The interactive serving method encourages mindful eating.
Weight management tips include savoring small portions mindfully rather than restricting entirely. Balance richer holiday treats with lighter meals throughout the day. Remember that occasional indulgences fit into overall healthy eating patterns. This perspective prevents guilt while supporting sustainable habits.
Dietary Adaptations
Gluten-free adaptation simply requires using certified gluten-free cookies. Many excellent commercial options exist, or you can bake your own favorite gluten-free cookies specifically for this project. Ensure all other ingredients, including chocolate and decorations, come from gluten-free facilities. This simple substitution makes the dessert accessible to those with celiac disease or gluten sensitivity.
Dairy-free creation involves selecting high-quality vegan chocolate and ensuring cookie choices contain no dairy products. Many dark chocolates naturally contain no dairy, but always check labels carefully. Coconut oil can replace butter in homemade cookie options. These adjustments create a treat everyone can enjoy regardless of dairy restrictions.
Vegan transformation requires attention to both chocolate and cookie ingredients. Select vegan chocolate without milk solids and cookies made without eggs or dairy. Decorations should contain no confectioner’s glaze, which often includes insect-derived components. With careful ingredient scrutiny, this impressive dessert can align with vegan principles.
Low-carb modification presents challenges due to the chocolate and cookie foundation. However, using sugar-free chocolate and low-carb cookie alternatives creates a reasonable adaptation. Adjust expectations for texture, as alternative ingredients behave differently. This version allows those following carbohydrate-restricted diets to participate in holiday treats.
Keto adaptation builds on low-carb principles with specific attention to net carbohydrates. Use high-cocoa, sugar-free chocolate and keto-friendly cookie recipes. Calculate macros carefully to ensure the dessert fits within daily limits. Though not identical to the original, this version maintains the festive spirit.
Paleo adaptation requires grain-free, dairy-free, and refined sugar-free ingredients. Use compliant chocolate sweetened with coconut sugar or maple syrup. Create cookie pieces from nut flour-based paleo cookies. While more work-intensive, this approach aligns with paleo nutritional principles.
Low-FODMAP adaptation involves careful selection of cookies without high-FODMAP ingredients like wheat, honey, or certain nuts. Use dark chocolate without high-FODMAP additives. Portion control remains important, as even adapted versions may contain some FODMAPs. This allows those with sensitive digestive systems to enjoy holiday treats.
Troubleshooting Guide
Texture issues often stem from chocolate temperature problems. If the shell is too thick, your chocolate was likely too cool during application. Conversely, thin, fragile shells result from overly warm chocolate. The ideal coating consistency should resemble warm honey. Practice helps develop intuition for the perfect working temperature.
Flavor balance problems might include excessive sweetness or insufficient chocolate intensity. Balance very sweet cookies with higher-cocoa chocolate. If the dessert tastes bland, add a pinch of salt to the chocolate or use more flavorful cookies. Remember that decorations also contribute sweetness, so adjust accordingly.
Temperature problems typically involve chocolate that sets too slowly or too quickly. In warm environments, work in an air-conditioned space or briefly chill between layers. In cold kitchens, maintain chocolate at slightly warmer temperature. Understanding your environment helps anticipate adjustment needs.
Equipment challenges might include balloons that won’t inflate evenly or chocolate that scorches during melting. Always test balloons before use and have extras available. Use gentle, indirect heat for melting to prevent burning. Proper equipment preparation prevents mid-recipe emergencies.
Ingredient substitutions sometimes behave differently than expected. When trying new cookie types, test a small batch first. unfamiliar chocolate brands may require temperature adjustments. Keep notes on successful substitutions for future reference. Experience builds confidence with variations.
Timing concerns often involve chocolate setting before decoration completion. Work in small sections if dealing with large spheres. Prepare all decorations within easy reach before beginning. Organization and efficiency prevent rushed work that compromises results.
Recipe Success Stories
Community feedback consistently highlights how this edible ornament bomb becomes the star of holiday gatherings. Many readers report that their guests initially hesitate to break the beautiful sphere, creating anticipation and conversation. Families enjoy making this project together, with children particularly loving the decoration stage. The combination of visual impact and delicious flavor receives repeated praise.
Variation successes demonstrate the recipe’s adaptability across different traditions and preferences. One reader created a Hanukkah version using blue and white decorations with menorah-shaped cookie pieces. Another family incorporates their traditional Christmas cookie recipe into the sphere, creating continuity with their established traditions. These personalized versions maintain the magical quality while reflecting individual family cultures.
Adaptation stories include creative solutions for dietary restrictions that allow everyone to participate. A grandmother developed a beautiful sugar-free version for her diabetic husband, using their favorite spice cookies. Another cook created an elaborate nut-free version for a school party that looked identical to the original. These adaptations demonstrate the recipe’s flexibility without compromising the festive experience.
Reader suggestions have improved the technique over time. One contributor recommended using a hairdryer on low heat to smooth chocolate imperfections. Another suggested placing the balloon in a wine glass for stability during coating. These community-generated tips enhance the recipe for everyone.
Photography tips from successful makers emphasize natural light and simple backgrounds that let the ornament shine. Many recommend shooting the breaking moment to capture the beautiful interior. Others suggest including festive props like vintage ornaments or evergreen sprigs. These visual storytelling ideas help document the creation process beautifully.
Frequently Asked Questions
Can I use milk chocolate instead of dark chocolate? Absolutely, milk chocolate works beautifully though it sets slightly softer than dark chocolate. The sweeter flavor profile appeals particularly to children. Just ensure you use high-quality chocolate designed for melting to achieve the proper consistency.
How far in advance can I make the edible ornament bomb? You can prepare this dessert up to three days ahead when stored properly in an airtight container at cool room temperature. The chocolate maintains its snap while the cookies retain pleasant crunch. For best appearance, add fresh garnishes just before serving.
What type of balloons work best for this project? Standard latex balloons work perfectly, but ensure they’re new and unused to maintain food safety. Inflate to a manageable size that provides good surface area without being unwieldy. Always test balloons for leaks before coating with chocolate.
Can I add other ingredients besides cookies? Certainly, chopped nuts, dried fruits, or candy pieces all work wonderfully. Just ensure additions are small enough to suspend properly in the chocolate. Avoid ingredients that release moisture, as this can affect the chocolate’s setting ability.
What if my chocolate cracks when removing the balloon? Don’t panic – you can repair cracks with melted chocolate applied with a small knife or toothpick. Smooth the repair and redecorate that area if necessary. Most small cracks become barely noticeable once the sphere is decorated and displayed.
Can I make smaller individual portions? Definitely, create smaller spheres using miniature balloons or even make half-spheres using bowl molds. The technique remains identical, though setting time decreases with smaller sizes. Individual portions make lovely place settings or party favors.
How do I achieve a perfectly smooth chocolate coating? The key is chocolate at the proper temperature – not too thick and not too thin. Apply multiple thin layers rather than one thick coating, allowing each to set slightly between applications. This building technique creates professional-looking results.
What’s the best way to break the sphere for serving? Use a small mallet or the back of a heavy spoon for dramatic effect. Tap gently until cracks form, then continue around the sphere. For less mess, place on a cutting board and use a knife to initiate breaking.
Can I use this technique with white chocolate? White chocolate works beautifully but requires extra care as it’s more temperamental when melting. Use lower heat and stir constantly to prevent seizing. The pastel color provides a lovely base for colorful decorations.
What if I don’t have all the decorative elements? Improvise with what you have – crushed candy canes, colored sugar, or even finely chopped dried fruit. The concept remains effective even with simple decorations. Sometimes minimalist approaches create the most elegant results.
Additional Resources
Related recipes that complement this edible ornament bomb include other no-bake holiday treats like peppermint bark or Christmas rocky road. These desserts share the convenience factor while offering different textures and flavors. Consider creating a dessert table featuring multiple no-bake options for stress-free entertaining. The coordinated approach simplifies holiday preparation while offering variety.
Technique guides for working with chocolate provide valuable skills beyond this specific recipe. Learning proper tempering methods opens possibilities for other chocolate creations. Understanding different melting techniques ensures success with various projects. These fundamental skills elevate all your chocolate work, from simple sauces to elaborate showpieces.
Ingredient information helps you make informed choices about chocolate types, cookie selection, and decoration options. Understanding cocoa percentages affects flavor intensity decisions. Knowledge of different cookie characteristics guides successful adaptations. This information empowers you to customize creations based on availability and preference.
Equipment recommendations extend beyond the basic requirements to specialized tools that enhance results. Chocolate thermometers ensure precise temperature control. Quality molds expand creative possibilities beyond the spherical form. Proper storage containers maintain freshness for gifting or advance preparation. Investing in key tools improves both process and outcomes.
Seasonal variations inspire creativity throughout the year while maintaining the core technique. Spring might feature pastel colors and floral decorations. Summer adaptations could incorporate tropical fruits and bright colors. Autumn versions might highlight warm spices and harvest themes. This ongoing creativity keeps the concept fresh and exciting beyond the winter holidays.
PrintThe Edible Ornament Bomb
Description
A festive, no-bake treat that looks like a colorful holiday ornament and bursts with sweet, crunchy flavors.
Ingredients
For the Crust:
- 1 cup white chocolate chips
- 1/2 cup creamy peanut butter
- 2 cups crispy rice cereal
- 1/2 cup mini marshmallows
- 1/4 cup colorful sprinkles
- 12 mini pretzel twists
- 6 lollipop sticks or decorative ribbons
Instructions
1. Prepare the Crust:
- Melt white chocolate chips and peanut butter together in a microwave-safe bowl, stirring every 30 seconds until smooth.
- Gently fold in crispy rice cereal and mini marshmallows until evenly coated.
- Scoop mixture and shape into 6 round balls, inserting a lollipop stick or tying a ribbon loop into the top of each.
- Roll each ball in colorful sprinkles to coat completely, then press a mini pretzel twist into the bottom to resemble an ornament cap.
- Place on parchment paper and refrigerate for at least 20 minutes until firm.
Notes
You can customize the seasonings to taste.
I’m Shaykee—born in Morocco, seasoned across continents. From airplane galleys to home kitchens, I share the flavors and stories that shaped my journey.