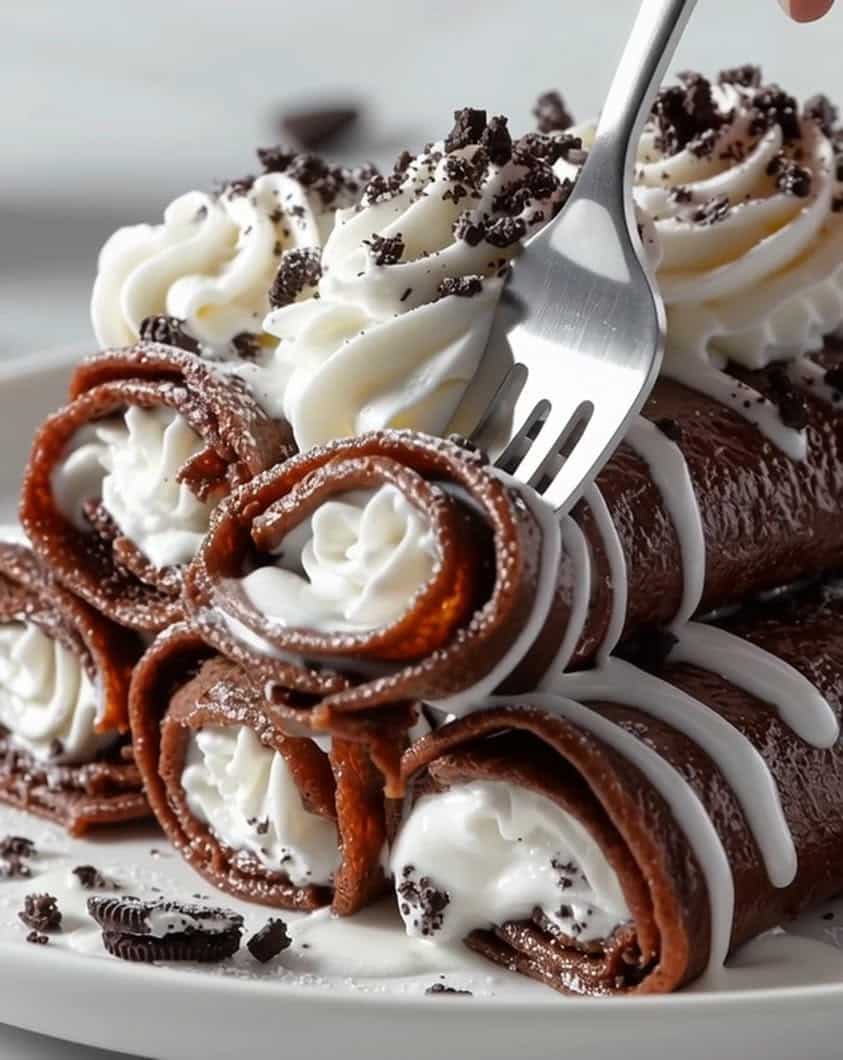
Chocolate Meringue Nest: A Cloud of Decadent Delight
Imagine a dessert that perfectly balances airy texture with rich flavor. This Chocolate Meringue Nest delivers exactly that experience. Essentially, it features crisp, chewy meringue clouds cradling a luxurious chocolate cream. The result is a stunning dessert that feels both elegant and comforting. Furthermore, its beautiful presentation makes it a showstopper for any dinner party or special occasion.
The magic of this recipe lies in its contrasting elements. For instance, the meringue provides a delicate, sweet crunch that dissolves on your tongue. Meanwhile, the chocolate filling offers a smooth, decadent counterpoint. Each bite is a harmonious blend of textures and tastes. Consequently, this dessert satisfies cravings for something sweet without being overly heavy.
Creating this Chocolate Meringue Nest is a rewarding baking project. Although it requires some precision, the steps are straightforward and manageable. Moreover, the process allows for creativity in shaping your meringue nests. Ultimately, you will achieve a professional-looking dessert that tastes as incredible as it looks. This recipe is perfect for anyone looking to elevate their baking repertoire with a classic technique.
Quick Recipe Highlights
- Flavor Profile: This dessert offers a beautiful symphony of sweet and rich notes. The meringue provides a pure, sugary base that complements the deep, dark chocolate filling. Additionally, a hint of vanilla enhances the overall flavor complexity.
- Texture: You will experience a delightful contrast between the crisp exterior and the slightly chewy interior of the meringue. The creamy, smooth chocolate filling melts in your mouth, creating a luxurious sensation. This combination is texturally fascinating and deeply satisfying.
- Aroma: As it bakes, the meringue fills your kitchen with a warm, sweet, and slightly toasty scent. The chocolate cream adds a rich, cocoa-based fragrance that is utterly irresistible. Together, they create an inviting aroma that promises a delicious treat.
- Visual Appeal: The snowy white meringue nests are rustic and elegant, forming perfect cups for the dark chocolate filling. A dusting of cocoa powder or shaved chocolate on top adds a professional finish. This dessert looks beautiful on any table.
- Skill Level Needed: This recipe is ideal for bakers with some basic experience. You need to be comfortable whipping egg whites to stiff peaks and handling a piping bag. However, with careful attention to the instructions, even a confident beginner can succeed.
- Special Equipment: A stand mixer or hand mixer is essential for whipping the meringue to the correct consistency. You will also need a piping bag with a large star tip for shaping the nests. Furthermore, a silicone baking mat or parchment paper is necessary for a non-stick surface.
Recipe Overview
- Difficulty Level: We classify this Chocolate Meringue Nest as intermediate due to the technique of making a stable meringue. The process requires attention to detail, such as ensuring your bowl is completely grease-free. However, the steps are clearly defined and easy to follow with patience. Success here builds foundational baking skills that are useful for many other desserts.
- Category: This dish falls squarely into the dessert category, perfect for concluding a meal. It can also be considered a pastry or a confection due to its meringue base. Its elegance makes it suitable for fine dining experiences at home.
- Cuisine: Meringue-based desserts have strong roots in European pastry traditions, particularly French and Swiss cuisine. The technique of baking whipped egg whites is a classic method used in many patisseries. This recipe is a modern take on those timeless principles, focusing on simple, high-quality ingredients.
- Cost: This is a relatively inexpensive dessert to create, as its main components are egg whites, sugar, and chocolate. You likely have many of the flavoring agents like vanilla and salt in your pantry already. Therefore, it offers a high return on investment in terms of impressive results for a modest cost.
- Season: This dessert is wonderfully versatile across all seasons. Its light meringue makes it refreshing in the spring and summer. Conversely, the rich chocolate center provides comfort during the fall and winter months.
- Occasion: The Chocolate Meringue Nest is perfect for celebrations like birthdays, anniversaries, or holiday gatherings. It also makes a wonderful weekend baking project to enjoy with family. Its elegant appearance is always suitable for impressing guests.
Why You’ll Love This Chocolate Meringue Nest
The taste and texture appeal of this Chocolate Meringue Nest is truly exceptional. Firstly, the contrast between the airy, sweet meringue and the rich, dark chocolate cream is a classic combination that never fails to delight. Each component complements the other perfectly, preventing the dessert from being one-dimensional. Moreover, the way the crisp meringue yields to a slightly marshmallowy center provides a fascinating eating experience. This dessert manages to feel both light and indulgent at the same time, satisfying a wide range of sweet tooth cravings.
From a convenience standpoint, this recipe offers significant preparation benefits. Although it requires some time, a large portion is hands-off baking, allowing you to attend to other tasks. You can also prepare the components in stages; for example, bake the meringue nests one day and fill them the next. This make-ahead flexibility is a huge advantage when planning for a dinner party or event. Consequently, you can serve a stunning, fresh dessert without last-minute stress.
Regarding nutritional advantages, this dessert has some surprising perks. Meringue is primarily egg whites and sugar, making it naturally fat-free. Egg whites are a great source of high-quality protein. When you use a high-cocoa percentage dark chocolate for the filling, you incorporate antioxidants and minerals like iron and magnesium. Of course, this is still a treat, but it is one you can feel slightly better about enjoying in moderation compared to denser, butter-heavy desserts.
The social and entertaining value of this Chocolate Meringue Nest is immense. Its dramatic, beautiful appearance is a guaranteed conversation starter at any gathering. People are often impressed by homemade meringue, as it seems like a professional bakery item. Serving this dessert shows care and effort, making your guests feel special. Furthermore, it is naturally portioned into individual servings, which simplifies plating and presentation for the host.
Finally, this recipe is remarkably cost-effective and accessible. The ingredients are basic and inexpensive, yet they transform into something that feels luxurious. You do not need any rare or hard-to-find items. This accessibility means you can create a gourmet dessert experience without a gourmet budget. It is a fantastic way to bake something impressive without a significant financial investment.
Historical Background and Cultural Significance
The origin of meringue is a topic of delightful debate among culinary historians. Many credit the Swiss village of Meiringen with its invention in the early 18th century, hence the name. However, other stories suggest a British chef created it earlier. Regardless of its precise birthplace, the technique of whipping egg whites with sugar spread rapidly through European courts. It was considered a delicacy for the wealthy, showcasing the chef’s skill and the host’s refinement. This Chocolate Meringue Nest is a direct descendant of those early, elegant confections.
The cultural importance of meringue is deeply woven into the fabric of European dessert traditions. In France, it is the foundation of desserts like the vacherin and dacquoise. Meanwhile, Italian meringue is a key component for buttercream and baked Alaska. The pavlova, a national dish of both Australia and New Zealand, is a large meringue base topped with fruit and cream. This global adoption highlights the universal appeal of its simple, ethereal texture. Our nest variation continues this tradition of using meringue as a versatile canvas for other flavors.
The evolution of the meringue recipe is a story of culinary technology. Initially, meringues were whipped by hand with a bundle of twigs, an incredibly labor-intensive process. The invention of the copper bowl was a major advancement, as a chemical reaction with the egg whites created a more stable foam. Later, the electric mixer revolutionized home baking, making meringues accessible to everyone. Today, we benefit from these centuries of innovation, allowing us to create perfect meringue nests with relative ease in our own kitchens.
Regional variations of meringue are fascinating to explore. French meringue is the simplest, made by whipping uncooked egg whites with sugar. Italian meringue involves pouring hot sugar syrup into whipping egg whites, making it very stable. Swiss meringue gently heats the egg whites and sugar together over a water bath before whipping. This recipe uses the French method for its simplicity and delightful texture. The concept of shaping meringue into a “nest” is a popular global variation, allowing for creative fillings from chocolate to fruit curds and whipped cream.
Ingredient Deep Dive
Egg Whites: Egg whites are the structural heart of any meringue, providing the protein network that traps air. Culturally, eggs have symbolized life and fertility across many civilizations. Nutritionally, they are a complete protein source, containing all nine essential amino acids with zero fat. For the best results, ensure your eggs are fresh and at room temperature, as they whip to a greater volume. Carefully separate the whites from the yolks, as any trace of fat from the yolk can prevent the whites from whipping properly. If you need a substitute, pasteurized liquid egg whites from a carton work well, though they may take slightly longer to whip.
Granulated Sugar: Sugar does more than just sweeten the meringue; it stabilizes the egg white foam and contributes to the crisp texture. Historically, sugar was a luxury item, and its use in desserts was a sign of status. In this recipe, superfine or caster sugar is preferable because its fine crystals dissolve more easily, creating a smoother, more stable meringue. If you only have regular granulated sugar, you can pulse it in a food processor for a few seconds to make it finer. There is no direct substitute for sugar in a classic meringue, as its structural role is critical.
Dark Chocolate: Chocolate, derived from the cacao bean, was first consumed as a bitter drink by Mesoamerican cultures and was considered the “food of the gods.” For the filling, use a high-quality dark chocolate with a cocoa content between 60-70% for the best balance of flavor and structure. This type of chocolate is rich in flavonoids, antioxidants linked to heart health. When selecting chocolate, choose a brand you enjoy eating on its own. To store it, keep chocolate in a cool, dark place. For a dairy-free version, ensure the dark chocolate does not contain any milk solids.
Heavy Cream: Cream is used to create the luxurious chocolate filling that sits inside the meringue nest. It provides the fat that carries the chocolate flavor and creates a smooth, rich mouthfeel. For whipping, ensure your cream is very cold, as this helps it hold more air and whip up faster. Look for heavy cream or double cream with a high fat content (at least 36%) for the best results. There is no direct one-to-one substitute for whipping cream, but for a dairy-free version, full-fat canned coconut cream can be chilled and the solid part scooped off and whipped.
Common Mistakes to Avoid
- Greasy Bowl or Utensils: Any trace of fat from yolk or oil will prevent the egg whites from whipping up properly. Consequently, always start with a impeccably clean, dry glass or metal bowl. Avoid using plastic bowls, as they can harbor invisible grease residues.
- Adding Sugar Too Quickly: Dumping all the sugar in at once will deflate the egg whites and result in a runny meringue. Instead, add the sugar one tablespoon at a time, only after the whites have reached soft peaks. This slow incorporation ensures the sugar dissolves fully for a stable, glossy meringue.
- Under-whipping the Meringue: If you stop whipping too soon, the meringue will not hold its shape when piped and may weep or collapse in the oven. You need to whip until the meringue is thick, glossy, and holds stiff, upright peaks when you lift the beaters.
- Over-whipping the Meringue: Conversely, whipping for too long can cause the protein network to break down, making the meringue grainy and curdled. Once you have stiff, glossy peaks, stop mixing. The meringue should still feel smooth, not gritty.
- Opening the Oven Door Early: A sudden drop in temperature can cause the delicate meringue to crack or collapse. Therefore, resist the urge to open the oven door during the first hour of baking. The meringues need this undisturbed, low heat to dry out properly.
- Baking at Too High a Temperature: High heat will cause the outside of the meringue to brown too quickly while the inside remains soft and sticky. A low, slow bake is essential for drying out the entire meringue, resulting in a crisp exterior and a slightly chewy center.
- Filling the Nests Too Early: If the meringue nests are not completely cool, the moisture from the chocolate cream will make them soggy. Always allow the meringues to cool completely in the turned-off oven before filling them. This patience ensures a perfect textural contrast.
- Using Low-Quality Chocolate: The flavor of the filling is paramount, and since it is a simple mixture, the quality of the chocolate shines through. Using a low-quality baking chocolate will result in a waxy, less flavorful filling. Invest in a good chocolate bar for the best taste.
Essential Techniques
Whipping Egg Whites to Stiff Peaks: This is the most critical technique for the Chocolate Meringue Nest. Stiff peaks mean the meringue holds its shape firmly when the beaters are lifted, with the tips standing straight up. To master this, start with room temperature eggs in a spotlessly clean bowl. Begin whipping on medium speed until the eggs are frothy, then increase to high. Add the sugar slowly only after soft peaks form. A common pitfall is under-whipping, which leads to flat meringues. The visual cue for success is a thick, glossy, and bright white mixture that does not slide when you tilt the bowl.
Piping the Meringue Nests: Piping creates the classic “nest” shape that holds the filling. It is important for both aesthetics and function. To master it, fill your piping bag fitted with a large star tip only halfway to maintain control. Hold the bag perpendicular to the baking sheet and apply steady pressure to pipe a solid circle base. Then, pipe two or three rings on top of the outer edge of the base to build up the sides. The common pitfall is uneven pressure, which creates lopsided nests. The cue for success is a uniform, raised edge that will perfectly contain the chocolate cream.
Folding in Ingredients: While this recipe is simple, the concept of folding is crucial for adding any flavorings like vanilla without deflating the meringue. Use a large rubber spatula and cut down through the center of the mixture, slide the spatula along the bottom of the bowl, and fold it over the top. Rotate the bowl a quarter turn and repeat. This gentle motion incorporates ingredients while preserving the precious air bubbles. The pitfall is stirring or beating, which will deflate the meringue. You have succeeded when the ingredient is just incorporated and no streaks remain.
Pro Tips for Perfect Chocolate Meringue Nest
- For the most stable meringue, add a tiny pinch of cream of tartar or a few drops of lemon juice when the egg whites are frothy. This acid helps to stabilize the protein structure, resulting in a meringue that is less likely to collapse or weep.
- If your kitchen is very humid, bake the meringues for an additional 15-20 minutes. Humidity is the enemy of crisp meringue, and the extra time helps to drive out more moisture, ensuring a perfectly dry shell.
- To check if the meringues are done, gently lift one from the tray. The bottom should feel dry and sound hollow if you tap it lightly. If it feels soft or sticky, it needs more baking time.
- Use a pencil to trace circles on the underside of your parchment paper as a guide for piping. This simple trick ensures all your Chocolate Meringue Nests are uniform in size, which looks more professional and ensures even baking.
- If you do not have a piping bag, you can use a gallon-sized plastic zip-top bag. Simply spoon the meringue into the bag, press out the air, and snip off one corner to create a makeshift piping bag.
- For an extra flavor dimension in the meringue, you can replace the vanilla extract with almond extract or add a teaspoon of finely grated citrus zest, such as orange or lemon.
Variations and Adaptations
Regional Variations: Around the world, meringue takes on different forms. For a taste of Italy, fold finely chopped toasted hazelnuts into the meringue before piping. For a tropical twist inspired by the Caribbean, add a teaspoon of coconut extract to the meringue and fill the nests with a chocolate-coconut cream. These adaptations connect your dessert to global culinary traditions while maintaining the classic nest structure.
Seasonal Adaptations: This Chocolate Meringue Nest is a fantastic base for seasonal flavors. In the summer, top the filled nests with fresh berries like raspberries or sliced strawberries. During the fall, incorporate a spoonful of pumpkin pie spice into the chocolate filling. For a winter holiday version, add a hint of peppermint extract to the cream and garnish with crushed candy canes. This flexibility keeps the recipe exciting all year round.
Dietary Modifications: To make this dessert vegan, use aquafaba (the liquid from a can of chickpeas) instead of egg whites. Whip it exactly as you would egg whites. For the filling, use a high-quality dairy-free dark chocolate and whip chilled coconut cream. For a sugar-free version, use a sugar substitute like erythritol that is labeled as being suitable for baking and meringues, and use sugar-free chocolate.
Flavor Variations: The basic recipe is a perfect canvas for experimentation. Swirl a tablespoon of raspberry or orange jam into the chocolate filling before spooning it into the nests. For a nutty flavor, sprinkle the piped meringues with chopped pistachios or almonds before baking. You could also add a tablespoon of espresso powder to the meringue for a mocha-flavored nest.
Serving and Presentation Guide
Plating your Chocolate Meringue Nest is key to its visual impact. Serve each nest on an individual dessert plate to highlight its individual beauty. For a modern look, use a slate plate or something with a contrasting color to make the white meringue and dark chocolate pop. If serving family-style, arrange them on a beautiful cake stand or a large platter, ensuring they are not touching to maintain their delicate structure.
Garnishing adds the final touch of elegance. A light dusting of cocoa powder or powdered sugar just before serving is classic and simple. For texture and flavor, sprinkle with chocolate shavings, cacao nibs, or finely chopped toasted nuts. Fresh edible flowers, a single mint leaf, or a few fresh raspberries placed beside the nest add a vibrant color contrast that makes the dessert look professionally crafted.
Consider traditional and modern accompaniments. A simple dollop of lightly sweetened whipped cream on the side is always welcome. For a fruit-forward approach, serve with a small side of mixed berries. For a truly decadent experience, offer a small pitcher of warm chocolate or caramel sauce for guests to drizzle over the top themselves. These additions allow everyone to customize their dessert experience.
Wine and Beverage Pairing
Selecting the right wine can elevate your Chocolate Meringue Nest experience. A sweet, fortified wine like a Ruby Port or a Banyuls is a classic pairing. Their rich, berry-like flavors and sweetness complement the dark chocolate without overpowering it. Alternatively, a Brachetto d’Acqui, a lightly sparkling red Italian wine, offers a delightful fruity contrast that cuts through the richness of the cream. The bubbles and acidity provide a refreshing counterpoint to the sweet, dense dessert.
For non-alcoholic alternatives, consider beverages that mirror the dessert’s profile. A glass of cold, creamy milk is a timeless and comforting choice. A rich hot chocolate, perhaps spiced with a hint of cinnamon or chili, doubles down on the chocolate theme beautifully. For something fruitier, a sparkling blood orange or pomegranate juice provides a tart contrast that cleanses the palate between bites of the sweet meringue and rich filling.
Coffee and tea are also excellent partners. A strong espresso or a cup of black coffee offers a bitter note that balances the dessert’s sweetness. In terms of tea, an Earl Grey with its bergamot notes pairs wonderfully with the dark chocolate. For a more exotic option, a Rooibos tea has natural sweetness and a nutty flavor that harmonizes with the meringue’s toasty notes. Always serve coffee and tea hot to provide a temperature contrast to the cool or room-temperature dessert.
Storage and Shelf Life
Proper storage is essential for maintaining the texture of your Chocolate Meringue Nest. The unfilled meringue shells can be stored in an airtight container at room temperature for up to two weeks. It is crucial that the container is completely airtight, as meringue acts like a sponge and will quickly absorb moisture from the air, becoming soft and sticky. Do not refrigerate the plain shells, as the humidity in the fridge will also make them soggy.
Once filled, the dessert’s shelf life changes dramatically. A filled Chocolate Meringue Nest is best enjoyed immediately. However, if you must store them, place them in a single layer in an airtight container in the refrigerator for no more than 4-6 hours. The refrigerator is cold and humid, so the meringue will start to soften and weep over time. For the best textural experience, plan to fill the nests just before you are ready to serve them.
Freezing is not recommended for the completed dessert. Freezing and thawing will cause the meringue to become unpleasantly soft and the creamy filling to separate. However, you can successfully freeze the plain, unfilled meringue nests. Place them in a single layer in a freezer-safe container, separated by layers of parchment paper. They can be frozen for up to one month. Thaw them in the container at room temperature to prevent condensation from forming on them.
Make Ahead Strategies
The best make-ahead strategy for this dessert is to break it into components. The meringue nests can be baked up to two weeks in advance and stored in an airtight container at room temperature. This is a huge time-saver for entertaining. You can also measure out your ingredients for both the meringue and the filling the day before, so everything is ready to go. This component-based approach transforms a complex-seeming dessert into a manageable, stress-free process.
For the chocolate filling, you can prepare it a day in advance. Make the chocolate cream, cover it with plastic wrap pressed directly onto the surface to prevent a skin from forming, and refrigerate it. When you are ready to serve, you may need to let it sit at room temperature for 15-20 minutes to soften slightly for easy spooning. You can also re-whip it for a few seconds with a hand mixer to restore its fluffy texture before filling the nests.
When assembling ahead of time, the maximum lead time is about 4-6 hours in the refrigerator. Assemble the nests and then keep them chilled until serving. Be aware that the meringue will soften the longer it sits with the filling. To add a fresh element right before serving, garnish with berries, mint, or a dusting of cocoa powder. This last-minute touch makes the dessert look freshly made and preserves the meringue’s crispness for as long as possible.
Scaling Instructions
Scaling this Chocolate Meringue Nest recipe up or down is straightforward because it uses weight-based ratios. To halve the recipe, simply divide all the ingredients by two. This is perfect for a smaller household. When halving, keep a close eye on the baking time, as smaller batches may bake slightly faster. Check for doneness about 10-15 minutes earlier than the original recipe suggests. The visual and tactile cues for doneness remain the same.
Doubling or tripling the recipe is excellent for a large party. Use a larger stand mixer bowl or work in batches to ensure the meringue has enough space to whip up properly. You may need to rotate your baking sheets in the oven to ensure even baking when multiple trays are used. The total baking time might need a slight increase of 5-10 minutes to account for the reduced air circulation in a full oven. Ensure your nests are consistently sized for even results.
When scaling up, consider your equipment. You will need multiple baking sheets and likely more than one oven rack. Parchment paper is essential for preventing sticking on all trays. If you are making a very large quantity, you might need to bake in consecutive batches, allowing the oven to reheat fully between batches. Proper storage of the cooled, unfilled meringues in airtight containers is crucial while you work through the baking process.
Nutritional Deep Dive
Understanding the nutritional profile of this Chocolate Meringue Nest helps with mindful enjoyment. A single serving provides a balance of macronutrients, with the majority of calories coming from carbohydrates in the form of sugar. The meringue itself is fat-free, while the chocolate cream contributes the fat content, primarily from the heavy cream and the cocoa butter in the chocolate. The egg whites provide a modest amount of high-quality protein, making this dessert more satiating than one made purely from flour and butter.
The micronutrient analysis reveals some benefits, particularly from the dark chocolate. High-quality dark chocolate is a source of iron, magnesium, copper, and manganese. It also contains flavonoids, which are plant compounds with antioxidant properties. The egg whites provide selenium and riboflavin (Vitamin B2). While this is a dessert and should be treated as such, it is made from whole food ingredients without artificial additives, which is a nutritional positive compared to many processed sweets.
For those managing their diet, portion control is straightforward since the dessert is pre-portioned into individual nests. The recipe as written creates six servings, which is a satisfying size. To reduce the sugar impact slightly, you can use a dark chocolate with a higher cocoa percentage (70% or above) for the filling, as it typically contains less sugar. Remember, this is a treat to be savored, and its airy nature can help you feel satisfied with one portion without overindulging.
Dietary Adaptations
Gluten-Free: This Chocolate Meringue Nest is naturally gluten-free, as it contains no wheat, barley, or rye. The main ingredients—egg whites, sugar, and chocolate—are all inherently free from gluten. This makes it an excellent and safe dessert option for anyone with celiac disease or a gluten sensitivity. Always double-check that your chocolate and any flavoring extracts are certified gluten-free if cross-contamination is a concern.
Dairy-Free: Adapting this recipe to be dairy-free is simple. For the chocolate filling, use a high-quality dairy-free dark chocolate bar and substitute the heavy whipping cream with full-fat, canned coconut cream. Chill the can of coconut cream overnight, then scoop out the solid cream that has risen to the top and whip it just like dairy cream. The meringue itself is already dairy-free, making this a seamless substitution.
Vegan: Creating a vegan Chocolate Meringue Nest is possible using a remarkable ingredient called aquafaba, which is the liquid from a can of chickpeas. Use 3 tablespoons of aquafaba to replace the volume of 1 egg white. So, for this recipe, you would use 9 tablespoons of aquafaba. Whip it with the sugar and vanilla exactly as you would egg whites. For the filling, follow the dairy-free instructions above. The results are surprisingly similar in texture and appearance.
Low-Carb/Keto: For a low-carb or keto version, you will need to replace the sugar in both the meringue and the filling. Use a powdered erythritol or monk fruit sweetener that measures 1:1 like sugar. The texture of the meringue may be slightly different, but it will still work. For the filling, use a sugar-free dark chocolate and whip the cream with your keto-friendly sweetener. Be mindful that sugar alcohols can sometimes cause digestive sensitivity.
Troubleshooting Guide
Problem: The meringue is flat and won’t hold peaks. Solution: This is almost always caused by a greasy bowl, a trace of egg yolk, or under-whipping. Ensure your equipment is perfectly clean and dry. Start over with fresh egg whites. If you are certain your bowl is clean, you may just need to continue whipping for several more minutes. Egg whites can take longer to whip than people expect, sometimes up to 10-12 minutes of whipping on high speed.
Problem: The meringue is beading or weeping (drops of liquid on the surface). Solution: Beading is often caused by the sugar not dissolving completely or the oven temperature being too high. Next time, use superfine sugar or whip for longer to ensure the sugar is fully incorporated. Weeping after baking can happen if the meringue is under-baked or if the humidity is very high. Ensure they are baked until completely dry and cool them slowly in the turned-off oven.
Problem: The meringue nests are sticking to the parchment paper. Solution: If they are sticking, they are likely under-baked. Return them to the oven for another 15-20 minutes to dry out further. Once fully baked and cooled, they should release easily. Using a silicone baking mat can also prevent sticking more reliably than parchment paper. If a small piece breaks off, you can often use it as “crumb” for a garnish.
Problem: The chocolate filling is too thick or grainy. Solution: A grainy filling means the chocolate may have seized or the cream was too hot when added. If it’s just too thick, you can whisk in a tablespoon of warm cream or milk to thin it to the desired consistency. To fix seized chocolate, whisk in a small amount of warm cream one teaspoon at a time until it becomes smooth again. Gentle, patient heating is key.
Recipe Success Stories
We love hearing from our community of bakers who have tried this Chocolate Meringue Nest. One reader, Sarah from Colorado, shared that she made these for her mother’s birthday and they were a “total showstopper.” She mentioned that following the tip about tracing circles on the parchment made her nests look perfectly uniform, boosting her confidence in her piping skills. Her family was impressed that she had made them from scratch, and she said the step-by-step instructions made the process feel manageable.
Another success story comes from Mark, a home baker who adapted the recipe to be dairy-free for his daughter. He used the coconut cream method and reported that the filling was “incredibly rich and decadent, no one missed the dairy at all.” He also experimented with adding a drop of orange oil to the chocolate, which he said paired beautifully. His adaptation proves that this recipe is a wonderful template for customization based on dietary needs and personal taste preferences.
Photography tips from our readers have been invaluable. Many have found that natural daylight is the best way to capture the beautiful contrast between the white meringue and dark chocolate. A dark, moody background can make the dessert look very elegant, while a bright, pastel background gives it a fresh, modern feel. Several readers have suggested taking a picture immediately after dusting with cocoa powder or powdered sugar to capture that perfect, just-finished look.
Frequently Asked Questions
Q: Can I make this recipe on a humid or rainy day?
A: Humidity is the biggest challenge for meringue. If it is very humid, your meringues may not get as crisp and can become sticky. If you must bake on a humid day, extend the baking time by 15-30 minutes and allow the meringues to cool completely in the oven with the door slightly ajar. Storing them in an absolutely airtight container is even more critical.
Q: Why did my meringue collapse in the middle?
A: A collapse usually indicates under-whipping or under-baking. The meringue needs to be whipped to very stiff peaks to hold its structure during the long, slow bake. If it was under-baked, the interior moisture causes the structure to fall. Ensure you bake until the meringues are completely dry and sound hollow when tapped on the bottom.
Q: Can I use liquid egg whites from a carton?
A: Yes, you can. Pasteurized liquid egg whites are a convenient and safe option. They may take a little longer to whip up to stiff peaks compared to fresh egg whites, but they will work. Use 3 tablespoons of liquid egg white to replace the volume of one large egg white.
Q: How do I know when the meringue has reached “stiff peaks”?
A: Stiff peaks mean that when you lift the beaters straight up out of the meringue, the peaks that form stand upright and do not droop or curl over at the tips. The meringue will be thick, glossy, and very white. If the peaks flop over, it is only at the “soft peak” stage and needs more whipping.
Q: My meringue has brown spots. Is it ruined?
A: Not at all! Small brown or beige spots are simply areas where the sugar has caramelized. This can happen if your oven has a hot spot. It does not affect the flavor
Print
Cinnamon Chocolate Clouds
Description
Fluffy clouds of cream wrapped in chocolatey hugs with a hint of cinnamon magic.
Ingredients
For the Crust:
- 1 cup heavy whipping cream
- 1/4 cup powdered sugar
- 1 tsp vanilla extract
- 1/2 cup dark chocolate chips, melted
- 1 tsp ground cinnamon
- 1/4 cup crushed graham crackers for garnish
Instructions
1. Prepare the Crust:
- In a large bowl, whip the heavy cream, powdered sugar, and vanilla until stiff peaks form.
- Gently fold in the melted dark chocolate and ground cinnamon until just combined.
- Spoon or pipe the mixture onto a parchment-lined tray and chill for at least 30 minutes.
- Sprinkle with crushed graham crackers before serving.
Notes
You can customize the seasonings to taste.
I’m Shaykee—born in Morocco, seasoned across continents. From airplane galleys to home kitchens, I share the flavors and stories that shaped my journey.