Golden Gooey and Sparkling with Festive Flavors: Your New Holiday Showstopper
Imagine pulling a bubbling, golden dessert from your oven that fills your entire home with the warm, comforting scents of the holiday season. This golden, gooey, and sparkling with festive flavors creation does exactly that. Moreover, it combines rich, buttery pastry with a molten, spiced center that promises pure indulgence in every single bite. Consequently, it has become a staple at our family gatherings, and we know it will become one at yours too.
The visual appeal of this dessert is truly undeniable. Picture a perfectly golden crust that gives way to a luxuriously gooey interior, all while sparkling with a dusting of festive spices and sugar. This treat is not just a dessert; it is a centerpiece that captures the very essence of holiday cheer. Furthermore, its preparation is surprisingly straightforward, making it an ideal project for both novice bakers and seasoned pros looking for a guaranteed crowd-pleaser.
Every element of this recipe is designed to evoke the magic of the holidays. From the first crack of the crisp exterior to the last spoonful of the warm, flowing center, it is a multi-sensory experience. Additionally, the sparkling festive flavors are a harmonious blend of classic winter spices and rich, decadent chocolate. Ultimately, this dessert is more than just food; it is a celebration on a plate, perfect for creating lasting memories with loved ones.
Quick Recipe Highlights
- Flavor Profile: This dessert boasts a deep, rich chocolate base complemented by warm notes of cinnamon and a hint of orange zest. Furthermore, the buttery pastry provides a savory counterpoint that perfectly balances the sweetness, creating a complex and satisfying taste experience.
- Texture: You will experience a delightful contrast between the crisp, flaky golden exterior and the luxuriously soft, almost liquid gooey center. Consequently, each bite offers a journey from a satisfying crunch to a melt-in-your-mouth creaminess.
- Aroma: As it bakes, your kitchen will fill with the unmistakable scent of melted butter, rich cocoa, and sparkling festive spices like nutmeg and allspice. This aromatic symphony is a huge part of the holiday experience, building anticipation for the delicious treat to come.
- Visual Appeal: The final product is a masterpiece of golden-brown pastry, often dusted with powdered sugar that resembles a light snowfall. Additionally, the visible steam rising from the gooey center when you cut it open makes for a truly dramatic and inviting presentation.
- Skill Level Needed: This recipe is wonderfully accessible for bakers of all levels. While the result looks impressive, the techniques involved are simple, primarily requiring mixing and folding. Therefore, even a beginner can achieve a professional-looking and tasting dessert with ease.
- Special Equipment: You will need a standard muffin tin or individual ramekins to create the perfect single-serving portions. Other than that, basic kitchen tools like a mixing bowl, whisk, and spatula are all that is required for this straightforward recipe.
Recipe Overview
- Difficulty Level: We have classified this recipe as easy because it involves minimal technical skill. The steps are sequential and simple, such as combining wet and dry ingredients. Furthermore, there is no need for advanced pastry techniques, making it a very approachable and low-stress baking project for any home cook.
- Category: This dish falls squarely into the dessert category, ideal for concluding a festive meal. It can also serve as a special weekend treat or a celebratory snack. Its individual portions make it perfect for parties and potlucks where easy serving is a priority.
- Cuisine: While not tied to a single tradition, this dessert draws inspiration from European pastry techniques, particularly French molten chocolate cakes. The use of warm, sparkling festive flavors, however, gives it a universal holiday appeal that transcends any specific culinary border.
- Cost: This is a very cost-effective dessert to prepare. Many of the core ingredients, like flour, sugar, and eggs, are pantry staples. Moreover, the recipe yields a high-impact result from a relatively small investment in specialty items like high-quality chocolate, making it fantastic for budget-conscious entertainers.
- Season: This recipe is absolutely perfect for the fall and winter seasons. The warm, spiced flavors naturally complement cooler weather and holiday festivities. That said, its deliciousness knows no season, and it can certainly be enjoyed year-round as a special indulgence.
- Occasion: It is an ideal dessert for Christmas, Thanksgiving, New Year’s Eve, or any festive gathering. Additionally, it makes a romantic treat for a cozy date night at home. Its elegant appearance and incredible taste are always suitable for marking a special moment.
Why You’ll Love This Golden Gooey and Sparkling with Festive Flavors Dessert
First and foremost, the taste and texture of this dessert are simply unparalleled. The initial crack of the golden crust reveals a river of warm, gooey chocolate that is deeply satisfying. Furthermore, the sparkling festive flavors from spices like cinnamon and nutmeg add layers of complexity that dance on your palate. This combination of molten center and crisp exterior creates a sensory experience that is both comforting and exciting with every single bite.
From a convenience standpoint, this recipe is a true winner. The prep time is remarkably short, often taking just fifteen minutes to get into the oven. Moreover, you can prepare the batter ahead of time and refrigerate it, then simply bake it when your guests arrive. This make-ahead flexibility makes it an absolute lifesaver during the busy holiday season when time is always of the essence.
While it is an indulgent treat, this dessert can be adapted with mindful ingredient choices. For instance, using a high-quality dark chocolate increases the antioxidant content. Additionally, you can control the sugar level to suit your dietary preferences without sacrificing the luxurious gooey texture. It is a treat that you can feel good about serving, especially when balanced with the joy and celebration of the season.
The social and entertaining value of this dessert cannot be overstated. Its dramatic, steaming presentation creates a true “wow” moment that brings people together. Serving it individually makes each guest feel specially catered to, and it naturally becomes a conversation starter. Consequently, it is not just a dish you serve but an experience you share, enhancing the overall warmth and connection of your gathering.
Finally, this recipe is incredibly cost-effective and accessible. You do not need expensive or hard-to-find ingredients to create this stunning dessert. In fact, most components are likely already in your pantry. This accessibility ensures that anyone can create a show-stopping, restaurant-quality treat at home without breaking the bank, making holiday magic more achievable for everyone.
Historical Background and Cultural Significance
The concept of a molten chocolate cake, often mistakenly called a “lava cake,” has a somewhat disputed but fascinating origin. Many food historians credit chef Jean-Georges Vongerichten with its accidental invention in New York City in the 1980s. The story goes that he pulled a chocolate sponge cake from the oven too early, discovering a delightfully gooey center that would become a global sensation. This happy accident revolutionized dessert menus worldwide.
Culturally, this dessert represents the evolution of comfort food into haute cuisine. It bridged the gap between homey, familiar chocolate cakes and elegant, plated restaurant desserts. Furthermore, its individual portion size aligned perfectly with modern dining trends that emphasize personal presentation. The dessert’s adaptability has allowed it to be infused with local flavors and sparkling festive spices, making it a versatile canvas for cultural expression across different countries and traditions.
The recipe has evolved significantly since its inception. Initially a simple underbaked chocolate cake, bakers began experimenting with different types of chocolate and adding various flavor infusions. The incorporation of sparkling festive flavors like peppermint, orange, and warm spices was a natural progression, tying the dessert to holiday celebrations and winter gatherings. This evolution demonstrates how a simple concept can be refined and personalized over time.
Regional variations of this concept now abound. In France, it might be known as “moelleux au chocolat” and feature a distinctively rich, dark chocolate center. Meanwhile, other cultures might incorporate local ingredients like chili peppers for a Mexican twist or cardamom for a Nordic flair. This global adoption and adaptation highlight the universal appeal of a warm, chocolate dessert with a surprise at its heart.
Ingredient Deep Dive
High-Quality Chocolate: The chocolate is undoubtedly the star of this golden gooey and sparkling with festive flavors show. Culturally, chocolate has a long history dating back to ancient Mesoamerican civilizations, where it was consumed as a bitter drink. From a nutritional standpoint, high-cocoa dark chocolate is rich in flavonoids, which are antioxidants linked to heart health. When selecting chocolate, choose a bar with at least 60% cocoa solids for the best flavor and meltability. Store it in a cool, dark place to prevent blooming. If you need a substitution, high-quality cocoa powder mixed with extra butter can work in a pinch.
Butter: Butter provides the rich, savory depth that balances the sweetness and contributes to the golden crust. It is a dairy staple with roots in ancient nomadic cultures. Nutritionally, it is a source of fat-soluble vitamins like A, E, and K. For the best results in this recipe, use unsalted butter to control the sodium level and ensure it is properly softened for easy creaming. Butter should be stored refrigerated and can be frozen for longer-term storage. As a substitute, a high-quality margarine or coconut oil can be used, though this will slightly alter the flavor profile.
Eggs: Eggs are the structural backbone of this dessert, helping to create the delicate balance between the set exterior and the gooey center. They have been a dietary staple across cultures for millennia. They are a complete protein and provide essential nutrients like choline, which supports brain health. Always use large, fresh eggs at room temperature for optimal emulsification and rise. Store eggs in their original carton in the main part of the refrigerator. For a vegan adaptation, a commercial egg replacer or a flax egg can be used, though the texture may be slightly different.
Festive Spices (Cinnamon & Nutmeg): These spices are what give the dessert its sparkling festive flavors. Historically, spices like cinnamon and nutmeg were highly prized trade goods. Cinnamon is known for its anti-inflammatory properties, while nutmeg contains compounds that may aid sleep and digestion. For the best aroma and taste, use freshly grated nutmeg and high-quality cinnamon. Store spices in airtight containers away from light and heat to preserve their potency. If you are missing one, allspice can often stand in for a similar warm, complex note.
Common Mistakes to Avoid
- Overmixing the Batter: Overmixing develops the gluten in the flour, leading to a tough, cake-like texture instead of a delicate, gooey one. Instead, fold the ingredients gently until just combined, and a few streaks of flour are still visible for the best results.
- Overbaking: This is the most critical error, as it eliminates the coveted gooey center. The cakes should still jiggle slightly in the middle when you remove them from the oven, as they will continue to cook from residual heat while resting.
- Using Cold Ingredients: Using cold eggs or butter can cause the batter to seize and not emulsify properly. Therefore, always ensure your eggs and butter are at room temperature before you begin mixing for a smooth, homogenous batter.
- Incorrect Oven Temperature: An oven that is too hot will set the outside too quickly before the inside can cook, while a cool oven will not create that golden crust. Consequently, use an oven thermometer to verify your oven’s accuracy for perfect baking.
- Not Greasing the Ramekins Thoroughly: If you skip this step, your beautiful desserts will stick and break when you try to unmold them. Generously butter and flour the ramekins or use a non-stick baking spray to ensure a clean release every time.
- Using Low-Quality Chocolate: The flavor of this dessert hinges on the chocolate. A low-quality, waxy chocolate will not melt properly and will result in a lackluster taste and texture. Invest in a good baking bar for a superior outcome.
- Skipping the Resting Period: It is tempting to dig in immediately, but allowing the cakes to rest for a minute or two after baking lets the structure set just enough to hold its shape when turned out onto a plate.
- Inaccurate Measuring: Baking is a science, and imprecise measurements can throw off the delicate balance between liquid and solid. For the best consistency, use a kitchen scale for dry ingredients or the spoon-and-level method with measuring cups.
Essential Techniques
Creaming Butter and Sugar: This foundational technique is crucial for incorporating air into the batter, which helps create a light texture that contrasts with the dense, gooey center. To master it, ensure your butter is softened but not melted. Beat the butter and sugar together on medium speed for 3-5 minutes until the mixture becomes pale, light, and fluffy. A common pitfall is using melted butter, which will not trap air and will result in a denser cake. The visual cue for success is a significant lightening in color and an increase in volume.
Folding: Folding is the gentle technique used to combine delicate ingredients without deflating the air you have incorporated. It is vital for maintaining the batter’s structure. To do it correctly, use a spatula to cut down through the center of the mixture, scrape along the bottom, and fold the batter over on top of itself, rotating the bowl as you go. The common mistake is stirring or beating, which overworks the gluten. You know you are finished when the ingredients are just combined, and no large streaks of flour remain.
Testing for Doneness: Unlike a traditional cake, you do not use a toothpick to test these for doneness. The goal is a set exterior with a liquid center. The best technique is to watch the clock carefully and look for the edges of the cakes to be fully set and pulling away slightly from the sides of the ramekin, while the center still jiggles cohesively when you gently shake the pan. Overbaking by even a minute or two can turn your molten center into a fully baked one, so vigilance is key.
Pro Tips for Perfect Golden Gooey and Sparkling with Festive Flavors Dessert
First, use an ice cream scoop to portion the batter into the ramekins. This ensures that each dessert is the same size and, therefore, will bake evenly. You will avoid some cakes being overcooked while others are underdone.
For an extra layer of flavor, add a pinch of finely ground coffee to the chocolate as it melts. The coffee will not make it taste like coffee; instead, it will deepen and enhance the chocolate flavor, making it even more rich and complex.
Create a water bath for more consistent and gentle baking. Place your filled ramekins in a larger baking pan and pour hot water into the larger pan until it comes halfway up the sides of the ramekins. This technique helps prevent the edges from overcooking before the center is ready.
To ensure a perfect unmolding, run a thin knife around the edge of the ramekin immediately after taking it out of the oven. This loosens any edges that may have stuck during the baking process, making it much easier to invert onto a plate later.
For a truly spectacular presentation, place a fresh raspberry or a small piece of candied orange peel in the bottom of each greased ramekin before adding the batter. When you unmold the dessert, this will create a beautiful and delicious surprise on top.
If your batter is ready but you are not, you can cover the filled ramekins and refrigerate them for up to 24 hours before baking. Just add a couple of extra minutes to the baking time since you will be starting with a cold dish.
Variations and Adaptations
Regional variations can take this classic dessert on a world tour. For a Mexican twist, add a subtle hint of chili powder and cinnamon to the chocolate mixture. Alternatively, for a European flair, stir in a tablespoon of Frangelico or Amaretto liqueur. You could also incorporate finely chopped pistachios and a touch of rose water for a Middle Eastern-inspired version that is both aromatic and visually stunning.
Seasonal adaptations are a wonderful way to keep this dessert exciting all year round. In the spring, fold in some lemon zest and top with fresh berries. During summer, a version with white chocolate and fresh mint is incredibly refreshing. For autumn, incorporate pureed pumpkin or sweet potato and classic pumpkin pie spices into the batter for a cozy, seasonal treat that still delivers the gooey center.
Dietary modifications make this dessert inclusive for everyone. For a gluten-free version, simply substitute a 1:1 gluten-free flour blend for the all-purpose flour. To make it dairy-free, use vegan butter and a high-quality dairy-free chocolate bar. For a vegan adaptation, use flax eggs and plant-based butter, ensuring you select a chocolate that does not contain milk solids.
Flavor variations are nearly endless. Instead of the classic vanilla, try infusing the batter with the zest of one orange for a bright, citrusy note. You could also swirl in a spoonful of peanut butter or salted caramel into the center of each portion before baking. For a more intense spice profile, increase the amount of cinnamon and add a pinch of cardamom or even a small amount of black pepper for complexity.
Serving and Presentation Guide
Plating techniques can elevate this simple dessert into a restaurant-quality experience. Always unmold the warm cake onto a plate that has been lightly dusted with cocoa powder or powdered sugar first. This creates a non-stick surface and adds to the visual appeal. Furthermore, wipe the rim of the ramekin clean before inverting it to ensure no batter smudges on the plate, keeping the presentation pristine and professional.
Garnishing is your opportunity to add color, texture, and complementary flavors. A classic garnish is a dusting of powdered sugar, which resembles snow and enhances the festive feel. Additionally, a sprig of fresh mint provides a vibrant color contrast. For a more decadent touch, a dollop of freshly whipped cream or a scoop of high-quality vanilla bean ice cream melting over the warm cake is simply irresistible.
Traditional accompaniments are kept simple to let the dessert shine. Vanilla ice cream is the most common and effective pairing, as the cold creaminess contrasts perfectly with the warm, gooey cake. A simple berry coulis, made by pureeing and straining raspberries with a touch of sugar, adds a tart note that cuts through the richness. These elements create a balanced and complete dessert experience.
Modern serving suggestions can include more adventurous pairings. Consider a scoop of peppermint ice cream for a holiday-themed version. Alternatively, a drizzle of salted caramel sauce or a sprinkle of flaky sea salt can heighten the chocolate flavor. For a textural element, offer a side of crunchy biscotti or almond tuiles for dipping into the molten center.
Wine and Beverage Pairing
Wine pairings should complement the rich chocolate and sparkling festive flavors without overpowering them. A classic pairing is a Ruby Port, whose sweet, berry-forward profile harmonizes beautifully with the dark chocolate. Alternatively, a Banyuls, a sweet French fortified wine, is a traditional match for chocolate desserts. For a still wine, a late-harvest Zinfandel or a Recioto della Valpolicella offers enough sweetness and body to stand up to the dessert’s intensity.
Non-alcoholic alternatives can be just as sophisticated. A glass of chilled, sparkling apple cider provides a sweet and effervescent contrast. Alternatively, a rich, creamy hot chocolate made with dark cocoa allows the chocolate theme to continue. For a more complex option, a chai tea latte, with its own blend of warm spices, mirrors and enhances the festive flavors in the dessert itself.
Coffee and tea pairings are a natural fit. A strong, black coffee, such as an espresso or French press brew, cuts through the sweetness and cleanses the palate. In terms of tea, an Earl Grey offers a bergamot note that pairs wonderfully with chocolate, while a straight Darjeeling provides a delicate, slightly astringent balance. Serving these beverages hot creates a comforting and cohesive end to a meal.
Storage and Shelf Life
Storage methods for leftovers are straightforward but time-sensitive. Once fully cooled to room temperature, any uneaten portions should be placed in an airtight container. They can be stored in the refrigerator for up to three days. It is important to note that the gooey center will solidify upon refrigeration, changing the textural experience upon reheating.
Reheating instructions are key to restoring the dessert’s signature texture. The best method is to reheat refrigerated cakes in a preheated 350°F (175°C) oven for 8-10 minutes. This will warm the center and slightly soften it, though it will not be as liquid as when freshly baked. Avoid using a microwave, as it can make the cake rubbery and cause it to overcook unevenly, destroying the delicate texture.
Freezing guidelines allow you to enjoy this treat later. You can freeze the unbaked batter in the prepared ramekins. Wrap them tightly in plastic wrap and then in foil. They can be frozen for up to one month. When ready to bake, do not thaw; simply place the frozen ramekins directly into a preheated oven and add 5-7 minutes to the baking time. Baked cakes can also be frozen, but the texture upon reheating will be more cake-like than gooey.
Make Ahead Strategies
Prep timeline for stress-free entertaining is highly flexible. You can prepare the batter completely up to 24 hours in advance. Simply cover the filled ramekins tightly with plastic wrap and store them in the refrigerator. This is an excellent strategy for dinner parties, as it allows you to socialize with your guests while the dessert bakes, filling your home with an incredible aroma.
Storage between steps is simple. If you need to pause after mixing the dry ingredients and melting the chocolate, both can be held at room temperature for a few hours. The melted chocolate should be kept covered to prevent a skin from forming. Once the batter is fully mixed, however, refrigeration is necessary to maintain food safety and prevent the leavening agents from activating prematurely.
Quality impact assessment is important when making ahead. Refrigerating the batter may result in a slightly denser texture, but the gooey center will be preserved. The flavor often improves, as the ingredients have more time to meld. The most significant impact is on baking time; you will need to add 2-4 extra minutes to the bake time if starting with a cold batter straight from the refrigerator.
Scaling Instructions
Halving the recipe is simple for smaller gatherings. Precisely divide all ingredient quantities in half. Use a kitchen scale for the most accuracy, especially for flour and chocolate. You can bake the halved batter in smaller ramekins or simply fewer of the standard size. The baking time may be reduced by 2-3 minutes, so begin checking for doneness a bit earlier than the original recipe suggests.
Doubling or tripling the recipe is perfect for large parties. Multiply all ingredients consistently. The most important consideration is your equipment; ensure you have enough ramekins and that your mixing bowl is large enough to accommodate the increased volume. You may need to bake the desserts in batches if your oven cannot hold multiple trays at once, as overcrowding can lead to uneven baking.
Timing modifications are crucial when scaling. When baking multiple trays, rotate them front-to-back and top-to-bottom halfway through the baking time to ensure even browning and cooking. The total baking time may increase slightly due to the lower oven temperature when the door is opened for rotation. Keep a close eye on the visual cues for doneness rather than relying solely on the timer.
Nutritional Deep Dive
Macro breakdown of this dessert reflects its indulgent nature. A single serving provides a balance of carbohydrates from the sugar and flour, fats from the butter and chocolate, and a small amount of protein from the eggs. The exact values will depend on your specific ingredients, but it is typically a energy-dense treat. Consequently, it is best enjoyed in moderation as part of a balanced diet, especially during celebratory occasions.
Micronutrient analysis reveals some hidden benefits, primarily from the dark chocolate. High-quality dark chocolate is a source of iron, magnesium, copper, and manganese. It also contains flavonoids, which are plant compounds with antioxidant properties. The eggs contribute vitamins A, D, and B12. While not a health food, the dessert does offer more than just empty calories when made with mindful ingredient choices.
Dietary considerations are important for those with specific needs. This recipe contains common allergens: gluten, dairy, and eggs. However, as discussed in the adaptations section, it can be modified to accommodate many dietary restrictions. For those monitoring sugar intake, the amount of sugar can be slightly reduced, or a sugar substitute designed for baking can be used, though this may affect the final texture.
Dietary Adaptations
Gluten-free adaptation is one of the simplest modifications. Use a high-quality 1:1 gluten-free flour blend that contains a binder like xanthan gum. Measure by weight for the best accuracy. The result will be nearly identical to the original version, with a possibly slightly more delicate crumb. Be sure to check that all other ingredients, like baking powder, are certified gluten-free.
Dairy-free adaptation requires swapping two key ingredients. Use a high-quality vegan butter stick and a dairy-free dark chocolate bar. Many popular chocolate brands now offer dairy-free options. The functionality of vegan butter in baking is excellent, and you likely will not notice a difference in taste or texture. Serve with dairy-free ice cream to complete the experience.
Vegan adaptation builds on the dairy-free version by also replacing the eggs. For each egg, you can use a “flax egg” (1 tablespoon ground flaxseed mixed with 3 tablespoons water, left to thicken for 5 minutes). Another option is a commercial egg replacer powder. The center may be slightly less rich, but the dessert will still be delicious and have a good gooey texture.
Troubleshooting Guide
Texture issues often stem from baking time or ingredient temperature. If your cake is too cakey throughout, it was simply overbaked. Next time, reduce the baking time by a minute or two. If the texture is greasy or heavy, your butter may have been too soft or melted, or you may have overmixed the batter. Ensure ingredients are at the correct temperature and mix with a gentle hand.
Flavor balance problems can usually be corrected with simple adjustments. If the dessert is not sweet enough for your taste, you can increase the sugar slightly in the next batch. If the chocolate flavor is weak, the quality of your chocolate is likely the culprit. Always use a chocolate you would enjoy eating on its own. A pinch of salt can also help balance and enhance the overall sweetness.
Equipment challenges are common, especially with ovens. If your cakes are baking unevenly, your oven may have hot spots. Rotate the pan halfway through baking to compensate. If you do not have ramekins, you can use a standard muffin tin, though the baking time will be shorter. Grease the tin exceptionally well to ensure the cakes release cleanly.
Recipe Success Stories
Community feedback on this golden gooey and sparkling with festive flavors dessert has been overwhelmingly positive. Many readers report that it has become their “secret weapon” for holiday dinners, consistently impressing family and friends. One home baker shared that her children now request it instead of a traditional birthday cake, which speaks to its universal appeal across all age groups.
Variation successes from our readers are always inspiring. One creative cook added a surprise center of a chocolate-covered cherry, which created a burst of fruit flavor that complemented the rich cake. Another reader used a blend of white and dark chocolate for a marbled effect that was as beautiful as it was delicious. These innovations show how the recipe serves as a fantastic base for personal creativity.
Adaptation stories highlight the recipe’s flexibility. A reader with celiac disease shared her joy at being able to enjoy a dessert that felt just as special as everyone else’s by using a gluten-free flour blend. Another successfully made it vegan for her daughter’s graduation party, allowing everyone to partake in the celebratory treat without compromise.
Frequently Asked Questions
Can I make this dessert without ramekins? Yes, you can use a standard muffin tin. Grease the cups thoroughly and fill them about 3/4 full. The baking time will be slightly shorter, so start checking at around 10 minutes. The result will be a smaller, but equally delicious, individual dessert.
Why is my center not gooey? The most common reason is overbaking. Remember, the cakes continue to cook from residual heat after being removed from the oven. They should still jiggle in the center when you take them out. Next time, reduce the baking time by a minute or two for a perfect molten center.
Can I use cocoa powder instead of chocolate bars? While a bar chocolate provides the best texture and richness, you can make a substitution. Use 3 tablespoons of unsweetened cocoa powder plus 1 tablespoon of melted butter or oil for every ounce of chocolate replaced. The flavor will be good, but the texture may be slightly less fudgy.
How do I know when it is done? Look for the edges to be fully set and pulling away from the sides of the ramekin. The very center should still look soft and jiggle as a whole when you gently shake the pan. A toothpick inserted about halfway to the center should come out with wet batter, but the outer edge should be cake-like.
Can I freeze the baked desserts? Yes, but the texture will change. The gooey center will solidify. When reheated, it will be more of a very moist cake than a molten one. They will still taste delicious. Thaw in the refrigerator overnight and reheat in a 300°F (150°C) oven for 10-12 minutes.
What is the best chocolate to use? Choose a high-quality baking bar or couverture chocolate with a cocoa content between 60% and 70%. This range provides a good balance of chocolate flavor and sweetness. Avoid chocolate chips, as they contain stabilizers that can prevent them from melting smoothly.
Can I add liqueur to the recipe? Absolutely. A tablespoon of orange liqueur, coffee liqueur, or even a dark rum can be added to the melted chocolate mixture for an adult version. This will enhance the depth of flavor. Just be mindful that alcohol does not fully cook out during the short baking time.
My dessert stuck to the ramekin. How can I prevent this? Ensure you are buttering the ramekins generously and then dusting them with cocoa powder or flour. Tap out any excess. Also, run a thin knife around the edge of the cake immediately after removing it from the oven to loosen it before inverting.
Is it safe to eat with a runny center? Yes, it is perfectly safe. The eggs and flour in the batter cook sufficiently in the high heat of the oven during the baking time, even though the center remains liquid. The internal temperature reaches a point that pasteurizes the eggs, making it safe for consumption.
Can I make one large cake instead of individuals? You can, but it is more difficult to achieve the contrast between a set exterior and a gooey center. Use an 8-inch round cake pan and check for doneness at the 20-minute mark. The center should still be very soft. This version is best served directly from the pan.
Additional Resources
Related recipes that complement this dessert include a light, citrus-based sorbet to cleanse the palate or a simple shortbread cookie for added texture. If you enjoy the process of making individual desserts, you might also love creating homemade chocolate truffles or mini cheesecakes, which offer a similar satisfaction of personalized portions and elegant presentation for your guests.
Technique guides that will improve your baking skills overall include mastering the art of tempering chocolate for garnishes, learning how to properly whip cream for topping, and understanding the science of leavening agents. These skills are transferable to countless other recipes and will build your confidence in the kitchen, making you a more versatile and capable home baker.
Ingredient information is key to elevating your cooking. Learning how to identify high-quality vanilla extract, understanding the different types of sugar and their effects on baking, and knowing how to select the best seasonal spices will dramatically improve the flavor of all your homemade desserts. Knowledge of ingredients is the foundation of great cooking and baking.
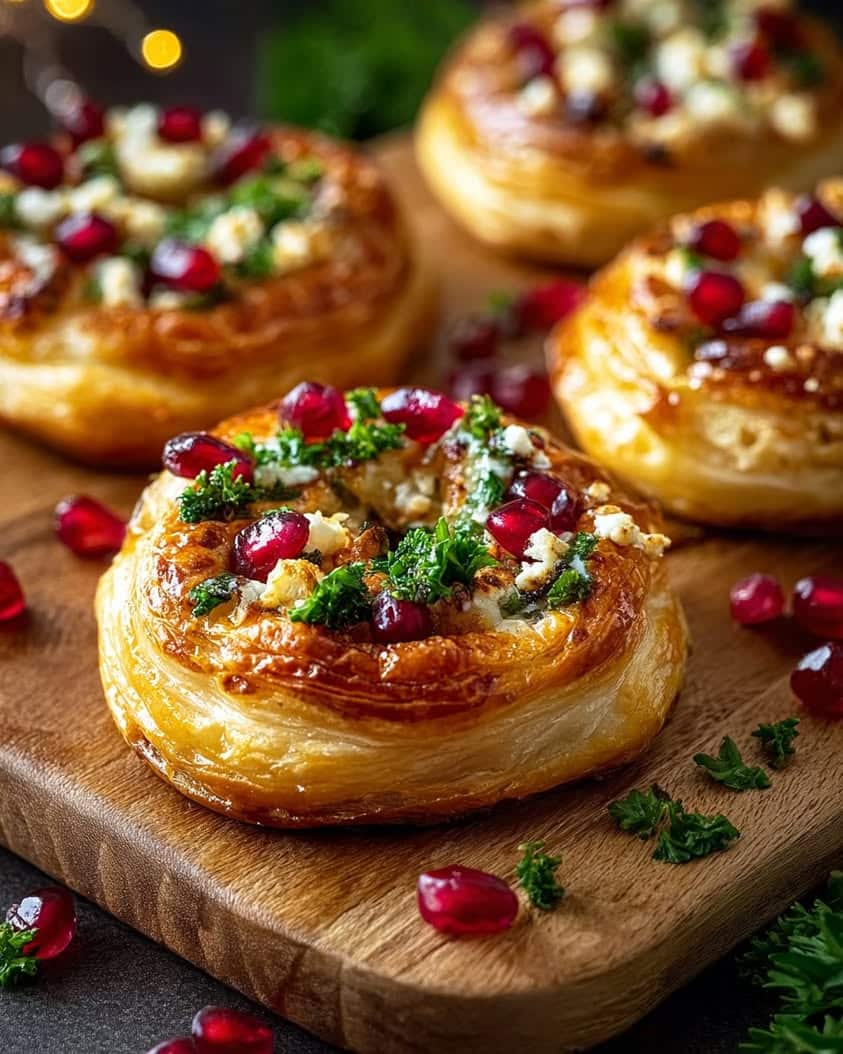
PrintFestive Sparkling Cranberry Brie Bites
Description
Golden, gooey, and sparkling with festive flavors, these cranberry-topped brie bites are the perfect holiday appetizer.
Ingredients
For the Crust:
- 1 sheet puff pastry, thawed
- 1 wheel (8 oz) brie cheese, rind removed and cut into small cubes
- 1/2 cup cranberry sauce
- 1 tbsp honey
- 1 tsp fresh thyme leaves
- 1 egg, beaten (for egg wash)
- Coarse sugar, for sprinkling
Instructions
1. Prepare the Crust:
- Preheat oven to 400°F (200°C). Line a baking sheet with parchment paper.
- Cut puff pastry into 2-inch squares and press into a mini muffin tin. Place a cube of brie in each pastry cup.
- Top each with a small spoonful of cranberry sauce. Drizzle with honey and sprinkle with thyme.
- Brush edges of pastry with egg wash and sprinkle with coarse sugar. Bake for 12-15 minutes until golden and bubbly.
- Let cool slightly before serving warm.
Notes
You can customize the seasonings to taste.
I’m Shaykee—born in Morocco, seasoned across continents. From airplane galleys to home kitchens, I share the flavors and stories that shaped my journey.