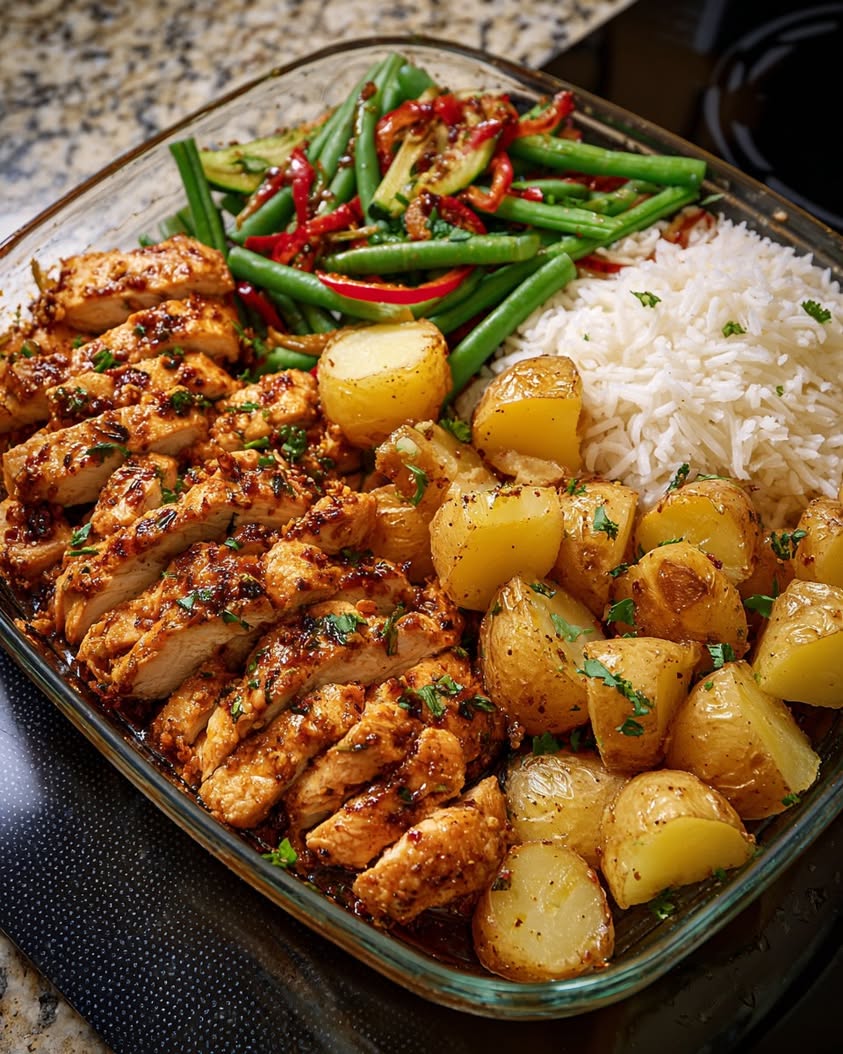
Honey-Mustard Chicken Tray with Herbed Potatoes, Rice & Green Beans: A Complete, Flavorful Dinner Made on One Pan for Easy Cleanup!
Imagine a dinner that fills your kitchen with the irresistible aromas of roasting garlic, sweet honey, and savory herbs. This honey-mustard chicken tray bake delivers exactly that experience, along with minimal cleanup. Essentially, you get a complete, flavorful dinner made on one pan for easy cleanup. The magic happens when juicy chicken thighs roast alongside crispy herbed potatoes and tender green beans, all coated in a sticky, tangy glaze.
Furthermore, this recipe is a true weeknight hero. It transforms simple, affordable ingredients into a meal that feels special and satisfying. The honey-mustard marinade caramelizes beautifully in the oven, creating a glossy, finger-licking-good sauce that coats every component. Meanwhile, the potatoes become golden and crisp on the outside while staying fluffy inside. Ultimately, this one-pan wonder proves that delicious, wholesome food doesn’t require a sink full of dishes.
Consequently, this honey-mustard chicken tray bake is perfect for busy families, meal preppers, or anyone craving comfort food without the fuss. The method is straightforward and forgiving. You simply arrange everything on a single sheet pan, let the oven do the work, and emerge with a balanced, restaurant-quality plate. Let’s dive into why this easy dinner recipe will become a staple in your rotation.
Quick Recipe Highlights
- Flavor Profile: This dish boasts a perfect balance of sweet and tangy notes from the honey and Dijon mustard, complemented by the earthy depth of garlic and aromatic herbs like rosemary and thyme. The result is a complex, savory-sweet glaze that enhances the natural flavors of the chicken and vegetables.
- Texture: You’ll enjoy a delightful contrast of textures: crispy, golden-brown chicken skin, fluffy and crisp-edged roasted potatoes, and tender-crisp green beans that retain a slight snap. The sticky honey-mustard sauce adds a glossy, luxurious mouthfeel that ties every bite together beautifully.
- Aroma: As it bakes, your kitchen will fill with the warm, inviting scents of roasting garlic, caramelizing honey, and woody herbs. These aromas mingle with the savory smell of chicken and potatoes, creating an olfactory promise of a comforting and delicious meal to come.
- Visual Appeal: The finished tray presents a vibrant and rustic feast. Golden-brown chicken thighs nestle among crispy potatoes and bright green beans, all glistening with a deep amber sauce. It’s a colorful, hearty presentation that looks impressive straight from the oven to the table.
- Skill Level Needed: This is a beginner-friendly recipe designed for home cooks of all levels. The techniques involve basic chopping, simple mixing for the marinade, and arranging ingredients on a pan. No advanced culinary skills are required, making it an excellent recipe for building confidence in the kitchen.
- Special Equipment: You only need a large, rimmed baking sheet (a half-sheet pan is ideal) to ensure everything cooks evenly without overcrowding. Other than that, standard kitchen tools like a mixing bowl, a whisk for the sauce, and a good chef’s knife are all you’ll require.
Recipe Overview
- Difficulty Level: We rate this recipe as “Easy” because it involves fundamental techniques like chopping vegetables and mixing a simple sauce. The oven handles most of the cooking work, and there’s no need for constant monitoring or tricky steps. Even novice cooks can achieve fantastic results by following the straightforward instructions.
- Category: This dish falls squarely into the categories of easy dinner recipes and family meals. It’s also a prime example of a healthy one-pan meal and a fantastic traybake or sheet pan dinner. The inclusion of protein, starch, and vegetables makes it a complete, balanced plate.
- Cuisine: While honey-mustard pairings are popular in American and European cooking, this recipe is a modern, streamlined take on a classic roast dinner. It draws inspiration from rustic, home-style cooking traditions where simple, hearty ingredients are combined and roasted together for maximum flavor and convenience.
- Cost: This is a very cost-effective meal. Chicken thighs are an affordable protein, and potatoes, green beans, and pantry staples like honey, mustard, and oil keep the price low. You can feed a family of four a restaurant-quality meal for a fraction of the cost of dining out or ordering takeout.
- Season: This honey-mustard chicken tray bake is truly a year-round recipe. It provides cozy, warming comfort in the fall and winter months. Conversely, it’s light enough for spring and summer, especially since it doesn’t heat up the kitchen for hours like a traditional roast.
- Occasion: It’s perfect for casual weeknight dinners, effortless weekend family gatherings, or even simple meal prep. The impressive presentation also makes it suitable for hosting informal guests. You get the “wow” factor of a elaborate meal with the ease of a simple preparation.
Why You’ll Love This Recipe
First and foremost, the taste and texture combination is utterly irresistible. The honey-mustard glaze caramelizes into a sticky, sweet, and tangy coating that seeps into the chicken and potatoes. Each bite offers a symphony of flavors: the savory umami of the chicken, the earthy herbs, the sharpness of mustard, and the mellow sweetness of honey. Additionally, the contrasting textures from the crispy potato edges to the juicy chicken create a satisfying eating experience that keeps you coming back for more. This complete, flavorful dinner made on one pan for easy cleanup delivers restaurant-quality taste in your own home.
From a convenience standpoint, this recipe is a game-changer. The “one-pan” method is its greatest asset, minimizing both active cooking time and post-dinner cleanup. You’ll spend about 15 minutes on prep—just chopping potatoes, trimming beans, and whisking the sauce—before everything goes into the oven. After that, you have 45 minutes of hands-off time to set the table, help with homework, or simply relax. Ultimately, washing a single baking sheet, a mixing bowl, and a cutting board is a small price to pay for such a magnificent meal. This efficiency makes it a top contender for busy weeknights.
Nutritionally, this traybake offers a well-rounded plate. Chicken thighs provide high-quality protein and essential B vitamins, while potatoes are a great source of potassium and vitamin C, especially when you leave the skin on. Green beans add fiber, vitamins A and K, and a vibrant pop of color. By controlling the ingredients, you can adjust the oil, honey, or salt to meet your dietary needs. Consequently, you’re serving a wholesome, home-cooked meal that nourishes your family without any hidden processed ingredients or excessive sodium.
For social and entertaining value, this dish is a host’s secret weapon. It looks abundant and impressive when you bring the entire tray to the table, encouraging a communal, family-style dining experience. The aroma alone will have your guests eagerly anticipating dinner. Because it requires little last-minute fuss, you can actually enjoy your company instead of being stuck at the stove. It’s a reliably delicious crowd-pleaser that suits both adults and children, making it perfect for casual gatherings and family meals alike.
Finally, the cost-effectiveness and accessibility of this recipe cannot be overstated. It utilizes inexpensive, readily available ingredients that you can find at any grocery store. Chicken thighs are often more affordable and forgiving than chicken breasts, staying juicy even if slightly overcooked. Potatoes and green beans are seasonal staples that are easy on the budget. This approach proves that eating well doesn’t require expensive or exotic items. You can create a spectacular, comforting feast that feels like a treat without straining your weekly food budget.
Historical Background and Cultural Significance
The concept of roasting meat and vegetables together over a fire is one of humanity’s oldest cooking methods. Our ancestors would cook hunted game with foraged roots and herbs in a single vessel, making efficient use of heat and resources. The modern “traybake” or “sheet pan dinner” is a direct descendant of these ancient practices, adapted for the contemporary kitchen oven. This honey-mustard chicken tray bake, therefore, connects us to a timeless culinary tradition of combining simple ingredients for a communal, hearty meal. It represents the evolution of rustic cooking into a convenient, modern format.
Culturally, the combination of honey and mustard has deep roots across Europe and the Middle East. Mustard seeds have been used for millennia, while honey has been a prized sweetener since ancient times. In medieval European cuisine, sweet and sour sauces featuring mustard, vinegar, and honey or fruit were common accompaniments to meats. This recipe’s glaze is a streamlined, accessible version of those historical gastronomic principles. It showcases how classic flavor pairings endure because they simply work, pleasing palates across generations and cultures.
The evolution of this specific recipe is tied to the mid-20th century rise of convenience cooking and the popularization of ingredients like Dijon mustard and pre-packaged honey. As home cooks sought faster ways to get dinner on the table after World War II, one-pan meals gained appeal. The honey-mustard chicken trend, often using bottled dressings, became popular in American households in the 1970s and 80s. Today’s version, like this one with fresh herbs and whole ingredients, reflects a shift back towards scratch cooking while retaining the convenience factor that made the original so appealing.
Regional variations of this concept are endless. In France, a “poulet à la moutarde” might use crème fraîche with the mustard. In the American South, the honey might be swapped for maple syrup or brown sugar. The vegetables can change with the season—swap green beans for Brussels sprouts in winter or asparagus in spring. The core idea remains: protein + vegetables + a flavorful glaze, all roasted together. This adaptability is key to the recipe’s enduring popularity and its status as a global weeknight dinner solution.
Ingredient Deep Dive
Chicken Thighs (Bone-in, Skin-on): Culturally, dark meat chicken has been prized in many cuisines for its richer flavor and moisture. Unlike breasts, thighs contain more fat and connective tissue, which renders during roasting to self-baste the meat, ensuring it stays incredibly juicy. Nutritionally, they provide high-quality protein, iron, zinc, and B vitamins. For selection, look for plump, pink thighs with evenly distributed fat under the skin. Store them in the coldest part of your fridge and use within 1-2 days of purchase. For a substitution, boneless, skinless thighs will work but may cook faster and be slightly less juicy; adjust cooking time accordingly. Chicken drumsticks or even pork chops can also be used.
Yukon Gold Potatoes: These potatoes are a relatively modern cultivar, developed in Canada, and are now beloved for their buttery flavor and creamy texture. They hold their shape well when roasted but also develop a beautiful golden crust. They are a good source of vitamin C, potassium, and fiber, especially with the skin left on. Choose firm potatoes without sprouts or green tinges. Store them in a cool, dark, well-ventilated place (not the refrigerator). Russet potatoes can be substituted for a fluffier interior, or baby potatoes can be used whole for a different presentation. The key is to cut them into uniform sizes for even cooking.
Dijon Mustard: Originating from the city of Dijon, France, this mustard is made from brown mustard seeds, white wine, and spices. It provides a sharp, complex tang that is less vinegary than yellow mustard. Its emulsifying properties help create a smooth, clingy sauce. Nutritionally, mustard seeds contain selenium and anti-inflammatory compounds. Choose a brand with simple ingredients. Mustard lasts for months in the refrigerator after opening. For substitutions, whole-grain mustard will add texture, while a good quality yellow mustard can work in a pinch, though the flavor profile will be simpler and more acidic.
Honey: As one of the world’s oldest sweeteners, honey has been used in cooking and medicine for thousands of years. In this recipe, it balances the mustard’s acidity, promotes caramelization, and creates the signature sticky glaze. It contains trace enzymes, minerals, and antioxidants. Choose raw, local honey for the most complex flavor, but any pure honey will work. Store it at room temperature. For a vegan substitution, maple syrup or agave nectar can be used, though they will impart their own distinct flavors and may caramelize differently. Brown sugar mixed with a little water is another alternative.
Fresh Rosemary & Thyme: These woody herbs are staples of Mediterranean and European cooking, symbolizing remembrance and courage in folklore. They release their essential oils slowly during roasting, infusing the entire dish with aromatic, earthy notes. They are rich in antioxidants. Look for vibrant, fragrant sprigs without wilting or black spots. Store them loosely wrapped in a damp paper towel in the refrigerator. Dried herbs can substitute in a pinch—use one-third the amount of fresh—but they lack the bright, resinous quality of fresh herbs. Other herb combinations like oregano and sage also work beautifully.
Common Mistakes to Avoid
- Overcrowding the Pan: This is the most common error. If the ingredients are piled on top of each other, they will steam instead of roast. Consequently, you’ll end up with soggy potatoes and pale, rubbery chicken skin instead of crispy, golden-brown results. Always use a large enough pan and spread everything in a single layer.
- Using Skinless, Boneless Chicken Breasts: While it seems like a healthier swap, chicken breasts dry out quickly in the high, dry heat of roasting. The bone-in, skin-on thighs provide built-in insurance against dryness. The skin protects the meat and becomes deliciously crisp, while the bone adds flavor and helps cook the meat evenly.
- Not Preheating the Oven: Starting with a cold oven drastically changes the cooking process. The chicken will sit in a lukewarm environment, causing it to release moisture and stew rather than sear. Always preheat your oven fully so the ingredients start cooking immediately, leading to better browning and texture.
- Cutting the Potatoes Unevenly: If your potato pieces are different sizes, the smaller ones will burn before the larger ones are cooked through. Take the time to cut them into uniform 1-inch chunks. This ensures they all roast at the same rate and finish perfectly tender and crisp at the same time.
- Adding the Green Beans Too Early: Green beans cook much faster than chicken and potatoes. If you add them at the beginning, they will become shriveled and burnt. Adding them during the last 15-20 minutes of cooking is crucial for achieving a tender-crisp, vibrant green result.
- Skipping the Oil on the Vegetables: The oil is not just to prevent sticking; it conducts heat and helps the vegetables’ surfaces caramelize and crisp. Tossing the potatoes and green beans in oil (and seasoning) ensures they roast properly and develop deep, savory flavors.
- Not Seasoning Each Component: Season the chicken generously, and don’t forget to season the potatoes and beans separately. Layering seasoning at each step builds a more complex and well-rounded flavor profile throughout the entire dish, rather than just on the surface.
- Using a Dark or Non-Stick Pan for the Entire Time: Dark pans can cause over-browning on the bottom. For the best all-over browning, a light-colored, rimmed aluminum sheet pan is ideal. If you only have a dark pan, consider reducing the oven temperature by 25°F and checking for doneness a few minutes earlier.
- Not Letting the Chicken Rest: Slicing into the chicken immediately after it comes out of the oven will cause all the precious juices to run out onto the cutting board, leaving the meat dry. Let it rest for 5-10 minutes tented with foil. This allows the juices to redistribute throughout the meat.
- Forgetting to Stir or Flip Halfway: While you don’t want to fuss with it constantly, a single stir or flip of the potatoes and a check on the chicken about halfway through cooking promotes even browning and prevents any one side from burning or sticking.
Essential Techniques
Creating an Emulsified Marinade/Glaze: Whisking the oil, honey, and mustard together vigorously is crucial. This technique, called emulsification, combines liquids that normally don’t mix (oil and water-based ingredients) into a smooth, homogeneous sauce. A stable emulsion ensures the glaze coats the chicken evenly and doesn’t separate in the oven’s heat. To master it, start with the mustard and honey, then slowly drizzle in the oil while whisking constantly. The common pitfall is adding the oil too quickly, which can cause the emulsion to “break” and look greasy and separated. Success looks like a thick, smooth, pale brown sauce that clings to a spoon.
Dry-Brining the Chicken (Seasoning in Advance): Salting the chicken and letting it sit for even 15-30 minutes before cooking is a form of dry-brining. The salt draws moisture from the skin to the surface, where it dissolves the salt. That seasoned moisture is then reabsorbed, seasoning the meat deeper and helping the skin dry out for ultimate crispiness. This technique is important for well-seasoned, juicy meat with crackling skin. The key is to pat the chicken skin very dry before seasoning. A common mistake is not patting the chicken dry, which leads to steaming. Visual cue for success: the chicken skin will look slightly puckered and matte before it goes into the oven.
High-Heat Roasting: Using a high oven temperature (400°F/200°C) is essential for this recipe. This technique quickly renders fat, creates a Maillard reaction (browning) on the chicken skin and potatoes, and caramelizes the sugars in the honey. It also cooks the food faster, preserving moisture inside while creating texture outside. The importance lies in achieving the signature crispy texture and deep flavor. To master it, ensure your oven is fully preheated. A common pitfall is opening the oven door frequently, which causes temperature drops and leads to uneven cooking. Success is visually apparent: golden-brown, crispy chicken skin and potatoes with caramelized edges.
Staggered Vegetable Addition: This technique involves adding ingredients with different cooking times to the same pan at different intervals. It ensures every component finishes cooking perfectly at the same moment. Here, the chicken and potatoes start together because they need the longest time. The green beans are added later because they cook quickly. This is important to prevent overcooked, mushy, or burnt vegetables. Master it by prepping your green beans ahead of time so they’re ready to scatter onto the hot pan. The pitfall is forgetting and adding everything at once. The visual cue is adding the beans when the potatoes are about halfway tender and the chicken is partially cooked.
Pro Tips for Perfect Honey-Mustard Chicken Tray Bake
1. Pat the Chicken Skin Exceptionally Dry: Use paper towels to thoroughly dry the chicken thighs before seasoning and adding the glaze. Any surface moisture will create steam, which is the enemy of crispy skin. This simple step is the single biggest factor in achieving that restaurant-quality, crackling crust.
2. Get the Pan Hot: For extra-crispy potato bottoms, place your empty sheet pan in the oven during the preheat cycle. Carefully remove it, arrange the oiled potatoes on the hot pan (they should sizzle), then add the chicken. This jump-starts the crisping process on the bottom side.
3. Use a Wire Rack (Optional but Great): If you have a wire rack that fits inside your sheet pan, place the chicken on it and the potatoes directly on the pan beneath. This allows hot air to circulate all around the chicken, rendering the fat more efficiently and crisping the skin on all sides evenly.
4. Don’t Neglect the Sauce in the Pan: After removing the tray from the oven, there will be delicious, concentrated juices and glaze drippings in the pan. Spoon this flavorful “pan sauce” over the chicken and vegetables before serving. It adds an incredible burst of concentrated flavor.
5. Finish with Freshness: Just before serving, sprinkle the entire tray with a handful of freshly chopped parsley or a squeeze of lemon juice. The bright, fresh element cuts through the richness of the glaze and adds a pop of color, elevating the dish from great to exceptional.
6. Check Doneness with a Thermometer: For perfectly cooked chicken every time, use an instant-read thermometer. Insert it into the thickest part of a thigh, avoiding the bone. The chicken is done and safe to eat when it reaches 165°F (74°C). This prevents guesswork and overcooking.
7. Let Components Rest Separately if Needed: If your green beans are done but your chicken needs more time, simply use a spatula to transfer the beans to a serving platter and return the chicken and potatoes to the oven. This prevents the beans from overcooking while everything else finishes.
8. Customize the Glaze: Taste your honey-mustard mixture before brushing it on. Prefer more tang? Add a teaspoon of apple cider vinegar. Like heat? Add a pinch of red pepper flakes or a dash of hot sauce. The glaze is easily adaptable to your personal taste preferences.
Variations and Adaptations
Regional Variations: Travel your taste buds by tweaking the glaze. For a French-inspired version, stir 2 tablespoons of crème fraîche into the mustard-honey mixture. For an American BBQ twist, add a tablespoon of smoked paprika and a teaspoon of Worcestershire sauce. An Asian fusion take could use soy sauce instead of salt, ginger in the glaze, and swap green beans for broccoli florets. The one-pan method remains constant, but the flavors can take you anywhere.
Seasonal Adaptations: This recipe is a perfect canvas for seasonal produce. In spring, use asparagus spears or baby carrots instead of green beans. Summer calls for zucchini, bell peppers, or cherry tomatoes. Autumn is ideal for Brussels sprouts, sweet potato cubes, or parsnips. In winter, try hearty chunks of butternut squash or turnips. Adjust the initial roasting time for harder vegetables, adding quicker-cooking items like tomatoes at the end with the green beans.
Dietary Modifications: For a gluten-free meal, ensure your Dijon mustard is certified GF (most are). To make it dairy-free, the recipe is already compliant as written. For a lower-carb or keto version, replace the potatoes with cauliflower florets or radishes, and use a sugar-free maple syrup substitute for the honey. A paleo adaptation would use similar potato substitutes and raw honey.
Flavor Variations: Experiment with the herb profile. Try herbes de Provence, Italian seasoning, or za’atar in place of rosemary and thyme. Add aromatics to the pan: scatter whole, unpeeled garlic cloves or shallots around the chicken. For a deeper umami note, add a splash of balsamic glaze to the honey-mustard mix or sprinkle everything with grated Parmesan in the last 5 minutes of cooking.
Texture Modifications: For extra-crispy potatoes, parboil the chopped potatoes for 5-7 minutes until just tender on the outside. Drain well, roughen them up in the colander (this creates a starchy surface for crispiness), then toss with oil and roast. For a saucier result, double the glaze ingredients and reserve half. Warm the reserved glaze gently and serve it on the side for dipping or drizzling.
Presentation Alternatives: Instead of serving straight from the pan, plate individually for a more refined look. Slice the chicken off the bone, fan it over a bed of the potatoes and beans, and spoon over the pan juices. Alternatively, shred the chicken and toss everything together in a large bowl for a deconstructed “bowl” style meal, perfect for packing lunches.
Serving and Presentation Guide
Plating Techniques: For family-style serving, bring the entire sheet pan to the table on a trivet—it’s rustic, impressive, and minimizes dishes. For individual plates, place a portion of herbed potatoes and green beans as a base. Then, top with a chicken thigh, spooning any pan juices over everything. Ensure each plate gets a mix of crispy potato pieces and tender beans for textural interest.
Garnishing Ideas: A final garnish adds freshness and visual pop. Chopped fresh parsley, chives, or dill are classic choices. A light sprinkle of flaky sea salt (like Maldon) on the chicken skin just before serving enhances crispiness. A few lemon wedges on the side allow guests to add a bright, acidic spark. For color, add a sprinkle of pomegranate arils in the fall or microgreens year-round.
Traditional Accompaniments: While this is a complete meal, a simple side salad with a sharp vinaigrette (like arugula with lemon) beautifully cuts the richness. A crusty baguette or dinner rolls are perfect for sopping up the delicious honey-mustard pan juices. For a more substantial spread, a simple apple sauce or a dollop of whole-grain mustard on the side complements the flavors.
Modern Serving Suggestions: Transform leftovers into a fantastic salad the next day. Slice the cold chicken and toss with the potatoes and beans over mixed greens. Drizzle with a quick vinaigrette made from lemon juice, olive oil, and a teaspoon of the leftover honey-mustard glaze. You can also chop everything and wrap it in a large flour tortilla with some greens for a hearty wrap.
Temperature Considerations: This dish is best served hot from the oven after the chicken has rested. However, it also holds well at a warm temperature for up to 30 minutes if covered loosely with foil, making it great for buffets or family dinners where people eat at different times. The potatoes will soften slightly but remain delicious.
Portion Control Tips: This recipe is designed for 4 servings: one chicken thigh per person, plus a generous scoop of potatoes and beans. For lighter appetites or if serving more sides, the recipe can stretch to 5-6 people. For heartier appetites, ensure you have bread or an additional simple side, like a grain salad, to round out the meal.
Wine and Beverage Pairing
Wine Pairings: The sweet and tangy profile of the honey-mustard glaze pairs beautifully with wines that have good acidity and a touch of sweetness or fruitiness. An off-dry Riesling or Gewürztraminer is a classic match—their acidity cuts through the richness while their fruit notes complement the honey. For red wine lovers, a light-bodied, low-tannin Pinot Noir or a fruity Beaujolais works well, as heavier tannins can clash with the sweetness. A dry rosé from Provence is another excellent, versatile option that bridges the gap between white and red.
Non-Alcoholic Alternatives: Sparkling water with a squeeze of lemon or lime provides a clean, palate-cleansing effervescence. For a more crafted option, try a ginger beer—its spicy sweetness mirrors the glaze’s flavors. Iced herbal tea, like peach or mint, is refreshing. A simple apple cider (sparkling or still) also echoes the autumnal, sweet-tart notes of the dish beautifully.
Coffee/Tea Pairings: While not a typical dinner beverage, a post-meal coffee or tea can be lovely. A medium-roast coffee with low acidity won’t compete with the meal’s flavors. For tea, consider a smoky Lapsang Souchong, which can stand up to the robust, caramelized notes, or a soothing cup of chamomile with honey to subtly extend the honeyed theme of the dinner.
Temperature Considerations: White wines and non-alcoholic sparklers should be served well-chilled, around 45-50°F. Light reds like Pinot Noir are best served slightly cooler than room temperature, around 55°F, to keep their fruitiness vibrant. This ensures the beverages refresh the palate between bites of the rich, warm traybake.
Serving Suggestions: Always offer water on the table alongside any other beverage. The saltiness and richness of the dish will make guests thirsty. If serving wine, consider pouring a small taste initially to see how guests enjoy the pairing with the food before filling glasses fully.
Storage and Shelf Life
Storage Methods: Allow the meal to cool completely to room temperature within two hours of cooking. Then, store components together or separately in airtight containers. Glass containers are ideal as they don’t absorb odors. If storing the chicken whole, place it on top of the vegetables to prevent the skin from getting soggy. The honey-mustard glaze can cause sticking, so a container is better than wrapping in foil.
Temperature Requirements: Refrigerate leftovers promptly. The safe storage temperature for cooked chicken and vegetables is below 40°F (4°C). Do not leave the traybake out on the counter for extended periods, as the moist environment and protein can quickly become a breeding ground for bacteria.
Container Recommendations: Use shallow containers rather than deep ones to promote rapid, even cooling. If you have a large quantity, divide it into two smaller containers. This is both a food safety best practice and helps maintain better texture, as a large, dense mass of food stays warm in the center for too long, continuing to cook and become mushy.
Signs of Spoilage: Discard leftovers if you detect an off or sour smell. Visually, look for significant discoloration or a slimy film on the chicken or vegetables. If mold appears, discard the entire container. As a general rule, consume refrigerated leftovers within 3-4 days for best quality and safety.
Reheating Instructions: To restore crispiness, reheat in the oven or toaster oven at 375°F until hot throughout. Spread the components on a baking sheet in a single layer. This will take 10-15 minutes. The microwave is quick but will steam the food, making the skin and potatoes soft. If using a microwave, place a cup of water in the corner to absorb excess moisture and reheat in short bursts.
Freezing Guidelines: This dish can be frozen, but expect a texture change. The potatoes may become grainy and the green beans mushy upon thawing. The chicken freezes best. If freezing, store in a freezer-safe bag or container for up to 2 months. Thaw overnight in the refrigerator before reheating thoroughly in the oven.
Make Ahead Strategies
Prep Timeline: You can prep this entire meal up to 24 hours in advance. The day before, chop the potatoes and store them submerged in cold water in the refrigerator to prevent browning. Trim the green beans and keep them in a sealed bag or container. Mix the honey-mustard glaze and store it separately. Even season the chicken and keep it on a plate, covered, in the fridge. This turns active cooking time into a simple 10-minute assembly before baking.
Storage Between Steps: Keep all prepped components in separate containers. Do not toss the potatoes in oil or combine the chicken with the glaze until you are ready to cook. The water bath for the potatoes is key—it keeps them fresh and also removes excess starch, which can help them crisp up even better. Drain and thoroughly pat them dry before oiling and seasoning.
Quality Impact Assessment: Prepping ahead has minimal negative impact and can even improve flavor. The dry-brining effect on the chicken is enhanced with an overnight rest in the fridge, leading to better seasoning and crispier skin. The potatoes may lose a tiny bit of texture but not enough to be noticeable. The glaze flavors will meld and deepen. Overall, make-ahead prep is highly recommended for this recipe.
Assembly Tips: When ready to cook, simply drain and dry the potatoes, toss them with oil and herbs, and arrange on the pan. Pat the chicken dry once more (condensation may form in the fridge), then brush generously with the glaze. Proceed with the recipe as written, adding the pre-trimmed green beans at the appropriate time. Your hands-on time will be drastically reduced.
Reheating Guidelines: If you fully cook the traybake ahead of time, follow the oven reheating instructions above. For the best texture, consider reheating the chicken and potatoes in the oven and briefly sautéing the green beans in a pan to refresh their snap, then combine for serving.
Fresh Element Additions: If making ahead, always add any fresh garnishes like chopped parsley or a lemon squeeze after reheating, just before serving. This ensures they retain their vibrant color and fresh flavor, lifting the entire dish.
Scaling Instructions
Halving the Recipe: To serve two, simply use two chicken thighs, one medium potato, and a half-pound of green beans. Halve all sauce and seasoning ingredients. Use a quarter-sheet pan or a smaller baking dish to maintain the proper single-layer spacing. Cooking time may reduce by 5-10 minutes, so start checking for doneness early, especially on the chicken’s internal temperature.
Doubling or Tripling: For a crowd, double or triple the ingredients. Crucially, do not use just one pan. Use two or three separate sheet pans placed on different oven racks. Rotate the pans top-to-bottom and front-to-back halfway through cooking to ensure even browning and cooking. You may need to add a few extra minutes to the total cook time. Ensure your oven is fully preheated to handle the increased load.
Equipment Adjustments: Scaling up requires planning.
Print
Honey-Mustard Chicken Tray with Herbed Potatoes, Rice & Green Beans
Description
A complete, flavorful sheet-pan meal featuring tender chicken thighs glazed with a sweet and tangy honey-mustard sauce, served alongside crispy herbed potatoes, fluffy rice, and fresh green beans.
Ingredients
For the Crust:
- 4 bone-in, skin-on chicken thighs
- 1 lb baby potatoes, halved
- 1 cup long-grain white rice
- 8 oz fresh green beans, trimmed
- 1/4 cup honey
- 3 tbsp Dijon mustard
- 2 tbsp olive oil
- 2 cloves garlic, minced
- 1 tsp dried thyme
- 1 tsp dried rosemary
- Salt and black pepper to taste
- 1 cup chicken broth
Instructions
1. Prepare the Crust:
- Preheat the oven to 400°F (200°C). In a small bowl, whisk together honey, Dijon mustard, 1 tbsp olive oil, minced garlic, salt, and pepper.
- Place chicken thighs on one side of a large baking sheet. Brush generously with the honey-mustard sauce, reserving some for later.
- Toss halved potatoes with remaining olive oil, thyme, rosemary, salt, and pepper. Spread on the other side of the baking sheet. Roast for 25 minutes.
- While the chicken and potatoes roast, cook rice according to package instructions using chicken broth instead of water for added flavor.
- After 25 minutes, remove the baking sheet. Add green beans to the tray, drizzle with reserved sauce, and toss with potatoes. Return to oven for 10-15 minutes until chicken is cooked through and vegetables are tender.
- Serve chicken, potatoes, and green beans over a bed of fluffy rice. Drizzle with any remaining pan juices.
Notes
You can customize the seasonings to taste.
I’m Shaykee—born in Morocco, seasoned across continents. From airplane galleys to home kitchens, I share the flavors and stories that shaped my journey.