Island-Style Juicy Teriyaki Chicken Thighs with Sweet Soy Glaze: Your New Weeknight Favorite
Imagine the sizzle of chicken hitting a hot grill, followed by the sweet, savory aroma of caramelizing soy and ginger filling your kitchen. This recipe for Island-Style Juicy Teriyaki Chicken Thighs with Sweet Soy Glaze delivers exactly that experience, transforming simple ingredients into a vibrant, flavor-packed dinner. Moreover, it captures the essence of relaxed, sun-soaked island cooking without requiring a passport. Ultimately, this dish proves that incredible flavor doesn’t need to be complicated.
These juicy, grilled teriyaki chicken thighs with a sweet soy glaze are a guaranteed crowd-pleaser. The recipe focuses on bone-in, skin-on chicken thighs, a cut renowned for its natural moisture and rich flavor. Consequently, even novice cooks can achieve perfectly cooked, succulent meat every single time. The accompanying glaze, a glossy reduction of soy sauce, brown sugar, and aromatics, clings to each piece, creating a sticky, finger-licking-good coating. In short, this easy, flavorful island-style dinner is ready in just 30 minutes, making it an ideal solution for busy weeknights or casual weekend gatherings.
The magic lies in the balance of flavors. Salty soy sauce mingles with sweet brown sugar and mirin, while fresh ginger and garlic provide a warm, aromatic backbone. When this mixture reduces and thickens, it transforms into a lacquered glaze that is both complex and deeply satisfying. Served over a bed of steaming rice with a side of crisp vegetables, this meal feels like a special occasion. However, its straightforward preparation means you can enjoy it any night of the week.
Quick Recipe Highlights
- Flavor Profile: This dish masterfully balances the classic sweet, salty, and umami notes of teriyaki. The brown sugar and mirin create a rich sweetness, while the soy sauce and garlic provide a savory depth. Finally, a hint of fresh ginger adds a bright, warming finish that defines its island-style character.
- Texture: Expect incredibly juicy and tender meat from the bone-in thighs, with crispy, caramelized skin from grilling. The reduced glaze adds a sticky, glossy coating that provides a delightful contrast. Every bite offers a perfect harmony of succulent interior and flavorful, slightly chewy exterior.
- Aroma: As the chicken grills, it releases smoky, savory notes. Simultaneously, the simmering glaze fills the air with the sweet scent of caramelizing sugar and the warm, inviting fragrances of ginger and garlic. This aromatic combination is unmistakably teriyaki and incredibly appetizing.
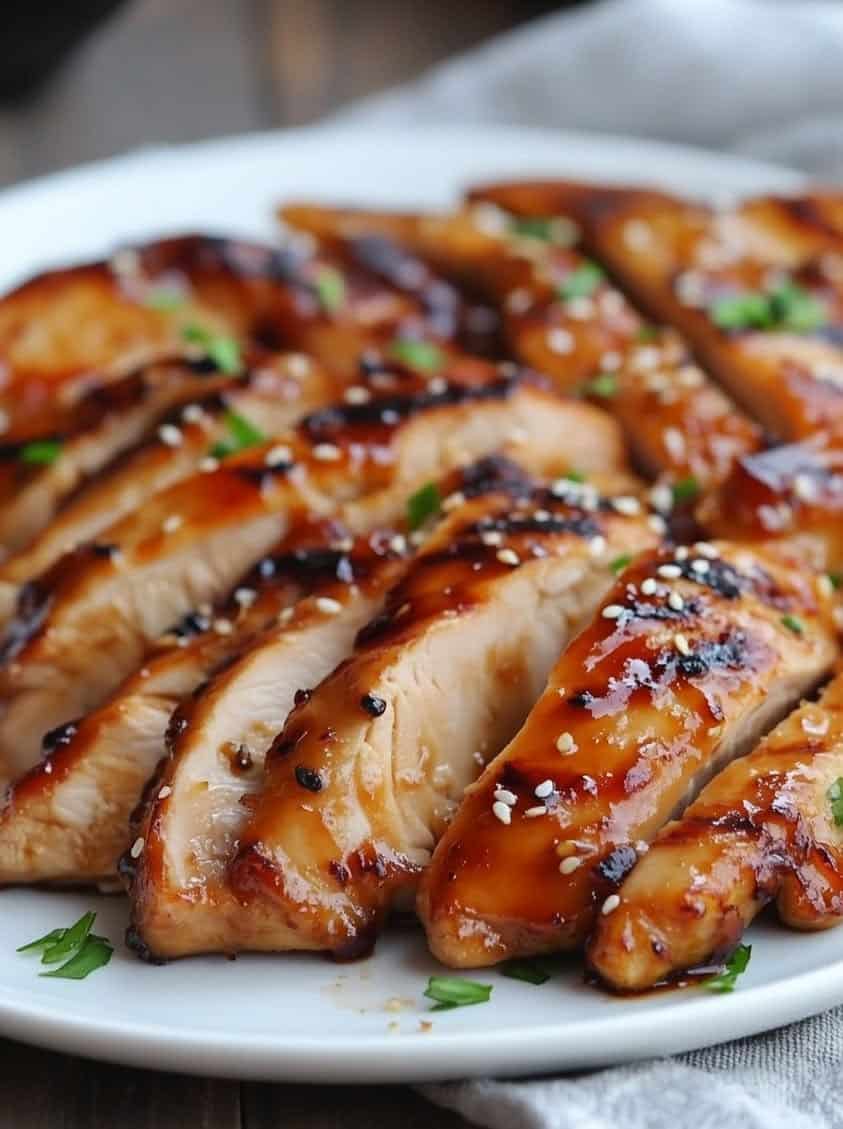
- Visual Appeal: The finished chicken boasts a beautiful, dark caramel color with a shiny, lacquered finish from the glaze. Scattered sesame seeds and sliced green onions add pops of white and green, creating a vibrant plate. Served alongside white rice and greens, the presentation is both rustic and appealing.
- Skill Level Needed: This is a beginner-friendly recipe designed for success. The primary techniques involve simple grilling or pan-searing and reducing a sauce. Therefore, no advanced culinary skills are required. With attention to basic doneness cues, anyone can create a restaurant-quality result at home.
- Special Equipment: A reliable grill, grill pan, or heavy skillet (like cast iron) is essential for achieving the proper sear and smoky flavor. Additionally, you will need a small saucepan for the glaze and basic kitchen tools like tongs and a whisk. No fancy gadgets are necessary for this easy dinner.
Recipe Overview
- Difficulty Level: We rate this recipe as “Easy” because it uses straightforward techniques accessible to cooks of all levels. The process involves minimal prep, a simple marinade or glaze preparation, and a standard cooking method. Importantly, the forgiving nature of chicken thighs prevents them from drying out easily, ensuring success even with slight timing variations.
- Category: This dish perfectly fits into multiple meal categories. Primarily, it is a hearty main course protein. Furthermore, it excels as a meal prep option, as the flavors deepen when stored. It also serves as a fantastic component for bento boxes or a centerpiece for a casual weekend barbecue with friends and family.
- Cuisine: While teriyaki has deep roots in Japanese cuisine, this version embraces an “Island-Style” interpretation. This suggests influences from Hawaiian and Pacific Rim cooking, often characterized by a slightly sweeter, more robust use of garlic and ginger. The result is a fusion dish that is globally inspired yet uniquely approachable and family-friendly.
- Cost: This is a remarkably cost-effective meal. Chicken thighs are typically one of the most affordable cuts of poultry. The sauce ingredients—soy sauce, brown sugar, ginger, garlic—are pantry staples with a long shelf life. Consequently, you can create an impressive, restaurant-worthy dinner for a family of four for a fraction of the cost of takeout.
- Season: This recipe is truly versatile across all seasons. It’s perfect for summer grilling outdoors, bringing smoky, tropical flavors to your backyard. Conversely, during colder months, cooking the thighs in a grill pan on the stovetop delivers the same delicious taste and provides a warm, comforting meal that brightens up any winter evening.
- Occasion: These teriyaki chicken thighs are incredibly versatile for any event. They are quick enough for a simple Tuesday night dinner yet special enough for casual weekend entertaining. Additionally, they are a fantastic potluck contribution, as they travel well and are universally loved by both adults and children alike.
Why You’ll Love This Recipe
First and foremost, the taste and texture are utterly irresistible. The chicken thighs remain supremely juicy and tender, while the skin crisps up beautifully, offering a satisfying contrast. The sweet soy glaze caramelizes into a sticky, glossy coating that packs an immense flavor punch in every bite. This combination of savory, sweet, and umami, with the aromatic hint of ginger, creates a deeply comforting and moreish dish that you will crave repeatedly.
From a convenience standpoint, this recipe is a true weeknight hero. With only 30 minutes from start to finish, it solves the eternal “what’s for dinner” question with minimal fuss. The ingredient list is short and composed of items you likely already have. Moreover, the cooking process is straightforward, involving simple searing and simmering. Therefore, you can achieve a spectacular result without spending hours in the kitchen, making it the ultimate easy dinner solution.
Nutritionally, choosing bone-in, skin-on chicken thighs is a smart decision. While slightly higher in fat than breasts, they offer richer flavor and are harder to overcook, ensuring you eat juicy, protein-rich meat. You can control the sodium and sugar levels in the homemade glaze, unlike store-bought sauces. Serving it with brown rice and steamed vegetables creates a balanced plate with protein, complex carbs, and fiber, contributing to a satisfying and wholesome meal.
For social and entertaining value, this dish is a guaranteed hit. Its vibrant, glossy appearance makes it look far more impressive than the effort required. It appeals to a wide range of palates, from kids who love the sweetness to adults who appreciate the complex flavors. You can easily double or triple the recipe to feed a crowd for a barbecue or potluck. Ultimately, it fosters a relaxed, communal dining experience perfect for sharing with loved ones.
Finally, its cost-effectiveness and accessibility cannot be overstated. As mentioned, chicken thighs are a budget-friendly protein, and the sauce ingredients are inexpensive pantry staples. This recipe demonstrates how to elevate humble ingredients into something extraordinary without breaking the bank. It is accessible to cooks everywhere, requiring no special equipment beyond a basic pan. This combination of flavor, ease, and value is what makes these island-style teriyaki chicken thighs a perennial favorite.
Historical Background and Cultural Significance
The story of teriyaki begins in 17th-century Japan, during the Edo period. The term itself combines “teri,” meaning luster or shine, and “yaki,” referring to the cooking method of grilling or broiling. Originally, teriyaki was a technique used primarily for fish, where the protein was grilled and then brushed with a mixture of soy sauce and mirin to create its characteristic glossy finish. This method was prized not only for flavor but also for its preservative qualities, as the salty-sweet glaze helped extend the shelf life of the cooked fish.
Teriyaki’s cultural significance in Japan is tied to its simplicity and emphasis on highlighting the quality of the main ingredient. It represents a cornerstone of washoku (traditional Japanese cuisine), which values balance, seasonality, and aesthetic presentation. The migration of teriyaki to the West, particularly to Hawaii and the Pacific coast of the United States, catalyzed its evolution. Japanese immigrants adapted their traditional recipes using locally available ingredients, such as pineapple juice and brown sugar, leading to the sweeter, thicker “island-style” or “American-style” teriyaki sauce we often enjoy today.
The evolution of the recipe from fish to chicken is a fascinating example of culinary adaptation. As teriyaki gained popularity in post-World War II America, chicken became a more affordable and readily available protein than many traditional fish varieties. Consequently, restaurants and home cooks began applying the teriyaki technique to poultry, with chicken thighs emerging as the ideal cut due to their higher fat content and ability to stay moist during grilling. The sauce also evolved, becoming a marinade as well as a glaze, and incorporating ingredients like garlic and ginger more prominently.
Regional variations of teriyaki now abound, reflecting local tastes and ingredients. In Hawaii, teriyaki often includes pineapple juice for tangy sweetness and is a staple of plate lunches. In the Pacific Northwest, particularly Seattle, a distinct style features a thicker, sweeter sauce and is commonly served as a beef teriyaki. Korean cuisine has a similar preparation called “bulgogi,” though it often uses a different blend of sweeteners. These global adaptations showcase the recipe’s incredible versatility and its power to bridge culinary traditions, creating the beloved fusion dish we are making today.
Ingredient Deep Dive
Chicken Thighs (Bone-In, Skin-On): This cut is the undisputed star for achieving juicy teriyaki chicken thighs. Culturally, dark meat poultry is celebrated in many Asian cuisines for its richer flavor and succulence compared to breast meat. Nutritionally, thighs provide high-quality protein, iron, zinc, and B vitamins. The skin and bone contribute to deeper flavor during cooking and help retain moisture. For selection, look for plump thighs with pink flesh and creamy white skin. Store them in the coldest part of your refrigerator and use within 1-2 days of purchase. For a leaner option, you can use boneless, skinless thighs, but expect slightly less juiciness and a shorter cook time.
Soy Sauce: This fermented soybean sauce is the umami backbone of the sweet soy glaze. Its history in East Asia spans over 2,500 years, originating as a way to preserve food. It is rich in amino acids and can contain antioxidants, though it is high in sodium. When selecting soy sauce for teriyaki, a good-quality all-purpose Japanese soy sauce (shoyu) like Kikkoman works perfectly. For a gluten-free version, use tamari. Store soy sauce in a cool, dark place; it has a very long shelf life. Low-sodium soy sauce is an excellent substitution if you are monitoring your salt intake, though you may need to adjust seasoning slightly.
Brown Sugar & Mirin: This duo creates the essential sweetness and gloss. Brown sugar, with its molasses content, offers a deeper, caramel-like sweetness than white sugar and helps the glaze thicken beautifully. Mirin is a sweet Japanese rice wine that adds a complex, mild sweetness and helps tenderize the chicken. It also contributes to the signature teriyaki sheen. If mirin is unavailable, a substitute can be made with a tablespoon of sugar dissolved in three tablespoons of dry white wine or sherry, though the flavor profile will shift slightly. Always store brown sugar in an airtight container to prevent hardening.
Fresh Ginger & Garlic: These aromatics provide the warm, pungent, and fragrant notes that define the sauce’s character. Ginger has a long history in Asian medicine and cuisine, valued for its digestive properties and zesty flavor. Garlic adds a robust, savory depth. Nutritionally, both are praised for their anti-inflammatory and antioxidant compounds. Select ginger with smooth, taut skin and garlic heads that are firm and heavy for their size. Store ginger in the refrigerator’s vegetable drawer and garlic in a cool, dark, dry place. In a pinch, 1/4 teaspoon of powdered ginger or garlic powder can substitute for 1 teaspoon of fresh grated, but fresh is always superior for vibrant flavor.
Common Mistakes to Avoid
- Using Chicken Breasts Instead of Thighs: Chicken breasts are much leaner and cook faster, making them prone to drying out, especially with a high-heat method like grilling. Thighs have more connective tissue and fat, which renders during cooking, basting the meat from within and ensuring it stays juicy and flavorful throughout the process.
- Not Patting the Chicken Dry: Skipping this crucial step means you are steaming the chicken instead of searing it. Moisture on the skin prevents proper browning and crisping. Always use paper towels to thoroughly dry the skin and thighs before seasoning and placing them on the grill or pan; this guarantees that beautiful, golden, crispy exterior.
- Crowding the Pan or Grill: Adding too many thighs at once drastically lowers the cooking surface temperature. This causes the chicken to release its juices and stew in them, resulting in pale, rubbery skin instead of a crisp sear. Cook in batches if necessary to ensure each piece has ample space for proper heat circulation and caramelization.
- Applying the Glaze Too Early: If you brush the sweet soy glaze onto the chicken at the beginning of cooking, the sugar in it will burn long before the chicken is cooked through. This leads to a bitter, charred flavor and a messy grill. Always apply the glaze during the last few minutes of cooking, allowing it to caramelize without burning.
- Overcooking the Sauce: Simmering the glaze for too long or over too high a heat can cause it to over-reduce, becoming overly thick, sticky, and salty. It can even burn. The goal is a syrup-like consistency that coats the back of a spoon. Remove it from the heat as soon as it reaches that stage, as it will continue to thicken slightly as it cools.
- Not Letting the Chicken Rest: Slicing into the chicken thighs immediately after grilling causes all the precious juices to run out onto the cutting board, leaving the meat drier. Allowing the chicken to rest for 5-10 minutes lets the muscle fibers relax and reabsorb those juices, ensuring every bite is maximally succulent and tender.
- Using Bottled Teriyaki Sauce: While convenient, most bottled sauces contain stabilizers, excessive sugar, and artificial flavors that overpower the natural taste of the chicken. The homemade sweet soy glaze takes only minutes to prepare and allows you to control the balance of sweet, salty, and savory, resulting in a far superior and fresher flavor profile.
- Skipping the Garnishes: Toasted sesame seeds and sliced green onions are not just decorative. They add essential textural contrast (a slight crunch) and fresh, sharp flavors that cut through the richness of the glaze. This final touch elevates the dish from good to great, adding complexity and visual appeal to your plate.
Essential Techniques
Proper Searing for Crispy Skin: Achieving crispy, golden-brown skin is critical for texture and flavor. The technique involves starting with a very hot cooking surface and dry chicken skin. Place the thighs skin-side down and do not move them for several minutes. This allows a crust to form, which naturally releases from the pan or grill grates. If you try to move them too early, the skin will tear and stick. The visual cue for success is when the edges of the skin look browned and you can easily lift the thigh with tongs without resistance. This sear also renders fat, basting the meat.
Controlling Heat for Glaze Reduction: Reducing the sauce to a perfect glaze requires gentle, controlled heat. After combining the ingredients, bring them to a simmer over medium heat. Then, reduce the heat to maintain a gentle bubble. A rapid, rolling boil can cause the sauce to reduce too quickly, leading to a scorched or overly salty result. Stir occasionally. The glaze is ready when it thickens enough to coat the back of a spoon and leaves a clear trail when you run your finger through it. This slow reduction allows the flavors to meld and the sauce to achieve a glossy, syrupy consistency.
Basting for Maximum Flavor: Basting is the act of brushing the cooking chicken with the reduced glaze during the final minutes. This technique layers flavor and builds a beautiful, lacquered finish. However, timing is everything. Begin basting only after the chicken is almost fully cooked and the skin is crisped. Use a silicone brush to apply a thin layer, allow it to caramelize for a minute, then flip and repeat. Basting too early, as mentioned, causes burning. Proper basting results in a sticky, shiny, deeply flavored coating that is the hallmark of perfect teriyaki chicken thighs.
Pro Tips for Perfect Island-Style Juicy Teriyaki Chicken Thighs
First, score the skin of the chicken thighs lightly with a sharp knife. Making a few shallow cuts through the skin (but not into the meat) helps render the fat more efficiently, leading to crispier skin. It also allows the seasoning to penetrate slightly and gives the glaze more surface area to cling to.
Second, consider marinating the chicken for an extra flavor boost. While the recipe works with a simple glaze, placing the thighs in a mixture of half the sauce (before reducing) for 30 minutes to 2 hours in the refrigerator infuses them with deeper flavor. Just remember to pat them completely dry before cooking to ensure proper searing.
Third, use an instant-read thermometer to eliminate guesswork. Chicken thighs are done when they reach an internal temperature of 165°F (74°C) at the thickest part, not touching the bone. This guarantees food safety while preventing the common mistake of overcooking, which can still happen even with this forgiving cut.
Fourth, toast your sesame seeds. Adding raw sesame seeds is fine, but toasting them in a dry skillet over low heat for a few minutes until fragrant dramatically enhances their nutty flavor and crunch. This tiny extra step adds a significant dimension to your final garnish.
Fifth, if using a grill, create two heat zones. Have one side on high heat for searing and the other side on medium or indirect heat for finishing and glazing. This technique, called zone cooking, gives you control to sear the skin without burning the glaze when you apply it.
Sixth, double the glaze recipe if you love extra sauce. Having extra sweet soy glaze on hand is fantastic for drizzling over rice or steamed vegetables on the plate. Store any leftover glaze in the refrigerator for up to a week; it reheats beautifully and can be used on other proteins or as a stir-fry sauce.
Variations and Adaptations
Regional Variations: To embrace Hawaiian style, add 1/4 cup of pineapple juice to the glaze ingredients and simmer until reduced. For a Korean-inspired twist, replace the brown sugar with an equal amount of grated Asian pear, add a tablespoon of gochujang (Korean chili paste) for heat, and garnish with thinly sliced fresh chili. A Pacific Northwest version might use honey instead of brown sugar for a floral sweetness and include a splash of orange juice.
Seasonal Adaptations: In summer, grill peaches or pineapple slices alongside the chicken and serve them on the side for a fresh, fruity complement. During fall, incorporate a tablespoon of pure maple syrup into the glaze for warmth and serve with roasted sweet potatoes and Brussels sprouts. For a spring meal, garnish the finished dish with finely chopped fresh cilantro or mint for a bright, herbal lift.
Dietary Modifications: For a gluten-free version, ensure you use tamari or a certified gluten-free soy sauce. To make it dairy-free, the recipe is naturally compliant as written. For a lower-sugar option, replace the brown sugar with a monk fruit sweetener blend or reduce the amount by half, supplementing the sweetness with a splash of orange juice.
Flavor Variations: Add a teaspoon of toasted sesame oil to the finished glaze for a deeper nutty aroma. For a spicy kick, stir in 1-2 teaspoons of sriracha or a pinch of red pepper flakes while simmering the sauce. You can also add a star anise pod or a small piece of cinnamon stick to the simmering glaze for a subtle, warm spice note, removing it before basting.
Texture Modifications: If you prefer a smoother glaze, you can strain it through a fine-mesh sieve after simmering to remove the minced garlic and ginger pieces. For a chunkier, more rustic texture, add finely diced pineapple or bell pepper to the sauce as it reduces. To achieve an extra-thick, almost candied glaze, add a cornstarch slurry (1 tsp cornstarch mixed with 1 tbsp water) at the end of simmering and cook for an additional minute.
Presentation Alternatives: Instead of serving whole thighs, let them rest, then slice the meat off the bone and fan it over rice before drizzling with extra glaze. For appetizers, use boneless, skinless thighs cut into bite-sized pieces, skewer them, grill, and glaze for teriyaki chicken skewers. For a bowl-style presentation, layer rice, shredded cabbage, shredded carrots, the sliced chicken, and garnish with sesame seeds and green onions for a deconstructed experience.
Serving and Presentation Guide
Plating Techniques: For a classic family-style presentation, arrange the whole grilled thighs on a large platter and drizzle generously with the remaining warm glaze. Alternatively, for individual plates, place a scoop of steamed white or brown rice slightly off-center. Lean one thigh against the rice, allowing the glossy skin to face upward. Spoon a little extra glaze around the plate for visual appeal and added sauciness.
Garnishing Ideas: The classic garnish of thinly sliced green onions and toasted white sesame seeds is always perfect. For added color and flavor, consider adding a sprinkle of black sesame seeds, finely shredded nori (seaweed), or a few microgreens. A very light drizzle of spicy mayo or a wedge of lime on the side allows guests to add a creamy or tangy element if they choose.
Traditional Accompaniments: Steamed short-grain white rice is the quintessential partner, soaking up the delicious glaze. A simple side of steamed or stir-fried bok choy, broccoli, or snap peas adds a fresh, green element. A small side of tangy, crisp cucumber sunomono (Japanese cucumber salad) or a simple green salad with a ginger-sesame dressing provides a refreshing contrast to the rich chicken.
Modern Serving Suggestions: Transform leftovers into teriyaki chicken bowls with rice, pickled vegetables, and a soft-boiled egg. Use the sliced chicken as a filling for lettuce wraps with shredded carrots and a drizzle of sriracha. Chop the chicken and toss it with soba noodles, edamame, and the remaining glaze for a quick noodle salad perfect for next-day lunch.
Temperature Considerations: Serve the chicken hot off the grill, while the skin is still crisp and the glaze is sticky. The rice and vegetable sides should also be served hot or warm. If preparing components in advance, have everything ready so you can plate immediately after the chicken has rested. The glaze can be gently reheated if it thickens too much upon standing.
Portion Control Tips: One average-sized bone-in chicken thigh per person is a standard serving, especially when paired with rice and vegetables. For larger appetites or if serving fewer sides, plan for 1.5 thighs per person. If using boneless, skinless thighs, 2 per person is a good guideline. Remember, the rich flavor of the glaze is satisfying, so you may need less protein than you think.
Wine and Beverage Pairing
Wine Pairings: The sweet and savory profile of the teriyaki glaze pairs beautifully with off-dry (slightly sweet) white wines. A German Riesling or a Gewürztraminer from Alsace complements the sweetness while cutting through the richness with their acidity. For red wine lovers, a light, fruity, low-tannin red like a Beaujolais or a Pinot Noir can work well, as they won’t clash with the dish’s sweetness. Ultimately, an off-dry sparkling wine or rosé also makes a festive and compatible choice.
Non-Alcoholic Alternatives: Iced green tea or jasmine tea is a classic and refreshing partner, their slight bitterness balancing the glaze’s sweetness. A sparkling yuzu or calamansi soda offers citrusy brightness. For a crafted mocktail, mix ginger beer with a splash of fresh lime juice and a pinch of salt—the ginger echoes the sauce, and the bubbles cleanse the palate.
Coffee/Tea Pairings: While not a typical dinner pairing, the flavors could transition to a post-meal drink. A lightly roasted, floral coffee or a genmaicha (brown rice green tea) would be interesting companions, as their toasty, nutty notes can harmonize with the sesame and caramelized elements of the dish without overpowering them.
Temperature Considerations: White and sparkling wines should be served well-chilled, between 45-50°F (7-10°C). Light reds like Pinot Noir are best served slightly cooler than room temperature, around 55°F (13°C). Non-alcoholic sparkling drinks and iced teas are most refreshing when served cold. The contrast between a cool beverage and the warm, savory chicken is part of the pairing’s appeal.
Serving Suggestions: Always offer beverages in appropriate glassware to enhance the experience. Pour wine just before serving to preserve its temperature and aroma. For non-alcoholic options, consider garnishes that tie into the meal—a slice of ginger in the iced tea or a lime wedge on the mocktail glass. Providing options allows guests to choose what best suits their taste.
Storage and Shelf Life
Storage Methods: Allow leftover chicken to cool completely to room temperature within two hours of cooking. Then, store the thighs and any remaining glaze separately in airtight containers. This prevents the crispy skin from becoming soggy in the sauce. Properly stored, cooked teriyaki chicken will last for 3-4 days in the refrigerator.
Temperature Requirements: Refrigerate leftovers promptly at or below 40°F (4°C). Do not leave the cooked chicken sitting out for extended periods, as this allows bacteria to grow. If you are making the dish for meal prep, divide it into portions and refrigerate immediately after the components have cooled.
Container Recommendations: Use shallow containers rather than deep ones to allow the chicken to cool quickly and evenly. Glass containers with tight-fitting lids are ideal as they do not absorb odors and allow you to see the contents. For the glaze, a small glass jar or container with a seal is perfect.
Signs of Spoilage: Discard the chicken if you notice an off or sour smell, a slimy texture on the surface, or any mold growth. If the glaze, which is high in sugar and salt, develops an unusual odor or fermentation bubbles, it should also be thrown out. When in doubt, follow the golden rule: if you are unsure, it is safer to discard it.
Reheating Instructions: To preserve texture, reheat chicken in an oven preheated to 350°F (175°C) or in an air fryer until warmed through. This helps re-crisp the skin. You can also use a skillet over medium-low heat. Avoid the microwave if possible, as it will make the skin rubbery. Reheat the glaze gently in a small saucepan or the microwave, adding a teaspoon of water if it has thickened too much.
Freezing Guidelines: You can freeze cooked teriyaki chicken for up to 2-3 months. Place cooled thighs on a baking sheet to flash-freeze individually, then transfer to a freezer-safe bag or container. The glaze can be frozen in an ice cube tray for easy portioning. Thaw overnight in the refrigerator before reheating. Note that the skin texture will suffer slightly upon thawing and reheating.
Make Ahead Strategies
Prep Timeline: You can prepare this dish in stages to streamline dinner time. Up to 2 days ahead, make the glaze and store it in the refrigerator. The day of or morning before, you can marinate the chicken thighs in a portion of the unreduced sauce. Also, prep garnishes like slicing green onions and toasting sesame seeds, storing them in small containers.
Storage Between Steps: Store the uncooked, marinated chicken in a sealed container or zip-top bag in the coldest part of your refrigerator. Keep the prepared glaze in a separate jar. Store pre-chopped aromatics (ginger, garlic) in small airtight containers in the fridge. This mise en place makes the final cooking process incredibly fast and organized.
Quality Impact Assessment: Marinating for up to 24 hours will only improve flavor penetration and tenderness. The glaze can be made days ahead, and its flavors will meld and deepen. Pre-toasted sesame seeds and sliced onions will retain their quality for a day. The only element best done right before serving is the actual grilling and crisping of the chicken skin for optimal texture.
Assembly Tips: When ready to cook, remove the marinated chicken from the fridge and pat it thoroughly dry—this is a non-negotiable step even when using a marinade. Gently reheat the glaze in a saucepan, adding a splash of water if it is too thick. Have your garnishes and serving platter ready so you can go from grill to plate seamlessly.
Reheating Guidelines: If you fully cook the chicken ahead of time, follow the oven or skillet reheating instructions above to restore texture. If you only pre-marinated, cook as directed from the pat-dry stage. The key to a successful make-ahead strategy is keeping components separate until the final heat application to maintain the ideal contrast of crispy skin and sticky glaze.
Fresh Element Additions: Always add the final garnishes—the green onions and sesame seeds—just before serving. This ensures they retain their fresh color, crisp texture, and vibrant flavor. If you made a side salad like sunomono, prepare that fresh as well. The hot, savory chicken paired with cold, crisp fresh elements creates the perfect balance on the plate.
Scaling Instructions
Halving the Recipe: Halving this recipe for two people is straightforward. Simply divide all ingredient quantities by two. Use a smaller skillet for cooking the chicken to maintain proper pan contact. The glaze will reduce more quickly due to the smaller volume, so watch it carefully to prevent over-reduction. Cooking time for the chicken will remain roughly the same, as you are still cooking individual thighs.
Doubling or Tripling: To feed a crowd, multiply the ingredients proportionally. The main adjustment is to avoid overcrowding; you will need to cook the chicken in multiple batches to ensure proper searing. Use a large saucepan for the glaze to accommodate the increased volume. Consider using a sheet pan in a 400°F (200°C) oven to finish large batches after an initial sear—place seared thighs on a rack over a sheet pan, brush with glaze, and bake until cooked through.
Equipment Adjustments: Scaling up requires planning. For a double batch, you may need two large skillets or to use your oven method. For the glaze, ensure your saucepan is large enough to hold the liquid comfortably as it simmers (it should fill no more than halfway to prevent boiling over). Have multiple baking sheets and cooling racks ready if using the oven-finish method for large quantities.
Timing Modifications: While the active hands-on time scales linearly, the total time may not double. Cooking the chicken in batches adds time. Glaze reduction for a larger batch will take slightly longer. Build in extra time for batch cooking and for the glaze to reduce. Starting the glaze earlier so it is ready when the first batch of chicken is done is a smart strategy.
Storage Considerations: When making a large batch, proper storage is key to food safety. Cool the chicken quickly by spreading it out on a clean baking sheet before transferring to shallow storage containers. Refrigerate or freeze in portion-sized containers for easy reheating. Label containers with the date if freezing. A large batch is perfect for meal prep throughout the week.
Nutritional Deep Dive
Macro Breakdown: A serving of one bone-in, skin-on chicken thigh with glaze is a good source of high-quality protein, essential for muscle repair and satiety. The fat content comes primarily from the chicken skin and the marbling in the thigh, providing energy and aiding in the absorption of fat-soluble vitamins. The carbohydrates in this dish come almost exclusively from the brown sugar and mirin in the glaze, offering a quick source of energy. Balancing this with a side of brown rice and vegetables adds complex carbs and fiber.
Micronutrient Analysis: Chicken thighs are rich in B vitamins, particularly B6 and B12, which are crucial for energy metabolism and nervous system health. They also provide minerals like iron, zinc, and selenium. The soy sauce contributes sodium but also contains manganese and magnesium. Fresh ginger and garlic add trace amounts of vitamin C, B6, and manganese, along with their beneficial bioactive compounds like allicin and gingerol.
Health Benefits: The protein promotes fullness and supports metabolic health. The ginger and garlic have well-studied
Print
Island-Style Juicy Teriyaki Chicken Thighs with Sweet Soy Glaze
Description
Tender, juicy chicken thighs marinated in a homemade teriyaki sauce with pineapple juice and soy, then grilled to perfection and glazed with a sweet, sticky soy reduction.
Ingredients
For the Crust:
- 8 boneless, skinless chicken thighs
- 1/2 cup soy sauce
- 1/4 cup pineapple juice
- 2 tablespoons brown sugar
- 2 cloves garlic, minced
- 1 teaspoon grated fresh ginger
- 1 tablespoon honey
- 1 tablespoon rice vinegar
- 1 tablespoon cornstarch mixed with 2 tablespoons water
- 1 tablespoon sesame oil
- 2 green onions, sliced for garnish
- 1 tablespoon sesame seeds for garnish
Instructions
1. Prepare the Crust:
- In a bowl, whisk together soy sauce, pineapple juice, brown sugar, garlic, ginger, honey, and rice vinegar to make the marinade.
- Place chicken thighs in a resealable bag or dish, pour marinade over, and refrigerate for at least 1 hour or overnight.
- Heat sesame oil in a skillet over medium-high heat. Remove chicken from marinade, reserving marinade, and cook for 5-7 minutes per side until browned and cooked through.
- Pour reserved marinade into the skillet, bring to a simmer, then stir in cornstarch mixture and cook until thickened into a glaze.
- Brush glaze over chicken thighs, garnish with green onions and sesame seeds, and serve immediately.
Notes
You can customize the seasonings to taste.
I’m Shaykee—born in Morocco, seasoned across continents. From airplane galleys to home kitchens, I share the flavors and stories that shaped my journey.