Creamy, Dreamy No-Bake Pumpkin Cheesecake in a Jar: The Ultimate Easy Autumn Dessert
Imagine capturing the very essence of a crisp autumn day in a single, delightful dessert. This creamy, dreamy no-bake pumpkin cheesecake in a jar does exactly that, offering a perfect symphony of flavors and textures without ever turning on your oven. It is, without a doubt, the ultimate easy autumn dessert for anyone craving a taste of seasonal comfort. Furthermore, the individual jar presentation makes it feel incredibly special and modern, ideal for both casual family dinners and festive gatherings.
The beauty of this no-bake pumpkin cheesecake lies in its simplicity and profound depth of flavor. Each layer contributes to the overall experience, from the spiced graham cracker crust to the luxuriously smooth pumpkin filling. Consequently, you get a dessert that feels indulgent and sophisticated, yet is surprisingly straightforward to prepare. This recipe is a fantastic solution for busy hosts or anyone who wants a spectacular treat with minimal effort.
Ultimately, this dessert is a celebration of fall. The warm spices, rich pumpkin, and creamy cheese combination is a classic for a very good reason. It evokes feelings of warmth, comfort, and nostalgia. Moreover, the portability of the jars means you can take this taste of autumn anywhere, from a cozy night in to a potluck with friends. This easy autumn dessert is sure to become a seasonal staple in your recipe collection.
Quick Recipe Highlights
- Flavor Profile: This dessert delivers a perfect balance of sweet, spicy, and tangy notes. The richness of cream cheese and whipped cream complements the earthy sweetness of pumpkin puree. Additionally, a warm blend of cinnamon, ginger, and nutmeg provides that classic, cozy fall spice flavor.
- Texture: Experience a delightful contrast in every spoonful. Firstly, the crust offers a satisfying crunchy base made from graham crackers. Then, the filling is incredibly smooth, creamy, and light, almost mousse-like, thanks to the no-bake preparation method.
- Aroma: The scent that wafts up as you open a jar is pure autumn. Key aromatic notes include the warm, sweet fragrance of pumpkin pie spice mingling with the subtle tang of cream cheese. It is an inviting and comforting aroma that promises a delicious treat.
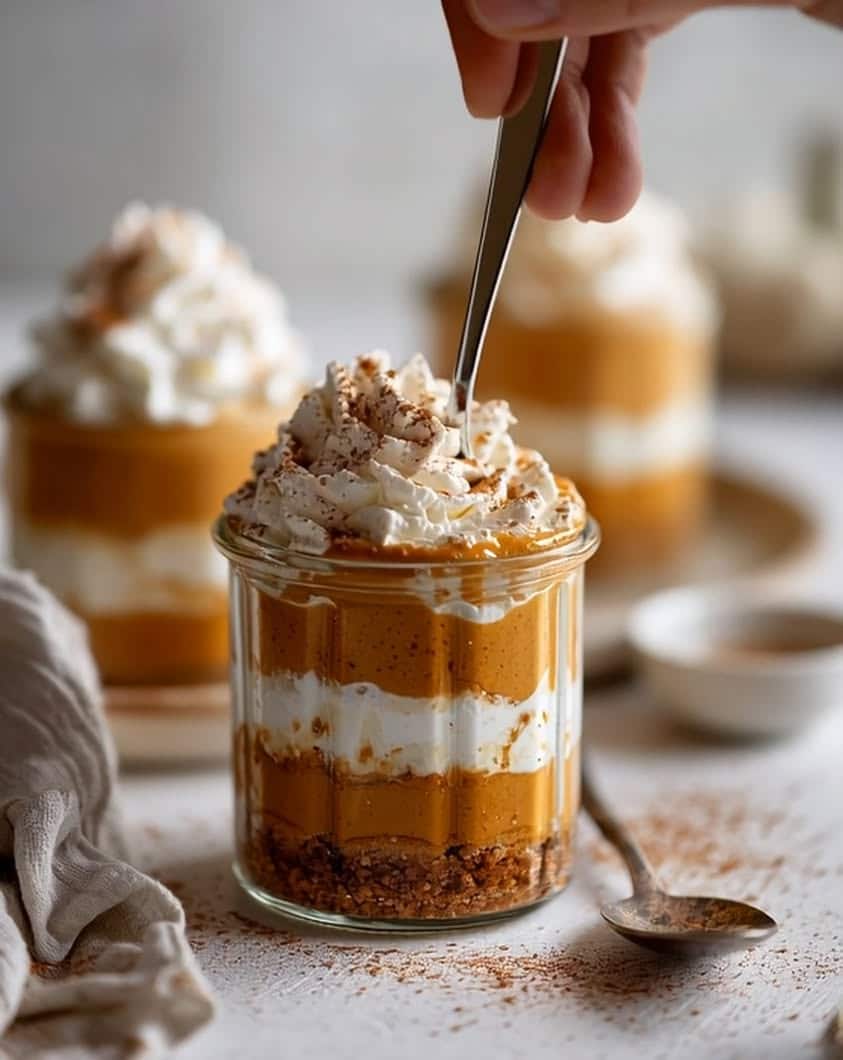
- Visual Appeal: These individual desserts are stunning. The layers of golden crust and orange-speckled cream filling create a beautiful vertical presentation. Finally, a dollop of whipped cream and a sprinkle of extra graham cracker crumbs on top add the perfect finishing touch.
- Skill Level Needed: This recipe is perfect for beginners. It requires no special pastry skills, no water bath, and no fear of cracking. Essentially, if you can mix ingredients together, you can create this impressive dessert.
- Special Equipment: You will need a electric hand mixer or stand mixer to achieve the lightest, fluffiest filling texture. Additionally, having four 8-ounce mason jars or similar serving glasses is essential for the signature presentation.
Recipe Overview
- Difficulty Level: We classify this recipe as easy because it involves simple mixing and assembling steps. There is no baking involved, which eliminates common cheesecake pitfalls like over-baking or cracking. However, patience is required for the chilling time to ensure the perfect set.
- Category: This dish falls squarely into the dessert category. It is a perfect sweet ending to any meal. It can also be considered a make-ahead recipe, as it requires several hours to chill.
- Cuisine: This is a modern American dessert that draws inspiration from classic pumpkin pie and New York-style cheesecake. It represents a fusion of these beloved traditions into a convenient, no-bake format.
- Cost: The cost is relatively moderate. Most ingredients, like cream cheese, pumpkin puree, and graham crackers, are pantry staples, especially during the fall season. Using store-brand items can make it even more budget-friendly.
- Season: This recipe is quintessentially autumnal. It is best made from September through November when pumpkins are in season and the weather calls for cozy, spiced desserts. It is a hallmark of fall baking, or in this case, no-bake preparation.
- Occasion: These individual cheesecakes are incredibly versatile. They are perfect for Thanksgiving, Halloween parties, harvest dinners, or simply as a weeknight treat. Their elegant presentation makes them suitable for formal occasions as well.
Why You’ll Love This No-Bake Pumpkin Cheesecake
First and foremost, the taste and texture of this creamy, dreamy no-bake pumpkin cheesecake in a jar are utterly irresistible. The filling is impossibly light and smooth, melting on your tongue while delivering a powerful punch of pumpkin and spice. Unlike baked cheesecakes, which can be dense, this version has an airy, mousse-like quality that feels indulgent without being heavy. The contrast with the crunchy, spiced graham cracker crust creates a perfect harmony in every bite. Consequently, you get a dessert that satisfies all your sensory cravings for a classic fall flavor experience.
From a convenience standpoint, this recipe is a true game-changer. As the ultimate easy autumn dessert, it requires zero baking, meaning you save time and avoid heating up your kitchen. The entire process is essentially mixing and layering, which is incredibly straightforward. Moreover, you can prepare these cheesecakes a day or two in advance, making them a lifesaver for entertaining. This make-ahead capability reduces stress and allows you to enjoy your own party. Therefore, it is the perfect solution for busy hosts who want to impress their guests with minimal last-minute effort.
Nutritionally, while still a dessert, this no-bake pumpkin cheesecake offers some benefits. Pumpkin puree is a great source of vitamin A, which is essential for eye health and immune function. By controlling the ingredients yourself, you can adjust the sugar level to your preference, unlike store-bought versions. You can also ensure there are no artificial preservatives or flavors. For a lighter version, you could explore using lower-fat cream cheese or a sugar alternative. Thus, you have more control over what goes into your treat compared to pre-made desserts.
The social and entertaining value of these jarred cheesecakes is immense. Their individual presentation is inherently charming and practical for parties. There is no need for slicing or plating; you simply hand each guest their own perfect portion. This makes serving clean and effortless. They are also highly photogenic, making them a star on social media. Furthermore, the jars are portable, so they are excellent for picnics or potlucks. Ultimately, this dessert is as much about the experience and presentation as it is about the delicious flavor.
Finally, this is an incredibly cost-effective and accessible dessert. The ingredients are common and affordable, especially during the fall season. You do not need any specialized or expensive equipment beyond a mixer and some jars. Compared to buying a similar dessert from a bakery, making it at home saves a significant amount of money. Additionally, the recipe is very forgiving and easy for cooks of all skill levels to master. This accessibility ensures that anyone can create a beautiful and delicious dessert without stress.
Historical Background and Cultural Significance
The origin of cheesecake itself stretches back thousands of years to ancient Greece, where it was served to athletes at the first Olympic Games. However, the creamy, cheese-based dessert we know today evolved significantly in America. New York-style cheesecake, known for its dense, rich texture thanks to cream cheese, became an iconic dessert in the 20th century. The invention of cream cheese in the late 1800s was a pivotal moment, providing the perfect base for the modern cheesecake. Consequently, this established a foundation for endless variations.
Pumpkin pie holds a deep cultural importance in North America, particularly as a symbol of harvest and Thanksgiving. Early American colonists adapted pumpkin preparations from Native American cuisine, eventually evolving into the sweet, spiced pie we recognize. The combination of pumpkin and warm spices like cinnamon and nutmeg became synonymous with autumn comfort and family gatherings. This cultural tradition made pumpkin a natural and beloved flavor to incorporate into other desserts, leading to innovations like pumpkin cheesecake.
The evolution towards a no-bake pumpkin cheesecake is a more recent development, reflecting modern desires for convenience and simplicity. No-bake cheesecakes, often set with gelatin, gained popularity in the mid-20th century as refrigerators became commonplace. This method offered a lighter, fluffier alternative to its baked counterpart. The addition of pumpkin puree was a logical and delicious progression, merging the comfort of pumpkin pie with the ease of a no-bake dessert. This evolution demonstrates how classic flavors adapt to contemporary lifestyles.
Regional variations of pumpkin desserts are abundant across the United States. In the South, a touch of bourbon or pecans might be added, while in the Northeast, a emphasis on maple syrup could be present. The individual jar presentation of this easy autumn dessert is a modern twist that prioritizes portion control and visual appeal. It reflects a current food trend towards individualized, Instagram-worthy servings. This adaptation shows how a traditional flavor profile can be repackaged for a new generation while maintaining its core cultural significance.
Ingredient Deep Dive
Let us start with pumpkin puree. It is crucial to use 100% pure pumpkin puree, not pumpkin pie filling, which contains added sugars and spices. Pumpkin is a nutritional powerhouse, packed with beta-carotene that your body converts to vitamin A. When selecting pumpkin puree, check the ingredient list to ensure it contains only pumpkin. For the best flavor, look for brands known for quality. You can also make your own by roasting and pureeing sugar pumpkins, which often yields a richer, less watery result. Store unused puree in an airtight container in the refrigerator for up to a week.
Cream cheese is the foundation of the filling, providing the characteristic tang and rich body. For the best results, always use full-fat, brick-style cream cheese and ensure it is softened completely to room temperature. This is non-negotiable for a smooth, lump-free filling. Cold cream cheese will result in a grainy texture. In terms of substitutions, neufchâtel cheese can be used for a slightly lower-fat option, but avoid whipped or spreadable cream cheese tubs as they contain stabilizers that can affect the set. Unopened cream cheese lasts for weeks in the fridge, but once opened, use it within ten days.
Graham crackers form the base of the crunchy crust. Their slightly sweet, honey-kissed flavor and sandy texture are ideal for no-bake desserts. From a cultural standpoint, graham crackers were originally created in the 19th century as part of a vegetarian diet movement. For a gluten-free version, certified gluten-free graham crackers are readily available. Alternatively, you can substitute them with digestive biscuits, ginger snaps, or even crushed pretzels for a sweet-and-salty twist. Store graham crackers in an airtight container to maintain their crispness. If they go stale, you can briefly toast them in the oven to revive them for crust use.
The spice blend is what gives this creamy, dreamy no-bake pumpkin cheesecake its warm, autumnal soul. A typical pumpkin pie spice mix includes cinnamon, ginger, nutmeg, and allspice or cloves. Cinnamon adds sweet warmth, ginger provides a little sharpness, and nutmeg offers a nutty depth. For the best flavor, consider grinding whole nutmeg yourself. You can adjust the ratios to your taste; for example, adding a pinch of cardamom can introduce a lovely, complex note. Store spices in a cool, dark place to maintain their potency, and generally, they are best used within six months to a year for maximum flavor.
Common Mistakes to Avoid
- Using cold cream cheese. This is the number one mistake. Cold cream cheese will not incorporate smoothly, leading to a lumpy filling. Always plan ahead and let your cream cheese sit on the counter for at least an hour until it is perfectly soft.
- Using pumpkin pie filling instead of puree. These are not interchangeable. Pumpkin pie filling is pre-sweetened and spiced, which will throw off the balance of your recipe and make it excessively sweet. Double-check the can label to ensure you have 100% pure pumpkin puree.
- Not whipping the cream cheese enough. Before adding other ingredients, take a minute to beat the cream cheese by itself until it is completely smooth and creamy. This initial step is crucial for breaking down any lumps and creating a silky base.
- Overmixing after adding the whipped cream. When you fold in the whipped cream, be gentle. Overmixing will deflate the air you just whipped in, resulting in a denser, less fluffy cheesecake filling. Fold just until no white streaks remain.
- Skipping the chilling time. The setting power of this dessert comes from refrigeration, not baking. Rushing this process will result in a soupy, unset filling. Four hours is the minimum, but overnight is ideal for the perfect texture.
- A soggy crust. Make sure your melted butter is fully incorporated with the graham cracker crumbs. The mixture should resemble wet sand. If it is too dry, it will not hold together; if too wet, it can become greasy.
- Adding watery ingredients. If your pumpkin puree seems particularly watery, consider draining it in a fine-mesh strainer for a bit. Excess moisture can prevent the filling from setting properly and make it runny.
- Using imitation vanilla extract. The flavor of vanilla is a supporting player that enhances the warm spices. Using a high-quality pure vanilla extract makes a noticeable difference in the depth of flavor compared to artificial imitations.
Essential Techniques
Properly softening cream cheese is a foundational technique for success. The goal is to bring the cream cheese to room temperature, which typically takes about 60-90 minutes on the counter. Do not try to speed this up by microwaving, as it can cause the cheese to become too warm and oily in spots, which will affect the texture of your filling. The perfectly softened cheese will be pliable and yield easily when pressed. This allows it to whip up smoothly and incorporate air, leading to a light and creamy consistency. Mastering this simple step is the key to avoiding a lumpy, grainy cheesecake.
Folding is a gentle mixing technique used to combine a light, airy ingredient like whipped cream with a heavier mixture without deflating it. To fold correctly, use a large rubber spatula. Cut down through the center of the mixture, scrape along the bottom of the bowl, and fold the mixture over onto itself. Then, give the bowl a quarter turn and repeat. The motion is slow and deliberate, not vigorous stirring. The goal is to combine the two elements while preserving as much air as possible. This technique is what gives the no-bake pumpkin cheesecake its characteristic mousse-like texture.
Creating a perfect crust is another essential skill. The graham cracker crumbs must be fine and uniform for the crust to hold together well. You can achieve this by pulsing the crackers in a food processor or placing them in a sturdy zip-top bag and crushing them with a rolling pin. The test for the right consistency is to press a small amount of the buttered crumbs in your hand; it should hold its shape. When pressing it into the jars, use the bottom of a glass or a tamper to create an even, firm layer. A well-made crust provides the necessary textural contrast to the creamy filling.
Pro Tips for Perfect No-Bake Pumpkin Cheesecake
- For the smoothest filling, sift your powdered sugar and pumpkin pie spice together before adding them to the cream cheese. This prevents any little lumps of sugar or spice from remaining in the final mixture.
- Chill your mixing bowl and beaters before whipping the heavy cream. A cold bowl helps the cream whip up faster and achieve stiffer peaks, which contributes to a stable, fluffy filling.
- Toast your graham cracker crumbs. After crushing the crackers, spread the crumbs on a baking sheet and toast them in a 350°F oven for 5-7 minutes until fragrant. This deepens their flavor and adds a wonderful nuttiness to the crust.
- Use a piping bag for a clean presentation. Instead of spooning the filling into the jars, transfer it to a piping bag fitted with a large round tip. This allows for neat, professional-looking layers and avoids smearing the filling on the sides of the jar.
- Add a flavor boost to the crust. Mix a tablespoon of brown sugar into the graham cracker crumbs along with the melted butter. This adds a deeper, caramel-like flavor that complements the pumpkin beautifully.
- For adult palates, consider adding a tablespoon of bourbon, rum, or spiced whiskey to the filling. The alcohol enhances the warm spices and adds a sophisticated complexity. Remember, the alcohol will not cook out.
- Garnish just before serving. If adding whipped cream on top, do it right before you serve the desserts. This prevents the whipped cream from weeping or deflating during storage in the fridge.
- Run a knife under hot water, wipe it dry, and then use it to create beautiful swirls on the top of the whipped cream garnish for an extra elegant touch.
Variations and Adaptations
For regional variations, consider incorporating local flavors. A Southern adaptation might include a layer of praline pecans between the crust and filling, or a swirl of bourbon caramel sauce. A New England-inspired version could use maple syrup as the primary sweetener instead of powdered sugar, lending a distinct, woodsy sweetness. In other words, you can easily tailor this easy autumn dessert to reflect the culinary character of your area.
Seasonal adaptations are also simple. While pumpkin is the star of fall, you can modify the recipe for other times of year. For a winter holiday version, add a hint of peppermint extract and crushed candy canes on top. In the spring, a swirl of strawberry puree would be delightful. Furthermore, for summer, a lime zest and ginger version would be incredibly refreshing. The basic no-bake cheesecake formula is a fantastic canvas for any seasonal fruit or flavor profile.
Dietary modifications are straightforward. For a gluten-free dessert, use certified gluten-free graham crackers or another gluten-free cookie for the crust. To make it dairy-free, substitute the cream cheese with a plant-based alternative and use coconut cream instead of heavy whipping cream. For a vegan version, combine these dairy-free swaps with a vegan sweetener. You can also reduce the sugar content significantly by using a sugar-free powdered sweetener designed for baking. This versatility makes the dessert accessible to almost everyone.
Serving and Presentation Guide
Plating techniques for jarred desserts are all about showcasing the beautiful layers. Use clear mason jars or glasses to allow the crust and filling to be visible. When assembling, press the crust down firmly to create a clean, level base. Then, when adding the filling, spoon it in gently or use a piping bag to avoid disrupting the crust layer. For the most professional look, wipe the inside of the jar clean after each layer is added.
Garnishing ideas can elevate this simple dessert into something spectacular. A classic dollop of freshly whipped cream is always welcome. Beyond that, consider a drizzle of caramel or chocolate sauce. A sprinkle of toasted pecans, walnuts, or pepitas adds crunch and a nutty flavor. A tiny dusting of cinnamon or pumpkin pie spice on top adds a final touch of color and aroma. A fresh mint leaf can also provide a lovely color contrast.
Traditional accompaniments for pumpkin desserts include a cup of strong coffee, a glass of cold milk, or a dessert wine like a late-harvest Riesling. For a non-alcoholic option, spiced apple cider is a perfect pairing. Temperature considerations are simple; serve the cheesecakes chilled directly from the refrigerator. The cold temperature enhances the creamy texture and makes the dessert refreshing. Allow them to sit on the counter for just 5 minutes before serving to take the extreme edge off the chill.
Wine and Beverage Pairing
Choosing the right wine can enhance the experience of your creamy, dreamy no-bake pumpkin cheesecake. The best pairings will complement the dessert’s sweetness, creaminess, and spice notes without overpowering it. A late-harvest Riesling or Gewürztraminer, with their inherent sweetness and floral aromas, are excellent choices. Their acidity helps cut through the richness of the cheesecake. Alternatively, a glass of tawny port or a cream sherry offers nutty and caramel notes that harmonize beautifully with the pumpkin and spice flavors.
For non-alcoholic alternatives, the options are plentiful. A steaming mug of chai tea is a fantastic match, as the spices in the tea mirror those in the cheesecake. Similarly, a hot apple cider, either spiced or plain, creates a cohesive autumnal flavor profile. Cold brew coffee with a splash of cream provides a bitter contrast that balances the sweetness of the dessert. For a simpler option, a glass of cold milk is a classic and always satisfying pairing with any cheesecake.
If you prefer coffee, consider serving a medium-roast coffee with notes of caramel or nut. The bitterness of the coffee contrasts nicely with the sweet, creamy dessert. Avoid very dark, bitter roasts that might clash with the spices. Tea drinkers might enjoy an Earl Grey, whose bergamot flavor adds a sophisticated citrusy note that plays well against the warm spices. Ultimately, the goal is to choose a beverage that either contrasts or complements the primary flavors of the dessert to create a more rounded tasting experience.
Storage and Shelf Life
Proper storage is key to maintaining the quality of your no-bake cheesecakes. They must be stored in the refrigerator at all times. Once assembled, cover the jars tightly with their lids or plastic wrap. This prevents the cheesecakes from absorbing other odors from the fridge and also stops the top from drying out. The airtight environment of the jar itself is ideal for storage.
The shelf life for these cheesecakes is excellent. They will keep well in the refrigerator for 3 to 5 days. The crust may soften slightly over time as it absorbs moisture from the filling, but the dessert will still be delicious. For the best texture and crust integrity, consuming them within the first 2-3 days is ideal. Always check for any signs of spoilage, such as an off smell or mold, before consuming, especially if you have added fresh fruit garnishes.
Freezing is a great option for longer storage. These cheesecakes freeze remarkably well. It is best to freeze them without the final whipped cream topping. Place the uncovered jars in the freezer for about an hour until the filling is solid, then screw on the lids. They can be frozen for up to 2 months. To thaw, transfer them to the refrigerator for several hours or overnight. Add fresh whipped cream and garnishes just before serving. Do not refreeze after thawing.
Make Ahead Strategies
This dessert is a champion of make-ahead preparation. In fact, it is highly recommended to make it at least a day in advance. The extended chilling time allows the flavors to meld together and the filling to set to the perfect consistency. You can prepare the entire dessert, cover the jars, and store them in the refrigerator for up to two days before serving. This makes it incredibly convenient for parties and holidays.
You can also break down the preparation over two days. On day one, you can prepare the crust layers in the jars, cover them, and store at room temperature. You can also make the filling, but store it separately in an airtight container in the fridge. Then, on the day you plan to serve, simply pipe or spoon the filling into the jars and chill for a few more hours to allow everything to firm up together. This strategy is perfect if you want the absolute freshest presentation with a crisp crust.
The quality impact of making it ahead is positive. The flavors have time to develop and become more complex. The texture of the filling sets perfectly. The only element that might suffer slightly is the crust, which can soften over time. To combat this, you can add a very thin layer of melted chocolate to the bottom of the crust before adding the crumbs. This creates a moisture barrier that helps keep the crust crunchy for longer. Always add any whipped cream or delicate garnishes right before serving for the best appearance and texture.
Scaling Instructions
Scaling this recipe up or down is straightforward because it is based on ratios. This recipe makes four generous servings in 8-ounce jars. To halve the recipe, simply divide all the ingredient quantities by two. You can make two perfect desserts. Conversely, to double the recipe for a larger crowd, multiply all ingredients by two. This will yield eight servings. The recipe scales linearly without issue.
When doubling or tripling the recipe, the main consideration is your equipment. Ensure your mixing bowl is large enough to accommodate the increased volume of filling. You may need to whip the cream in batches to avoid overfilling your mixer. The preparation time will increase slightly due to the larger quantity of ingredients to measure and mix, but the active hands-on time remains relatively efficient. The chilling time will remain the same, as the individual jar size does not change.
For very large batches, such as for a wedding or big event, it is advisable to do a test batch first to perfect your technique and timing. Storage considerations are also important; ensure you have enough refrigerator space for all the jars. When scaling up, consistency is key. Use a kitchen scale to measure ingredients by weight for the most accurate results, especially with the graham cracker crumbs and powdered sugar. This ensures every jar tastes identical.
Nutritional Deep Dive
A single serving of this indulgent dessert provides a rich source of energy primarily from fats and carbohydrates. The cream cheese and heavy cream contribute saturated fat, which gives the dessert its luxurious mouthfeel. The carbohydrates come from the graham cracker crust and the powdered sugar, providing quick energy. While it is a treat, the pumpkin puree does contribute beneficial nutrients, including a significant amount of Vitamin A, essential for vision and immune function, as well as fiber.
From a micronutrient perspective, pumpkin is the standout ingredient. It is an excellent source of beta-carotene, a powerful antioxidant. The spices, particularly cinnamon, may also offer anti-inflammatory properties. However, it is important to view this as a dessert to be enjoyed in moderation as part of a balanced diet. The sugar and calorie content are considerable. For those monitoring their intake, being mindful of portion size is key. The individual jar presentation actually helps with portion control, as each serving is pre-determined.
For weight management, enjoying this dessert as an occasional treat is perfectly reasonable. You cannot realistically make it low-calorie without significantly altering its character, but you can make smarter choices within the recipe. Using a reduced-fat cream cheese and slightly less sugar can shave off some calories. Remember, the context of your overall diet is what matters most. Savoring one of these cheesecakes mindfully is a better approach than seeking out a “diet” version that may not be satisfying.
Dietary Adaptations
Creating a gluten-free version of this no-bake pumpkin cheesecake is simple. The only ingredient containing gluten is the graham cracker crust. Fortunately, several brands offer certified gluten-free graham crackers that work perfectly. Alternatively, you can use crushed gluten-free cookies like ginger snaps, shortbread, or even a nut-based crust made from almonds or pecans. The filling is naturally gluten-free, as cream cheese, pumpkin, and sugar do not contain gluten. Always check labels to ensure all ingredients are certified gluten-free if you have a severe allergy.
For a dairy-free adaptation, you will need to substitute the cream cheese and heavy whipping cream. The market for plant-based alternatives has expanded greatly. Look for a high-quality, firm-style vegan cream cheese. For the whipped component, the best option is to use the solid part of a can of full-fat coconut milk or coconut cream that has been chilled overnight. Whip it just as you would dairy cream. The result will be a slightly tropical-flavored but still delicious and creamy filling. Vegan butter can be used for the crust.
A vegan version combines the gluten-free and dairy-free adaptations. Use a vegan crust, vegan cream cheese, and coconut cream. Ensure your sugar is vegan, as some refined white sugars are processed with bone char. Most powdered sugar contains cornstarch and is typically vegan, but it is always good to check. The resulting dessert will be free of animal products while still capturing the essence of the original. The spice profile will shine through, and the texture will be very similar to the traditional version.
Troubleshooting Guide
If your filling is too runny and will not set, the most common cause is under-whipped cream or insufficient chilling time. Ensure you whip the heavy cream to stiff peaks so it provides enough structure. If the problem persists, the filling may have too much moisture. Next time, try draining your pumpkin puree in a fine-mesh strainer for 30 minutes to remove excess water. If you are in a pinch, you can try to salvage it by folding in a little more whipped cream to add air, but extended chilling is the primary solution.
If your filling is lumpy, it is almost certainly due to cream cheese that was not soft enough. Unfortunately, this is difficult to fix once it is happened. You can try pressing the filling through a fine-mesh sieve to remove the lumps, but this can be messy and may deflate the airiness. Prevention is the best cure here: always allow adequate time for the cream cheese to come to room temperature. Using a electric mixer to beat the cream cheese alone until perfectly smooth before adding other ingredients is crucial.
If your crust is too crumbly and will not hold together, it likely needs more binding agent, which is the melted butter. The mixture should feel like wet sand. If it is too dry, add more melted butter, a teaspoon at a time, until the consistency is correct. If the crust is too hard or greasy, you have used too much butter. You can try to balance it by adding a few more tablespoons of graham cracker crumbs. When pressing the crust into the jars, use firm, even pressure to compact it well.
Frequently Asked Questions
Can I use fresh pumpkin instead of canned?
Absolutely. Using fresh pumpkin can yield a fantastic flavor. You will need to roast a sugar pumpkin (not a large carving pumpkin), scoop out the flesh, and puree it until smooth. It is crucial to drain the puree very well, as fresh pumpkin often contains more water than canned. Spread it on a paper towel-lined baking sheet to absorb excess moisture before using it in the recipe. The process takes more time but can be rewarding.
How long can I store these cheesecakes in the fridge?
Properly stored in airtight containers or jars with lids, these cheesecakes will keep well in the refrigerator for 3 to 5 days. The quality is best within the first 2-3 days, as the crust may begin to soften over time. For the best texture and flavor, I recommend enjoying them within this timeframe.
Can I freeze these no-bake cheesecakes?
Yes, they freeze exceptionally well. For best results, freeze them without the whipped cream topping. Place the uncovered jars in the freezer until solid (about 1-2 hours), then seal with the lids. They can be frozen for up to 2 months. Thaw overnight in the refrigerator and add fresh toppings before serving.
My filling is too soft. What did I do wrong?
A soft filling usually points to two issues: either the heavy cream was not whipped to stiff peaks, or the cheesecakes did not chill long enough. The whipped cream provides the structure, so it must be firm. Ensure you chill the desserts for at least 4 hours, but overnight is truly ideal for a perfect set.
Can I make this without an electric mixer?
While it is possible, it is very challenging and will require a lot of elbow grease. A whisk can be used to whip the cream and beat the cream cheese, but it will take much longer and may not achieve the same level of airiness and smoothness. An electric mixer is highly recommended for the best texture.
Is there a substitute for heavy whipping cream?
For a non-dairy version, the thick cream from a can of full-fat coconut milk (chilled overnight) is the best substitute. Do not use light coconut milk or other milk alternatives, as they will not whip. For a dairy-based option, there is no direct substitute that will whip properly; the high fat content is essential.
Can I use a different type of cookie for the crust?
Certainly. Ginger snaps, biscoff cookies, digestive biscuits, or even crushed vanilla wafers or shortbread cookies make excellent crusts. The method remains the same: crush the cookies into fine crumbs and mix with melted butter. Choose a cookie whose flavor will complement the pumpkin and spices.
Why is it important for the cream cheese to be at room temperature?
Room temperature cream cheese is soft and pliable, allowing it to blend smoothly with the other ingredients without leaving any lumps. Cold cream cheese is firm and will remain chunky no matter how much you mix it, resulting in a grainy, unpleasant texture in your final dessert.
Additional Resources
If you enjoyed this creamy, dreamy no-bake pumpkin cheesecake in a jar, you might want to explore other related recipes on the blog. For instance, a classic baked pumpkin cheesecake offers a denser, richer experience for those who prefer the traditional method. We also have a recipe for pumpkin spice snickerdoodle cookies, which are another fantastic way to enjoy the flavors of fall. For a different no-bake option, our maple pecan cheesecake bars are always a hit during the holiday season.
For
Print
No-Bake Pumpkin Spice Energy Bites
Description
A quick, no-bake treat packed with autumn flavors—perfect for a cozy snack or healthy dessert.
Ingredients
For the Crust:
- 1 cup rolled oats
- 1/2 cup pumpkin puree
- 1/4 cup maple syrup
- 1/4 cup almond butter
- 1 tsp pumpkin pie spice
- 1/4 cup chopped pecans
- 2 tbsp chia seeds
- Pinch of salt
Instructions
1. Prepare the Crust:
- In a medium bowl, mix pumpkin puree, maple syrup, and almond butter until smooth.
- Add rolled oats, pumpkin pie spice, pecans, chia seeds, and salt. Stir until well combined.
- Refrigerate mixture for 20 minutes, then roll into 1-inch balls. Store in an airtight container.
Notes
You can customize the seasonings to taste.
I’m Shaykee—born in Morocco, seasoned across continents. From airplane galleys to home kitchens, I share the flavors and stories that shaped my journey.