No-Knead Rosemary Cranberry Bread: The Effortless Artisan Loaf You Can Master
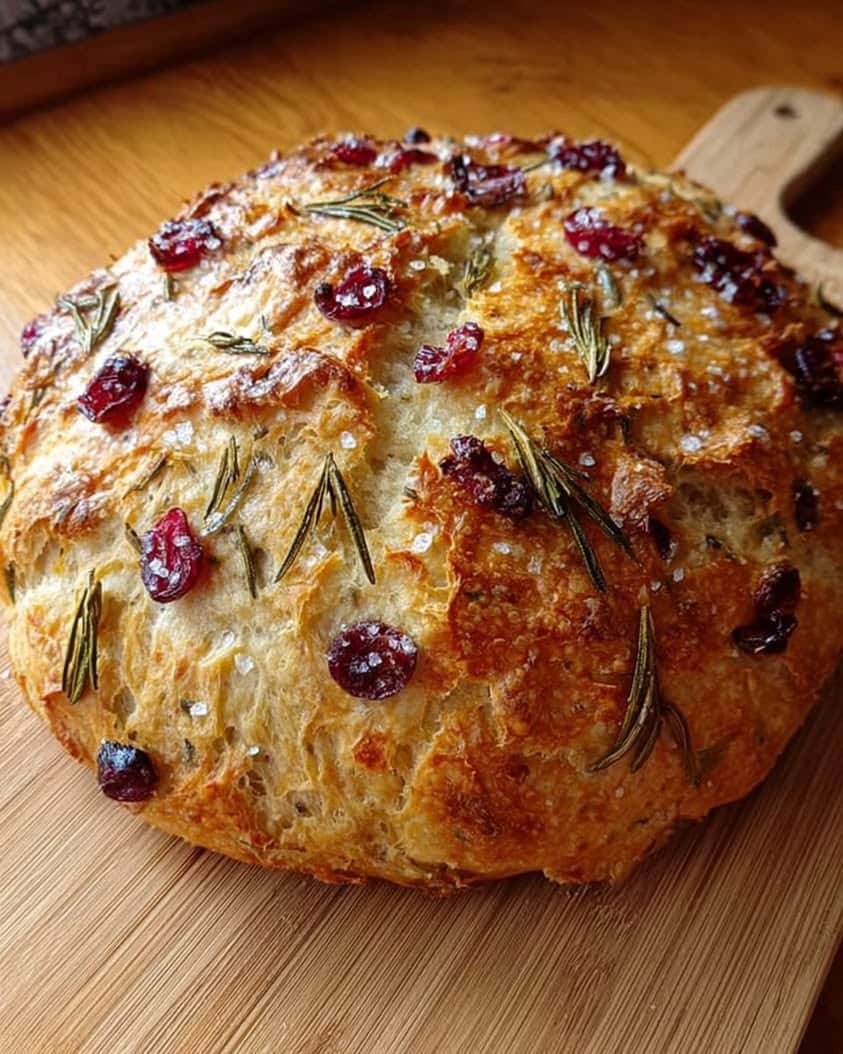
Imagine pulling a golden, crackling loaf of homemade bread from your oven. The aroma of earthy rosemary and sweet cranberries fills your kitchen. This stunning no-knead bread features a crisp, blistered crust that gives way to a soft, airy interior studded with ruby-red fruit and fragrant herbs. Best of all, this impressive rosemary cranberry bread requires almost no effort from you. The magic happens overnight as the dough slowly ferments, developing complex flavors that rival any professional bakery.
This particular easy bread recipe transforms simple pantry staples into something extraordinary. The combination of savory olive oil, piney rosemary, and tart-sweet cranberries creates a symphony of flavors in every slice. Furthermore, the method eliminates the most intimidating aspect of bread making. You simply mix the ingredients and let time do the work. Consequently, even complete beginners can achieve bakery-quality results with this forgiving technique.
The final result is a beautiful, rustic loaf that looks and tastes artisan. A generous drizzle of olive oil and a sprinkle of flaky sea salt before baking create an unforgettable crust. This homemade bread is perfect for everything from holiday dinners to casual weeknight soups. Ultimately, it will become your go-to recipe for impressing guests or treating your family to something special.
Quick Recipe Highlights
- Flavor Profile: This bread masterfully balances savory and sweet notes. Earthy, pine-like rosemary complements the bright, tart bursts of dried cranberries. Meanwhile, high-quality olive oil adds a fruity depth, and a final sprinkle of sea salt enhances every flavor.
- Texture: The crust is shatteringly crisp and thin, a hallmark of proper steam baking. Inside, the crumb is remarkably soft, chewy, and full of irregular holes. These textural contrasts between the crunchy exterior and tender interior are truly satisfying.
- Aroma: As it bakes, your kitchen will fill with an intoxicating scent. The primary notes are the herbal fragrance of fresh rosemary and the warm, yeasty smell of baking dough. Subtle undertones of toasted wheat and sweet fruit complete the aromatic experience.
- Visual Appeal: This loaf boasts a gorgeous, rustic appearance. The exterior is a deep golden-brown with a beautifully blistered and floured crust. When sliced, the interior reveals a stunning mosaic of creamy dough and vibrant crimson cranberries.
- Skill Level Needed: This recipe is specifically designed for bakers of all levels, especially beginners. There is no complicated kneading technique required. The most important skill is patience, as the long fermentation is key to the bread’s character.
- Special Equipment: You only need a few basic kitchen tools. A digital scale is highly recommended for accuracy, along with a large mixing bowl. Most importantly, you will need a heavy, lidded Dutch oven to create the perfect steamy baking environment.
Recipe Overview
- Difficulty Level: This recipe earns its easy rating because it eliminates traditional, labor-intensive steps. There is no kneading involved, and the process is incredibly forgiving. The long rest period does all the work of developing gluten and flavor, making it virtually foolproof. Consequently, it is an ideal starting point for anyone new to baking bread.
- Category: This versatile loaf falls squarely into the category of artisan breads and side dishes. It is perfect for serving alongside soups, stews, and salads. Additionally, it makes for a spectacular breakfast toast or a base for sophisticated sandwiches.
- Cuisine: This bread draws inspiration from European rustic baking traditions, particularly Italian and French styles. The use of olive oil and rosemary nods to Mediterranean flavors. However, the inclusion of cranberries adds a modern, North American twist, creating a unique fusion.
- Cost: This is an incredibly cost-effective recipe to make at home. The primary ingredients are simple flour, water, yeast, and salt. Adding cranberries and fresh rosemary only marginally increases the cost, especially when compared to buying a similar artisan loaf from a bakery.
- Season: While wonderful year-round, this bread feels particularly special during the autumn and winter months. The warm, herbal notes of rosemary and the festive cheer of cranberries make it a holiday favorite. It is the perfect comfort food for colder weather.
- Occasion: This impressive loaf is suitable for everything from a casual family dinner to a formal holiday feast. It elevates a simple weeknight meal and shines as a centerpiece on a festive table. It also makes a thoughtful and delicious homemade gift for friends and neighbors.
Why You’ll Love This No-Knead Rosemary Cranberry Bread
The taste and texture of this no-knead bread are truly exceptional. Each bite offers a delightful contrast between the crisp, salty crust and the soft, chewy interior. The sweet-tart cranberries provide little bursts of flavor that cut through the richness of the olive oil. Meanwhile, the rosemary infuses the entire loaf with its distinctive, aromatic quality. This complex flavor profile makes it far more interesting than a plain white loaf, yet it remains incredibly versatile for pairing with various foods.
From a convenience standpoint, this easy bread recipe is a game-changer. The active hands-on time is less than 15 minutes, spread over a full day. You can mix the dough before bed and bake it the next evening for dinner. This schedule fits seamlessly into a busy life. Moreover, you do not need any special baking skills or expensive equipment beyond a sturdy pot. The process is remarkably forgiving, which builds confidence in novice bakers.
Nutritionally, this homemade bread allows you to control exactly what goes into your food. There are no preservatives, artificial flavors, or unpronounceable ingredients. Using high-quality flour, olive oil, and dried fruit creates a wholesome product. While it is a treat, it contains simple, real food ingredients. You can feel good about serving it to your family, knowing its pure composition.
The social and entertaining value of this rosemary cranberry bread cannot be overstated. The dramatic presentation of the rustic, crackled loaf never fails to impress guests. The wonderful aroma that fills your home as it bakes creates a warm, welcoming atmosphere. Serving a beautiful, homemade loaf conveys care and effort, making people feel special. It is a fantastic conversation starter and a guaranteed crowd-pleaser at any gathering.
Finally, this loaf is incredibly cost-effective. The ingredients are pantry staples that are inexpensive to purchase. A single bakery-quality artisan loaf can cost five to ten dollars, but this homemade version costs a fraction of that. Baking it yourself saves money while yielding a superior product. Furthermore, the recipe is easy to double, allowing you to make two loaves for the price of one store-bought version.
Historical Background and Cultural Significance
The technique for this style of no-knead bread was popularized for the home baker by journalist Mark Bittman and baker Jim Lahey in 2006. However, the principles of long, slow fermentation are ancient. European bakers have used similar methods for centuries, relying on wild yeasts and time to leaven their dough. This modern recipe brilliantly simplifies these traditional techniques, making artisan-style bread accessible to everyone with a standard kitchen oven.
Bread itself holds profound cultural significance across the world, often symbolizing life, community, and sustenance. The act of breaking bread together is a universal gesture of friendship and hospitality. This particular rosemary cranberry bread blends Old World baking traditions with New World ingredients. Rosemary has been a staple in Mediterranean cooking for millennia, while cranberries are native to North America. Their combination in a loaf represents a beautiful culinary fusion.
The evolution of this recipe mirrors a broader trend in home cooking. As people sought to reconnect with their food and avoid processed ingredients, homemade bread experienced a major resurgence. The no-knead method was a revolutionary development because it removed the largest barrier to entry for home bakers. It demonstrated that incredible flavor and texture came not from strenuous effort, but from patient fermentation. This understanding empowered a new generation of bakers.
Regional variations of fruit and herb breads exist throughout Europe. For instance, Italian bakers might use olives and rosemary, while French bakers might incorporate walnuts and raisins. This easy bread recipe with cranberries is a distinctly American take on that tradition. It utilizes a native fruit and adapts a classic method, resulting in a loaf that is both familiar and novel. It is a perfect example of how recipes travel and evolve across cultures.
Ingredient Deep Dive
Bread flour is the foundation of this loaf, chosen for its high protein content, typically around 12-14%. This protein, primarily glutenin and gliadin, combines to form gluten when hydrated. The long, slow fermentation of this no-knead bread method naturally develops this gluten network without kneading. This creates the strong, elastic structure needed to trap gas bubbles during fermentation, resulting in an open, airy crumb. For best results, use unbleached bread flour. If you must substitute, all-purpose flour will work but may yield a slightly less chewy texture.
Fresh rosemary is the star herb in this rosemary cranberry bread, providing an aromatic, pine-like flavor that is both earthy and slightly peppery. Rosemary has been used in cooking and medicine since ancient times, symbolizing remembrance and friendship. Its robust essential oils can withstand the heat of baking without losing their character. For the brightest flavor, use fresh sprigs and chop the needles finely just before using. If you only have dried rosemary, use one-third the amount, as dried herbs are more concentrated.
Dried cranberries add pockets of chewy sweetness and a vibrant color contrast to the loaf. Unlike raisins, cranberries provide a pleasant tartness that balances the richness of the bread. When selecting dried cranberries, check the ingredient list to avoid brands with excessive added sugar or oils. For a more nuanced flavor, you can plump the cranberries in warm water or orange juice for 10 minutes before adding them to the dough. This prevents them from absorbing too much moisture from the dough during baking.
Extra virgin olive oil contributes a fruity, peppery depth and helps create a tender crumb. The oil coats the flour proteins, slightly inhibiting gluten formation, which results in a softer texture. Additionally, it adds richness and helps keep the bread moist for days. Use a good-quality olive oil that you enjoy the taste of, as its flavor will come through in the finished loaf. A robust, cold-pressed oil will give the best results, infusing the bread with the essence of the Mediterranean.
Sea salt is crucial for both flavor and controlling yeast activity. Flaky sea salt, such as Maldon, is ideal for sprinkling on top before baking as it creates delightful crunchy bursts. The salt in the dough strengthens the gluten network and regulates the fermentation speed, preventing the yeast from working too quickly. Do not be tempted to reduce the salt, as it is essential for a well-balanced flavor. Using a fine sea salt within the dough ensures even distribution.
Common Mistakes to Avoid
- Using hot water to mix the dough can kill the yeast, resulting in a dense, flat loaf. Always use lukewarm water, around 100°F (38°C), which feels slightly warm to the touch. This temperature provides the ideal environment for the yeast to become active and begin fermenting the sugars in the flour.
- Neglecting to let the Dutch oven preheat sufficiently is a common error. A properly preheated pot is non-negotiable for achieving a good oven spring and a crisp crust. Preheat the empty Dutch oven with its lid on for a full 45-60 minutes to ensure it is screaming hot when the dough goes in.
- Over-flouring the dough during shaping can lead to a tough, dry crust. The dough is meant to be wet and sticky. Use just enough flour on your hands and the work surface to prevent sticking, but do not knead extra flour into the dough itself. A bench scraper is very helpful for handling the sticky dough.
- Using instant yeast instead of active dry yeast without adjusting the amount can affect the fermentation timeline. While they are often interchangeable, instant yeast is more potent. If substituting, you can use about 25% less instant yeast to prevent the dough from over-fermenting too quickly.
- Cutting into the bread immediately after baking is a temptation you must resist. The loaf continues to cook internally as it cools, a process called carryover cooking. Slicing it too soon will release steam and result in a gummy, undercooked texture. Allow it to cool completely on a wire rack for the best crumb structure.
- Adding the cranberries too early or without preparation can cause issues. If you mix them in at the very beginning, their sugars can slightly inhibit yeast activity. Furthermore, dry, hard cranberries can steal moisture from the dough. Folding them in during the final stages of mixing is the best technique.
- Not scoring the dough deeply enough prevents the bread from expanding properly in the oven. A shallow cut will seal over quickly, trapping steam and causing the bread to burst at its weakest point. Use a sharp blade, like a lame or razor, and make a confident, decisive slash about half an inch deep.
- Using a glass or ceramic Dutch oven instead of a cast-iron one can be risky. While they can work, cast iron retains and distributes heat far more effectively. Enameled cast iron is an excellent choice. If using a different material, be aware that baking times may need adjustment.
Essential Techniques
Autolyse is a critical technique, though it happens passively in this recipe. After initially mixing the flour and water, the dough is left to rest. During this time, the flour fully hydrates, and enzymes begin breaking down starches into simple sugars. This process naturally initiates gluten development, making the dough smoother and more elastic without any kneading. It is the secret to the open crumb and superior texture of this homemade bread. You will see a visible change in the dough’s consistency after this rest period.
Long, cold fermentation is the heart of the no-knead method. By allowing the dough to rise slowly in the refrigerator for 12-18 hours, the yeast and bacteria have time to develop complex flavors. This slow proof mimics the sourdough process, creating tangy, nuanced notes. Additionally, the cold temperature makes the wet dough much easier to handle when it is time to shape it. This extended rest is what transforms simple ingredients into an extraordinary easy bread recipe with deep, artisan flavor.
Creating steam in the oven is essential for a crisp, glossy crust. By baking the bread in a preheated, lidded Dutch oven, you trap the moisture evaporating from the dough. This steam keeps the dough surface supple during the initial oven spring, allowing the loaf to expand fully before the crust hardens. After removing the lid, the steam escapes, and the dry heat then crisps and browns the crust to perfection. This technique is what gives professional-quality results in a home kitchen.
Proper scoring is not just for decoration; it is functional. Using a sharp blade to slash the top of the loaf just before baking controls where the bread expands. This guided release prevents the loaf from tearing unpredictably and allows for an optimal oven spring. The angle and depth of the score affect the final shape of the loaf, with a deep, swift cut yielding the best “ear” and an attractive bloom. Mastering this simple technique elevates the appearance of your rosemary cranberry bread immensely.
Pro Tips for Perfect No-Knead Rosemary Cranberry Bread
Weigh your ingredients using a digital kitchen scale for absolute precision. Baking is a science, and flour measured by volume can vary dramatically in weight depending on how it is scooped. Using grams ensures consistency and perfect hydration every time, which is crucial for the success of this wet dough.
Use a bench scraper to handle the sticky dough confidently. This simple tool is invaluable for folding the dough, transferring it from the bowl, and cleaning your work surface. It prevents you from adding too much extra flour during handling, which is a common mistake that can toughen the bread.
Listen to the bread as it bakes. During the final 15-20 minutes of baking with the lid off, you may hear a faint crackling sound. This is the music of the crust caramelizing and becoming crisp. It is a good auditory cue that your loaf is progressing beautifully towards a perfect finish.
Test for doneness with an internal temperature check. A perfectly baked loaf will register between 205-210°F (96-99°C) in the center when measured with an instant-read thermometer. This is a more reliable method than thumping the bottom, guaranteeing your bread is fully cooked without being over-baked.
Let the baked loaf cool completely on a wire rack. This allows the internal steam to redistribute and the crumb structure to set. Slicing into a warm loaf may be tempting, but it will result in a gummy texture. The flavor also continues to develop as the bread cools.
For an extra glossy, blistered crust, add an ice cube to the Dutch oven. When you place the dough inside the preheated pot, quickly toss an ice cube into the corner before closing the lid. The extra burst of steam will enhance the crust’s texture and appearance significantly.
Variations and Adaptations
For regional variations, you can easily adapt this loaf to reflect different culinary traditions. An Italian-inspired version might include sun-dried tomatoes, kalamata olives, and basil. A French twist could feature walnuts, gruyère cheese, and thyme. For a German-style bread, incorporate whole rye flour and caraway seeds. These adaptations show the incredible versatility of the basic no-knead method and allow you to travel the world from your kitchen.
Seasonal adaptations make this recipe a year-round favorite. In the spring, try adding fresh peas, lemon zest, and dill. For summer, consider chopped apricots, pistachios, and a hint of mint. Autumn is perfect for this classic rosemary and cranberry combination, or try apples and cinnamon. In winter, a hearty version with toasted walnuts and a touch of maple syrup is wonderfully comforting. Using seasonal ingredients ensures peak flavor and freshness.
Dietary modifications are straightforward with this forgiving dough. For a gluten-free version, use a high-quality 1:1 gluten-free flour blend and add one teaspoon of xanthan gum. To make it vegan, ensure your sweetened dried cranberries do not contain honey. For a dairy-free version, this recipe is already perfect as written. A lower-sugar option can be made by using unsweetened dried cranberries or reducing the quantity.
Flavor variations are endless. For a sweeter breakfast bread, increase the cranberries and add orange zest. A savory loaf can be created with garlic powder, black pepper, and grated parmesan cheese. For a holiday version, add a pinch of nutmeg and allspice to the dough. You can also experiment with different herbs like sage, thyme, or oregano in place of rosemary. Each variation creates a uniquely delicious loaf.
Texture modifications can be achieved by altering the ingredients. For a denser, more substantial crumb, replace one cup of bread flour with whole wheat flour. For added crunch, incorporate seeds like sunflower, pumpkin, or flax into the dough. Soaking the cranberries in a flavored liquid like apple cider or tea before adding them will make them plumper and softer in the final bread.
Presentation alternatives allow for creative expression. Instead of one large boule, you can divide the dough to make two smaller loaves or even individual rolls. You can bake it in a preheated loaf pan for a more traditional sandwich shape. For a stunning centerpiece, braid three small pieces of dough or create a decorative pattern with your scoring. The dough is very adaptable to different forms.
Serving and Presentation Guide
Plating techniques for this beautiful loaf should highlight its rustic charm. Place the whole loaf on a wooden cutting board or a slate slab for a natural, artisanal look. Use a sharp serrated bread knife to slice it into thick, generous pieces that showcase the airy crumb and vibrant cranberries. Arrange the slices slightly fanned out or stacked casually. This approach makes the bread a visual centerpiece on your table, inviting everyone to dig in.
Garnishing ideas can elevate the presentation from simple to spectacular. Just before serving, drizzle the top of the loaf with a little extra virgin olive oil and a light sprinkle of flaky sea salt. You can also tuck a few fresh rosemary sprigs around the base of the loaf on the board. For a festive touch, scatter a few extra dried cranberries on the serving platter. These small details enhance the visual appeal and hint at the flavors within.
Traditional accompaniments for this bread are simple and elegant. A small bowl of high-quality olive oil for dipping is a classic choice, perhaps with a splash of balsamic vinegar. Softened, whipped butter is another perfect partner, allowing the bread’s flavors to shine. For a cheese board, pair it with creamy brie, sharp cheddar, or a tangy goat cheese. These pairings complement the bread without overwhelming its delicate balance of sweet and savory.
Modern serving suggestions include using it as a base for sophisticated appetizers. Top thick slices with whipped goat cheese, a drizzle of honey, and a crack of black pepper. Use it for a next-level turkey and cranberry sauce sandwich after the holidays. Cube and toast it for a unique crouton in a fall harvest salad. These ideas transform the bread from a side dish into a versatile component of a modern meal.
Temperature considerations are important for the best eating experience. This bread is truly sublime when served still slightly warm from the oven, as the crust is at its crispiest and the aroma is most potent. However, for clean slicing, it is best to let it cool completely. If serving later, you can reheat whole loaves in a 350°F oven for 10 minutes to refresh the crust and warm the interior.
Portion control tips are helpful given how irresistible this bread can be. A standard one-pound loaf typically yields 8 generous slices or 12 more modest ones. For a dinner party, plan on one to two slices per person as an accompaniment to the main course. If serving as an appetizer with dips or as part of a bread basket, you can slice it thinner. Remember, it is easier to slice a cool loaf neatly than a warm one.
Wine and Beverage Pairing
Wine pairings for this bread should complement its sweet and savory profile. A crisp, unoaked Chardonnay or a French Chablis works beautifully, as their acidity cuts through the richness of the olive oil. For red wine lovers, a light-bodied Pinot Noir with its red fruit notes echoes the cranberry flavors without overpowering the bread. A dry Rosé is another excellent choice, bridging the gap between red and white with its versatility. Ultimately, the herbal notes in the bread also pair wonderfully with an herbal Sauvignon Blanc.
Non-alcoholic alternatives can be just as sophisticated. A sparkling apple cider provides sweetness and effervescence that cleanses the palate between bites. For a warmer option, a rosemary-infused tea mirrors the herbal notes in the bread. A tart cranberry spritzer made with club soda and a splash of unsweetened cranberry juice is a direct flavor pairing. These beverages allow everyone to enjoy a thoughtful pairing with the bread.
Coffee and tea pairings are perfect for breakfast or brunch servings. A medium-roast coffee with low acidity complements the bread’s warmth without bitterness. An Earl Grey tea, with its bergamot citrus notes, contrasts nicely with the sweet cranberries. For a herbal tea, chamomile or mint provides a soothing, refreshing counterpoint. A chai latte, with its spices, can stand up to the robust flavors of the rosemary and olive oil.
Temperature considerations for beverages depend on the context. Chilled white wines and sparkling non-alcoholic drinks are refreshing when the bread is served with a salad or light meal. Fuller-bodied red wines and warm teas are cozier companions for soup or a winter dinner. Serving beverages at their ideal temperature ensures they enhance the bread-eating experience rather than distracting from it.
Serving suggestions for beverages should focus on simplicity and elegance. Pour wines into appropriate glassware to appreciate their aroma. Serve non-alcoholic options in clear glasses to showcase their color. Offer coffee and tea in sturdy mugs that retain heat. Providing a choice of two different pairings can make the meal feel more special and tailored to your guests’ preferences.
Storage and Shelf Life
Storage methods are crucial for maintaining the bread’s texture. Once completely cool, store the loaf in a paper bag at room temperature for up to two days. The paper allows the crust to remain crisp while the interior stays moist. Avoid plastic bags initially, as they will trap moisture and make the crust soft and chewy. For longer storage, a bread box is an ideal environment. These methods help preserve the artisan quality of your homemade bread.
Temperature requirements are straightforward for short-term storage. Room temperature, around 68-72°F (20-22°C), is perfect. Do not refrigerate the bread, as the cold temperature accelerates starch retrogradation, which causes the bread to stale much faster. The refrigerator is the enemy of fresh bread texture. If your kitchen is particularly warm or humid, storage in a cool, dark pantry is better than on the counter.
Container recommendations depend on how long you plan to store the bread. For one to two days, a paper bag is superior. For up to four days, a bread box or a loosely covered ceramic container works well. If you must use plastic, wait until the second day, when the crust has softened naturally. Never store bread in an airtight container while it is still warm, as this will create condensation and promote mold.
Signs of spoilage to watch for include visible mold, which usually appears as green or blue spots, and an off or sour smell. If the bread develops mold, discard the entire loaf, as spores can penetrate throughout. Staling is different from spoilage; stale bread is dry and hard but still safe to eat. You can revive stale bread by sprinkling it with water and reheating it in an oven.
Reheating instructions can restore the bread’s fresh-from-the-oven quality. For whole loaves, sprinkle the crust with a little water and heat in a 350°F (175°C) oven for 10-15 minutes. For slices, toasting is the best method. You can also warm slices directly on the rack of a toaster oven for a few minutes. Avoid using the microwave for reheating, as it will make the bread tough and rubbery.
Freezing guidelines are excellent for long-term storage. Wrap the completely cooled loaf tightly in plastic wrap, then in aluminum foil. Label it with the date and freeze for up to three months. To serve, thaw the wrapped loaf at room temperature for several hours, then refresh in a 350°F oven for 10 minutes. You can also freeze individual slices for quick toasting.
Make Ahead Strategies
Prep timeline for this easy bread recipe is inherently make-ahead friendly. The entire first rise happens slowly in the refrigerator for 12-18 hours. You can mix the dough in the evening, let it ferment overnight, and then bake it the next afternoon for dinner. Alternatively, you can prepare the dough, let it undergo its initial rise, shape it, and then hold it in the refrigerator for an additional 4-6 hours before baking. This flexibility makes it easy to fit bread baking into a busy schedule.
Storage between steps is simple. After mixing, cover the bowl tightly with plastic wrap to prevent the dough from drying out. During the long fermentation in the refrigerator, no special attention is needed. If you need to delay the baking after shaping, place the shaped dough on a floured sheet of parchment paper, cover loosely with plastic, and refrigerate. The cold temperature will significantly slow the final proof.
Quality impact assessment of make-ahead steps is generally positive. The long, cold fermentation only improves the flavor and texture of the bread. Delaying the baking after shaping by a few hours will not harm the loaf; in fact, it can develop more flavor. The key is to avoid letting the dough over-proof, which can cause it to collapse. With practice, you will learn to read the dough’s readiness.
Assembly tips for a streamlined process include measuring your dry ingredients the night before. You can combine the flour, salt, and yeast in the mixing bowl and cover it. Then, the next day, you simply add the water and olive oil. Having your add-ins like chopped rosemary and cranberries pre-measured saves time. This mise en place approach makes the actual mixing quick and effortless.
Reheating guidelines for a make-ahead loaf are the same as for fresh bread. The best method is to warm the whole loaf in a conventional oven to restore the crisp crust. If you baked the bread completely ahead of time, consider under-baking it very slightly by 2-3 minutes if you know you will be reheating it. This prevents it from over-drying during the second heating.
Fresh element additions can be considered if making the dough ahead. For the brightest herbal flavor, you could mix the dough without the rosemary, then knead it in briefly during the shaping stage before the final proof. This ensures the rosemary’s essential oils are at their peak when the bread bakes. Similarly, you can reserve a few cranberries to press into the top of the loaf after shaping for a more decorative appearance.
Scaling Instructions
Halving the recipe is straightforward and perfect for smaller households. Simply divide all the ingredient quantities by two. Use 250 grams of bread flour, 190 grams of water, 2 grams of yeast, 4 grams of salt, and proportionally less of the add-ins. The fermentation times will remain largely the same. The main difference will be a smaller loaf that may bake slightly faster, so start checking for doneness 5-10 minutes earlier than the original recipe suggests.
Doubling or tripling the recipe is great for gift-giving or gatherings. Multiply all ingredients consistently. Mix the dough in a very large bowl or divide the ingredients between two separate bowls for mixing. The fermentation time remains unchanged. When baking, you will need to bake the loaves one at a time unless you have multiple Dutch ovens. Shape the second loaf while the first one bakes, keeping it covered at room temperature. The wait is worth it for multiple beautiful loaves.
Equipment adjustments are necessary when scaling. For a double batch, ensure your mixing bowl is large enough to accommodate the dough as it rises; it will nearly triple in volume. When halving the recipe, the same Dutch oven will work, but the loaf will be smaller. There is no need to adjust the preheating time or temperature of the Dutch oven based on the batch size.
Timing modifications are minimal when scaling. The long fermentation in the refrigerator remains 12-18 hours regardless of batch size. The baking time may vary slightly: a halved recipe may take 5-10 minutes less, while a doubled recipe (in a larger Dutch oven) may need a few extra minutes. Always rely on the internal temperature of 205-210°F (96-99°C) and the deep golden color of the crust as your final guides.
Storage considerations change with batch size. If making multiple loaves, consider freezing one immediately after it cools completely for best quality. A single, smaller loaf from a halved recipe will be consumed more quickly, so short-term room temperature storage is sufficient. Label and date any frozen loaves, and try to use them within three months for optimal flavor and texture.
Nutritional Deep Dive
Macro breakdown of this bread is typical of an artisan loaf. A single slice provides complex carbohydrates for sustained energy, a moderate amount of protein from the wheat gluten, and a small amount of fat primarily from the olive oil. The cranberries add a minor amount of simple sugars and dietary fiber. This balance makes it a satisfying food that provides energy without a sharp blood sugar spike, especially when paired with protein or healthy fats like olive oil or cheese.
Micronutrient analysis reveals a range of vitamins and minerals. The bread flour provides B vitamins, important for energy metabolism, and iron. The olive oil contributes vitamin E, a powerful antioxidant. Rosemary contains compounds like rosmarinic acid, known for its anti-inflammatory properties. Cranberries are a source of vitamin C and various phytonutrients. While not a vitamin-dense food, it contributes meaningfully to a balanced diet.
Health benefits are tied to its whole-food ingredients and preparation method. The slow fermentation can make the bread easier to digest for some people compared to quickly made commercial breads. The olive oil provides heart-healthy monounsaturated fats. The lack of preservatives and artificial additives is a significant benefit. Enjoyed as part of a varied diet, this homemade bread is a wholesome and nourishing choice.
Dietary considerations are important for those with specific needs. This recipe contains gluten and is not suitable for those with celiac disease or a gluten intolerance. The cranberries may contain added sugars, so those monitoring sugar intake should check labels or use unsweetened varieties. It is naturally dairy-free and can be made vegan by ensuring the cranberries are sweetened with sugar rather than honey. As with any bread, portion control is key for those managing carbohydrate intake.
Portion analysis helps with mindful eating. A typical slice from this loaf is satisfying due to its dense, chewy texture and flavorful add-ins. This often means you may be content with one slice where you might eat two slices of a less flavorful bread. Pairing a slice with a protein source like soup, eggs, or cheese creates a more balanced meal and helps regulate the absorption of carbohydrates.
Weight management tips include being mindful of accompaniments. The bread itself is a reasonable food, but slathering it with large amounts of butter or oil can significantly increase the calorie count. Using it as a component of a meal rather than the main focus is a good strategy. Its robust flavor also means that a little goes a long way in terms of satisfaction, which can naturally help with portion control.
Dietary Adaptations
Gluten-free
Print
No-Knead Rosemary Cranberry Bread with Olive Oil & Sea Salt
Description
A rustic, aromatic loaf with sweet cranberries, fragrant rosemary, and a hint of sea salt, made effortlessly without kneading.
Ingredients
For the Crust:
- 3 cups all-purpose flour
- 1 1/2 tsp salt
- 1/2 tsp active dry yeast
- 1 1/2 cups warm water
- 1/2 cup dried cranberries
- 2 tbsp fresh rosemary, chopped
- 2 tbsp olive oil
- 1 tsp coarse sea salt for topping
Instructions
1. Prepare the Crust:
- In a large bowl, mix flour, salt, yeast, cranberries, and rosemary. Add warm water and olive oil, stirring until a shaggy dough forms.
- Cover bowl with plastic wrap and let rise at room temperature for 12-18 hours, until doubled and bubbly.
- Preheat oven to 450°F (230°C) with a Dutch oven inside. Turn dough onto a floured surface, shape into a round, and sprinkle with sea salt.
- Carefully place dough into the hot Dutch oven, cover, and bake for 30 minutes. Remove lid and bake 10-15 minutes more until golden.
Notes
You can customize the seasonings to taste.
I’m Shaykee—born in Morocco, seasoned across continents. From airplane galleys to home kitchens, I share the flavors and stories that shaped my journey.
I can’t wait to try your recipe! I was wondering whether I can use sourdough starter in this?