Spinach Artichoke Dip Pull-Apart Bread: The Ultimate Cheesy Party Appetizer
Imagine the warm, gooey comfort of classic spinach artichoke dip, but instead of scooping it with chips, you pull it apart with soft, buttery pieces of bread. This spinach artichoke dip pull-apart bread is exactly that magical creation. It transforms a beloved party staple into a self-contained, shareable centerpiece that is as fun to eat as it is delicious to taste. The aroma alone, as it bakes and fills your kitchen with the scent of garlic, herbs, and melting cheese, is enough to gather a crowd.
This recipe masterfully combines two crowd-pleasing concepts into one unforgettable appetizer. Firstly, you have the rich, creamy dip loaded with tender spinach, tangy artichokes, and a blend of cheeses. Secondly, a whole loaf of bread acts as both the vessel and the utensil, its interior transformed into pockets of cheesy goodness. Consequently, every pull reveals another steamy, cheesy bite perfectly attached to a piece of bread. It is the ultimate solution for game day, holiday parties, or any gathering where you want to serve something impressively simple.
Beyond its incredible taste, this spinach artichoke dip pull-apart bread offers visual drama and interactive eating. Presenting a golden, crusty loaf that oozes with cheesy filling the moment you break into it creates instant excitement. Moreover, it requires minimal cleanup since everything bakes and is served from the same dish. Ultimately, this recipe guarantees that you will become the hero of any potluck or family get-together with minimal effort.
Quick Recipe Highlights
- Flavor Profile: This dish delivers a powerful punch of creamy, tangy, and savory notes. The richness of cream cheese and mozzarella balances perfectly with the bright acidity of artichokes and Parmesan. Additionally, garlic and herbs provide a fragrant backbone that makes every bite complex and satisfying.
- Texture: Experience a delightful contrast between the crispy, golden exterior of the bread and its soft, fluffy interior soaked in creamy dip. The spinach and artichokes retain a slight bite, offering pleasant texture against the smooth, molten cheese filling.
- Aroma: While baking, the scent of roasting garlic, toasting bread, and melting dairy will permeate your home. This aromatic promise builds anticipation and is a hallmark of truly comforting, shareable food.
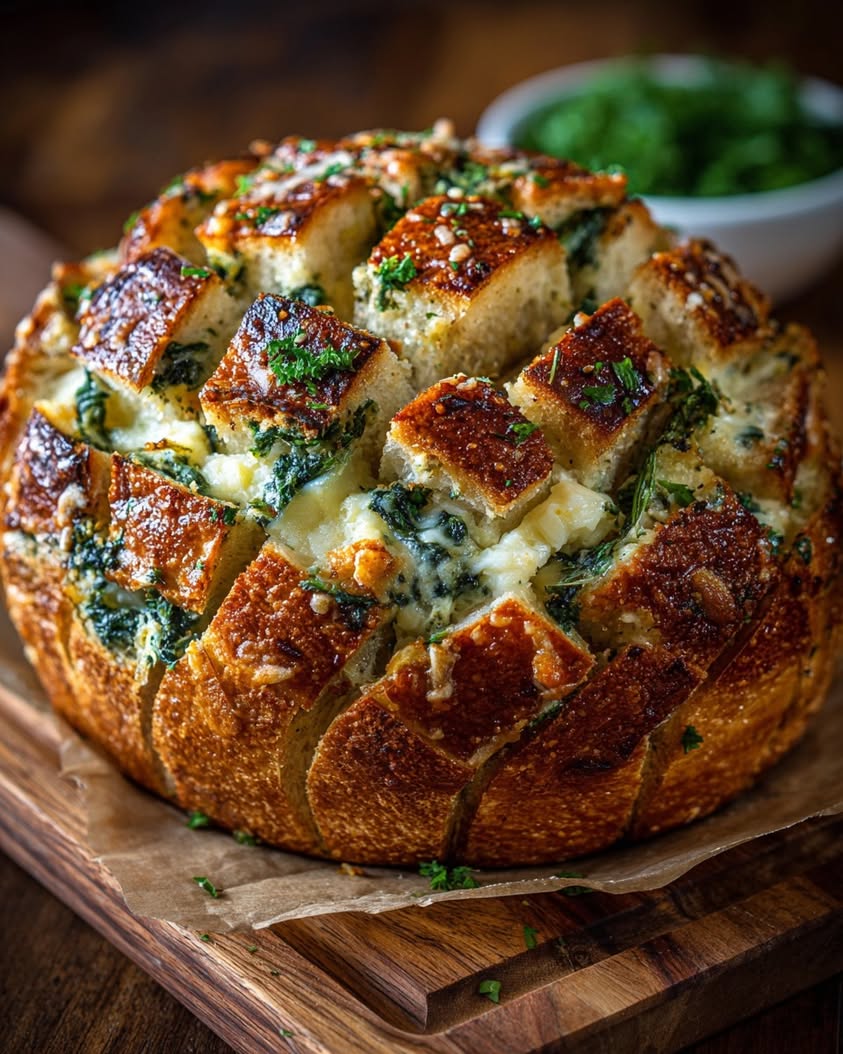
- Visual Appeal: The finished loaf boasts a gorgeous, deep golden-brown crust. When you cut or tear it open, the vibrant green spinach and creamy white cheese filling create a stunning, inviting contrast that is perfect for photography and impressing guests.
- Skill Level Needed: This is a beginner-friendly recipe requiring no advanced techniques. Essentially, if you can chop vegetables, mix ingredients, and use a knife to score bread, you can successfully create this impressive appetizer.
- Special Equipment: You need only a mixing bowl, a sharp serrated knife, a baking sheet, and aluminum foil. No special appliances or tools are necessary, making this recipe highly accessible.
Recipe Overview
- Difficulty Level: We rate this recipe as easy because it utilizes mostly pre-prepared ingredients and straightforward assembly. The most technical step involves cutting the bread loaf without slicing through the bottom, which is simple with a little guidance. Furthermore, the filling comes together in one bowl with no cooking required before baking.
- Category: This dish falls squarely into the appetizer and snack category. It is ideal for parties, potlucks, and casual gatherings. However, it can also serve as a indulgent centerpiece for a relaxed dinner with a side salad.
- Cuisine: While spinach artichoke dip has roots in American cuisine, often linked to chain restaurant appetizers, this pull-apart bread adaptation is a modern, internet-era creation. It represents a fusion of comfort food trends, focusing on shareable, cheesy, and visually engaging dishes popular in contemporary home cooking and social media food culture.
- Cost: This is a cost-effective party dish. A round loaf of bread, frozen spinach, canned artichokes, and common cheeses and condiments keep the ingredient list affordable. Importantly, it yields a large, impressive appetizer that can feed many people for a relatively low cost per serving.
- Season: This recipe is truly a year-round favorite. It is perfect for cozy winter holidays and fall game days. Conversely, it also works for summer barbecues and spring gatherings because its appeal is universal and not tied to specific seasonal produce.
- Occasion: Think of any event where people gather to graze: Super Bowl parties, holiday cocktail hours, book club meetings, or family movie nights. Its interactive nature makes it a conversation starter and a focal point for social eating.
Why You’ll Love This Recipe
You will adore this spinach artichoke dip pull-apart bread first and foremost for its incredible taste and texture. Each component complements the other flawlessly. The bread soaks up the rich, garlicky dip while its exterior bakes to a satisfying crunch. Meanwhile, the filling remains luxuriously creamy with little pops of flavor from the artichokes and spinach. Every single bite delivers the perfect ratio of bread to dip, eliminating the common problem of running out of chips or crackers. This built-in delivery system ensures a consistently delicious experience from the first pull to the last.
From a convenience standpoint, this recipe is a true winner. Assembly is remarkably quick, often taking less than fifteen minutes of active prep work. You can even prepare the filled loaf ahead of time and refrigerate it until you are ready to bake. Consequently, when guests arrive, you simply pop it in the oven, and within half an hour, you have a hot, bubbly, impressive appetizer with minimal last-minute fuss. The cleanup is equally simple, as the entire dish bakes on a single sheet pan.
While indulgent, this appetizer does incorporate vegetables like spinach and artichokes. Spinach provides vitamins A, C, and K, along with iron and fiber. Artichokes are a great source of fiber and contain antioxidants. Of course, enjoying them baked into a cheesy bread loaf makes consuming these nutrients an absolute pleasure. It is a more engaging way to include greens in a party spread.
The social and entertaining value of this dish cannot be overstated. Food that encourages interaction, like pull-apart bread, naturally breaks the ice and gets people talking. Placing this steaming, cheesy loaf in the center of a table creates an instant focal point. Guests will gather around, tearing off pieces and marveling at the gooey interior. It fosters a sense of community and shared enjoyment that a plated appetizer simply cannot match.
Finally, this recipe is highly cost-effective and accessible. The ingredients are common and affordable, available at any standard grocery store. You do not need expensive equipment or rare items. For the price of a few bags of chips and a store-bought dip, you can create a homemade showstopper that looks and tastes far more luxurious. This accessibility ensures that anyone, regardless of cooking budget or experience, can create a memorable dish for their loved ones.
Historical Background and Cultural Significance
The story of spinach artichoke dip is a fascinating tale of American culinary innovation. Most food historians trace its popularization to the rise of casual dining chain restaurants in the 1970s and 1980s. Restaurants like T.G.I. Friday’s and Bennigan’s featured it as a hot, cheesy appetizer designed for sharing at the table. Its creamy, comforting profile and use of convenient ingredients like frozen spinach and canned artichokes made it a scalable, profitable menu item. The dip quickly became a staple of sports bars, family restaurants, and party platters across the country, embodying a certain era of American indulgence.
Culturally, spinach artichoke dip represents the American love for rich, shareable appetizers. It sits alongside nachos, buffalo wings, and potato skins as a category of food meant for communal eating and casual socializing. The dish has no deep historical roots in European or other world cuisines; instead, it is a product of mid-century American home economics and the canned food industry. Its enduring popularity speaks to a universal craving for creamy, salty, vegetable-laden cheese dips, a craving that transcends its commercial origins.
The evolution from a dip served in a dish to one baked inside bread is a more recent phenomenon, fueled by the internet and food blogging. The “pull-apart bread” or “cheese pull bread” trend took off in the 2010s, with cooks stuffing everything from pizza toppings to buffalo chicken into scored bread loaves. The marriage of spinach artichoke dip with this technique was a natural and brilliant progression. It solved the practical problem of serving dip by integrating the vehicle directly into the food, while also amplifying the visual and textural appeal for the social media age.
Regional variations of the base dip do exist. In some areas, you might find added water chestnuts for crunch, or a heavier use of jalapeños for heat. Some versions rely solely on mayonnaise and sour cream, while others use a bechamel or cream cheese base. The pull-apart bread method, however, has become a standard and beloved adaptation nationwide. It demonstrates how a classic recipe can be reinvented through technique, creating a new tradition that feels both familiar and excitingly novel.
Ingredient Deep Dive
Round Bread Loaf (Sourdough or Italian): The bread choice is the structural foundation. A round, crusty loaf like sourdough or Italian bread works best because it holds its shape during scoring and baking. The crust provides a sturdy container, while the interior is soft enough to tear easily. Sourdough adds a pleasant tang that contrasts the rich filling, while a plain Italian loaf offers a neutral, buttery backdrop. Always select a loaf that is fresh but not super soft; a slightly day-old loaf can actually be easier to score without collapsing.
Frozen Chopped Spinach: Using frozen spinach is a major time-saver and ensures consistent results. It is pre-chopped, pre-cleaned, and retains its bright green color and nutrients when properly drained. Historically, the widespread availability of frozen vegetables in the mid-20th century made dishes like this dip possible for home cooks. To use it, you must thaw and thoroughly squeeze out all excess water. This step is critical; any remaining moisture will make your filling runny. Spinach provides iron, fiber, and vitamins, adding nutritional heft to the cheesy base.
Canned Artichoke Hearts: Canned artichoke hearts are the other convenience hero. Native to the Mediterranean, artichokes have been cultivated for centuries, but their canned form made them accessible globally. They offer a distinctive, slightly tangy and nutty flavor that is irreplaceable in this dip. Be sure to drain and chop them well. You can use marinated artichokes, but rinse them lightly to avoid making the filling too oily. They contribute fiber and antioxidants, and their unique texture is a key identifier of the dish.
Cream Cheese: This is the primary source of creamy richness and body. Invented in the late 19th century and popularized in the United States, cream cheese provides a smooth, tangy base that melts beautifully. Use full-fat brick-style cream cheese for the best texture and flavor stability when baked. Let it soften at room temperature before mixing to ensure a lump-free filling. It acts as the glue that binds the other ingredients together into a cohesive, spreadable mixture.
Shredded Mozzarella and Parmesan: This cheese duo provides stretch and flavor. Mozzarella, with its excellent meltability, creates the iconic “cheese pull.” Low-moisture, part-skim mozzarella works best as it melts without releasing too much oil. Parmesan, specifically Parmigiano-Reggiano or a good domestic counterpart, adds a salty, umami punch that deepens the overall flavor profile. The combination ensures the filling is both gooey and intensely savory. For best results, shred your own cheese from a block, as pre-shredded bags contain anti-caking agents that can inhibit smooth melting.
Common Mistakes to Avoid
- Not Draining Spinach and Artichokes Enough: This is the number one cause of a watery, soggy filling. After thawing the spinach, squeeze it in a clean kitchen towel or multiple layers of paper towels until no more liquid comes out. Similarly, press the chopped artichokes in a sieve to remove their canned brine. Excess moisture will steam inside the bread, making the bottom mushy.
- Using Cold Cream Cheese: Attempting to mix rock-hard cream cheese with other ingredients will result in a lumpy, uneven filling. Always plan to let the cream cheese sit on the counter for at least 30 minutes to soften. This ensures it blends smoothly with the mayonnaise, sour cream, and cheeses.
- Cutting Through the Bottom Crust: When scoring the bread loaf into squares or diamonds, use a sharp serrated knife and cut deeply, but stop about 1/2 inch from the bottom crust. Cutting all the way through will cause the loaf to fall apart and the filling to leak out onto the pan during baking.
- Overstuffing the Cuts: It is tempting to pack as much filling as possible into every crevice. However, overstuffing can prevent the filling from heating through evenly and may cause it to spill over excessively. Gently pry each cut open and use a spoon or butter knife to spread a moderate amount inside; the filling will expand as it heats.
- Skipping the Foil Tent: The initial covered baking time is crucial. It allows the entire loaf and filling to heat through without the top of the bread burning. If you bake it uncovered the whole time, the crust may become too dark and hard before the center is hot and cheesy.
- Using Pre-Shredded Cheese Exclusively: While convenient, pre-shredded cheeses are coated with cellulose or starch to prevent clumping. These coatings can make the melted cheese texture slightly grainy or gummy. For the smoothest, stretchiest melt, take two minutes to shred a block of mozzarella and Parmesan yourself.
- Not Letting it Rest Before Serving: Pulling the bread from the oven and immediately tearing into it is tempting but dangerous. The filling is molten lava hot. Let it rest for 5-10 minutes. This allows the cheese to set slightly, making it easier to pull apart without burning fingers, and gives the flavors a moment to settle.
- Using a Bread Loaf That’s Too Soft: An overly soft, fluffy sandwich loaf will not hold its structure when scored and filled. It may collapse or become unpleasantly soggy. Seek out a loaf with a sturdy, crisp crust and a denser crumb, which acts as a better vessel for the heavy filling.
Essential Techniques
Scoring the Bread Loaf: This technique creates the pockets that hold the filling and defines the “pull-apart” structure. Use a sharp serrated bread knife for clean cuts. Place the loaf on a stable surface and mentally map a grid pattern. Cut deeply, about 3/4 of the way down, but consistently stop before cutting through the bottom crust. A good method is to place your hand on top of the loaf to steady it and use a gentle sawing motion. Consistent depth ensures even filling distribution and baking.
Thoroughly Draining Vegetables: Proper moisture removal is non-negotiable for success. For frozen spinach, thaw it completely, then gather it in the center of a clean, lint-free kitchen towel. Twist the towel tightly over the sink to wring out every drop of green water. For canned artichokes, drain in a colander, then spread on paper towels and press with more towels. This step prevents a soggy bottom and ensures a rich, concentrated flavor in your filling.
Creaming the Cheese Base: Achieving a smooth, homogenous filling starts with properly softened cream cheese. In a large bowl, beat the room-temperature cream cheese first until it is smooth and pliable. Then, add the mayonnaise, sour cream, and seasonings, mixing until fully combined and creamy. Finally, fold in the shredded cheeses and drained vegetables. This sequential method prevents lumps and ensures every ingredient is evenly coated and distributed.
Stuffing and Sealing: After scoring, gently pry each section of the loaf open. Use a small spoon or a butter knife to spread the filling into each cut, pushing it down towards the bottom. Do not just pile it on top. Once all cuts are filled, you can press the loaf gently back into a round shape. Optionally, wrapping the stuffed loaf in foil for the first part of baking helps “steam” it slightly, ensuring the interior bread softens and the filling heats through completely before the final crisping stage.
Pro Tips for Perfect Spinach Artichoke Dip Pull-Apart Bread
First, for maximum flavor, sauté a clove or two of minced garlic in a teaspoon of butter before adding it to the filling. This mellows the raw garlic bite and adds a deeper, more rounded garlic flavor to the entire dish.
Second, add a pinch of red pepper flakes or a dash of hot sauce to the filling mixture. This small addition provides a subtle background heat that cuts through the richness and makes the flavors more complex without being overtly spicy.
Third, brush the top and sides of the bread loaf with melted garlic butter before you even start scoring it. This extra step guarantees an incredibly flavorful, golden, and crispy crust that everyone will fight over.
Fourth, if you want an even more dramatic cheese pull, reserve a handful of your shredded mozzarella. Sprinkle this reserved cheese over the top of the loaf during the last 5 minutes of uncovered baking. It will create a beautiful, bubbly, browned cheese crust.
Fifth, for a fresher herb flavor, mix dried herbs into the filling as directed, but also sprinkle fresh chopped parsley or chives over the baked loaf just before serving. The bright green color and fresh taste provide a lovely contrast.
Sixth, serve it with a small bowl of warm marinara sauce or a zesty ranch dressing on the side for dipping. This gives guests an option for extra sauciness and enhances the overall experience.
Seventh, if your bread loaf seems particularly large or dense, you can hollow out some of the soft interior bread from the scored sections before stuffing. This creates more room for filling and prevents an overly bready result.
Eighth, always place the stuffed loaf on a parchment paper-lined baking sheet. This prevents any cheese that bubbles over from sticking to the pan and makes for the easiest cleanup imaginable.
Variations and Adaptations
Regional Variations: Across different parts of the country, you might find unique twists. In the Southwest, add roasted green chiles and a blend of Monterey Jack and pepper jack cheese. In the South, a spoonful of Cajun or Creole seasoning and the use of pimento cheese as a base could be delightful. A coastal variation might include lump crab meat mixed into the filling for a luxurious spin.
Seasonal Adaptations: While the core recipe is perennial, you can tweak it for the seasons. In fall, add a tablespoon of pureed pumpkin or butternut squash to the filling for sweetness and color, paired with sage. For summer, use fresh, blanched spinach instead of frozen and add fresh basil and sun-dried tomatoes.
Dietary Modifications: For a gluten-free version, use a sturdy, round gluten-free bread loaf. Be aware that GF bread can be more crumbly, so handle it gently when scoring. For a keto or low-carb adaptation, the filling itself is already fairly low-carb. Simply serve it in a hollowed-out bell pepper “bowl” or bake it in a dish without the bread, using pork rinds or celery for dipping.
Flavor Variations: The basic formula is incredibly versatile. Try a “Buffalo Chicken” version by mixing shredded cooked chicken with buffalo sauce into the cream cheese base. A “Pizza” variation could include pepperoni, pizza sauce, and Italian cheese blend. For a “Jalapeño Popper” style, add diced jalapeños and crispy bacon bits.
Texture Modifications: If you enjoy more texture, fold in a quarter cup of finely chopped water chestnuts or toasted panko breadcrumbs into the filling. For an ultra-smooth and decadent filling, you can pulse the mixture a few times in a food processor before stuffing.
Presentation Alternatives: Instead of one large loaf, use individual sourdough rolls or small baguettes to create personal-sized pull-apart breads. This is perfect for dinner parties where you want individual servings. Alternatively, you can bake the filling in a hollowed-out pumpkin or round of sourdough for a stunning autumn centerpiece.
Serving and Presentation Guide
Plating this dish is all about embracing its rustic, shareable nature. Transfer the entire baked loaf directly onto a large wooden cutting board or a sturdy, heatproof platter. Surround it with garnishes like fresh herb sprigs, lemon wedges, or extra red pepper flakes for color. The board presentation invites interaction and makes serving feel casual and communal.
For garnishing, a final drizzle of high-quality olive oil or a sprinkle of flaky sea salt over the hot crust adds shine and flavor. Freshly chopped herbs like parsley, chives, or dill provide a vibrant green contrast against the golden bread and white cheese. A light dusting of grated Parmesan right after baking also enhances the visual appeal.
Traditional accompaniments are simple. Since the bread is built-in, you do not need chips. However, offering small bowls of additional dipping sauces like marinara, ranch, or a garlic aioli allows guests to customize their experience. A crisp, light vegetable platter with carrots, celery, and bell peppers provides a refreshing, crunchy counterpoint to the rich bread.
Modern serving suggestions might include placing the loaf as the centerpiece of a “snack table” or grazing board. Pair it with other finger foods like meatballs, olives, and cured meats. For a full meal, serve it alongside a hearty salad like a Caesar or an Italian chopped salad to balance the indulgence.
Temperature is critical. This dish must be served warm, when the cheese is at its peak stretchiness. If it sits too long, the cheese will firm up. Keep it on a warming tray or in a low oven if you need to hold it before serving. Conversely, warn guests that the interior will be very hot initially.
Portion control is naturally built in, as people pull off pieces at their own pace. However, for a larger crowd, you can pre-pull a few sections to make it easier for the first person to dive in. Estimate that one standard loaf will serve 6-8 people as an appetizer, depending on what other food is available.
Wine and Beverage Pairing
Wine pairings for this rich, cheesy, and garlicky dish should focus on cutting through the fat. A crisp, high-acid white wine like Sauvignon Blanc or Pinot Grigio is an excellent choice. Their citrus and green fruit notes cleanse the palate between bites. Alternatively, a dry sparkling wine like Prosecco or Cava offers refreshing bubbles that contrast the dense texture beautifully. For red wine lovers, a light-bodied, low-tannin red like Beaujolais or a chilled Pinot Noir can work well without overwhelming the flavors.
Non-alcoholic alternatives are just as important. A sparkling water with a squeeze of lemon or lime provides the same palate-cleansing effect as wine. Iced herbal teas, like mint or lemon verbena, are refreshing and won’t compete with the dish’s savory notes. For a creamier option, a chilled glass of buttermilk or a tomato-based Virgin Mary can be surprisingly complementary.
While not a typical coffee dish, if serving this for a brunch or late morning gathering, coffee can pair nicely. Opt for a medium-roast coffee with low acidity to avoid clashing with the tomatoes or artichokes. A black tea like Earl Grey, with its citrusy bergamot notes, can also be a pleasant accompaniment.
Temperature considerations are straightforward: serve all beverages well-chilled. The cold contrast against the warm, rich bread is key to the pairing’s success. Have plenty of ice on hand for water and non-alcoholic drinks to ensure they remain cold throughout the social eating period.
Finally, consider the setting. For a casual game day, beer is a classic pairing. A pilsner, pale ale, or wheat beer with moderate hops and carbonation works wonderfully. Offer a variety so guests can choose their preferred level of bitterness to balance the creamy dip.
Storage and Shelf Life
Storage of leftovers requires careful handling. First, allow any uneaten portion to cool completely to room temperature. Then, wrap the entire loaf or individual portions tightly in plastic wrap, followed by aluminum foil. You can store it in the refrigerator for up to 3 days. The bread will soften considerably from the moisture of the filling, so expect a different, but still tasty, texture upon reheating.
For reheating, the oven or toaster oven is best to restore some crispness. Preheat your oven to 350°F. Unwrap the bread and place it on a baking sheet. If it’s a large portion, cover it loosely with foil to prevent over-browning. Heat for 10-15 minutes, or until warmed through. For a single serving, a few minutes in an air fryer can recrisp the exterior wonderfully.
Freezing is possible but with caveats. Assemble and stuff the loaf but do not bake it. Wrap it tightly in several layers of plastic wrap and foil, then freeze for up to 1 month. To cook, thaw overnight in the refrigerator, then bake as directed, adding a few extra minutes to the covered baking time if needed. Note that freezing may slightly alter the texture of the bread, making it a bit more chewy.
Signs of spoilage are typical for dairy-based dishes. Look for any off smells, such as a sour or unpleasant odor. Visible mold, especially on the bread crust or filling, means it must be discarded. If the filling has separated into an oily, grainy mess, it is likely past its prime. Always err on the side of caution and discard if you are unsure.
For the best quality, this dish is truly meant to be enjoyed fresh from the oven. While storage and reheating are feasible, the magic of the crispy bread and perfectly molten cheese is at its peak immediately after baking. Plan your preparation timeline to serve it as soon as possible after it comes out of the oven.
Make Ahead Strategies
You can prepare this recipe almost entirely in advance, which is a huge advantage for entertaining. The filling can be mixed, covered, and refrigerated for up to 24 hours before you need it. This allows the flavors to meld beautifully. Store it in an airtight container. If the filling seems very thick after chilling, let it sit at room temperature for 15-20 minutes to soften slightly before stuffing the bread.
For the most streamlined party plan, you can assemble the entire loaf a day ahead. Score the bread, prepare the filling, stuff the loaf, and wrap it tightly in plastic wrap. Store it in the refrigerator. When ready to bake, remove it from the fridge while you preheat the oven. You may need to add 5-7 extra minutes to the initial covered baking time since you are starting with a cold loaf.
Assessing the quality impact of make-ahead steps is important. The filling benefits from resting, as the flavors intensify. The bread itself may soften slightly from contact with the filling overnight, but the initial covered bake time will steam it back to a pleasant texture. The final uncovered bake will still achieve a crispy crust. Overall, the difference is minimal, and the convenience far outweighs any slight textural change.
For assembly tips when making ahead, be generous with the plastic wrap. Wrap the stuffed loaf snugly to prevent the bread from drying out in the fridge. Place it on a baking sheet in the refrigerator to maintain its shape. If the loaf seems unstable, you can tie kitchen twine around it to hold its form overnight.
Reheating guidelines for a fully pre-assembled loaf are as above. The key is ensuring the center is hot. Use a food thermometer to check that the internal temperature of the filling reaches at least 165°F. If the top is browning too quickly during the final bake, simply lay a piece of foil loosely over it.
If you want to add fresh elements, prepare any herb garnishes or side sauces the day before but keep them separate. Sprinkle fresh herbs and add any final cheese topping only after the loaf is baked and just before serving to preserve their color, texture, and vibrant flavor.
Scaling Instructions
Halving the recipe is straightforward if you are cooking for a smaller group. Use a smaller round loaf, like a mini sourdough boule. Halve all the filling ingredients precisely. The baking time will be slightly reduced. Start checking for doneness after about 15 minutes of covered baking and 5-10 minutes uncovered. The visual cues of golden crust and bubbling filling remain the same.
Doubling or tripling the recipe for a crowd is easy, but you must consider equipment and oven space. Do not try to double the filling in one giant loaf; it will not bake evenly. Instead, prepare two or three separate loaves on separate baking sheets. You may need to bake them in batches or use multiple oven racks, rotating the sheets halfway through baking for even browning. Ensure there is enough air circulation between racks.
Equipment adjustments are minimal. For multiple loaves, you will obviously need more baking sheets and parchment paper. A large mixing bowl will be necessary for mixing a double or triple batch of filling. Consider using a stand mixer with the paddle attachment to easily cream together large quantities of cream cheese and other ingredients.
Timing modifications are key when scaling up. The prep time will increase linearly as you chop more vegetables and shred more cheese. However, the baking time per loaf should remain roughly the same. The real time management comes in staggering the assembly if you are working alone, or enlisting help to assemble multiple loaves simultaneously.
Storage considerations for scaled-up recipes are similar. Any leftover baked loaves can be stored as previously described. If you have uncooked, assembled loaves, they can be wrapped and frozen individually. This allows you to bake one for a small gathering and save others for future events, making this a versatile strategy for meal prep.
Nutritional Deep Dive
A macro breakdown of this dish reveals it is a rich source of fats and carbohydrates, with moderate protein. The primary fats come from the cheeses, mayonnaise, and sour cream, providing energy and satiety. The carbohydrates are predominantly from the bread, offering quick energy. The protein comes from the dairy and, to a lesser extent, the spinach. This combination makes it a filling appetizer, but one best enjoyed in moderation as part of a balanced diet.
The micronutrient analysis shows valuable contributions from the vegetables. Spinach is loaded with Vitamin K for bone health, Vitamin A for vision, and folate. Artichokes provide fiber, which aids digestion, and antioxidants like cynarin. The dairy components offer calcium and phosphorus for strong bones and teeth. While the dish is indulgent, it does deliver more micronutrients than many other cheesy appetizers.
Health benefits are tied to its components when considered separately. The calcium supports bone density. The fiber from the vegetables promotes gut health. The lycopene in any added marinara sauce is an antioxidant. However, these benefits are balanced against the high saturated fat and sodium content, which is typical of celebratory foods. The key is mindful enjoyment.
For dietary considerations, this is not suitable for those strictly monitoring sodium, saturated fat, or calories. It contains gluten and dairy. However, as discussed in the adaptations section, modifications can be made for specific dietary needs. Always check labels on pre-packaged ingredients like canned artichokes and mayonnaise for hidden allergens or additives.
Portion analysis is helpful. One serving (roughly 1/8 of a loaf) is a satisfying handful. Being mindful of portion size allows you to enjoy the flavors without overindulgence. Since it is so rich, people often naturally stop after a few pieces, especially if other lighter foods are available.
Weight management tips include balancing this appetizer with very light meals before and after. If you know you will be enjoying this at a party, focus on lean proteins and vegetables for your other meals that day. Also, be active! The social, interactive nature of pulling the bread apart can slow down eating, allowing your body to register fullness more effectively.
Dietary Adaptations
Gluten-Free: Use a certified gluten-free round loaf. Many bakeries and stores now carry sturdy GF sourdough options. Be extra gentle when scoring, as GF bread can be crumbly. Ensure all other ingredients, like mayonnaise and canned artichokes, are labeled gluten-free, as cross-contamination can occur.
Dairy-Free/Vegan: This requires more substitutions but is entirely possible. Use vegan cream cheese, sour cream, and shredded mozzarella ( brands like Miyoko’s or Violife work well). For Parmesan, use a vegan alternative or nutritional yeast for umami. Ensure the bread loaf is vegan (no dairy or honey). The flavor profile will be different but still deliciously creamy and tangy.
Low-Carb/Keto: The filling itself is relatively low in carbs. The main issue is the bread. Serve the spinach artichoke dip baked in a dish instead. For a vessel, use hollowed-out bell peppers, zucchini boats, or low-carb bread alternatives like a fathead dough round. You can also simply enjoy the baked dip with celery sticks, cucumber slices, or pork rinds.
Paleo: Paleo adaptations avoid dairy, grains, and legumes. For the base, use a combination of coconut cream and cashew cheese. Thicken with arrowroot powder if needed. Stuff the mixture into a large, hollowed-out sweet potato or acorn squash instead of bread. Garnish with fresh
Print
Spinach Artichoke Dip Pull-Apart Bread
Description
A fun and cheesy appetizer that combines creamy spinach artichoke dip with pull-apart bread, perfect for parties or game day.
Ingredients
For the Crust:
- 1 round sourdough bread loaf (about 1 lb)
- 1 cup frozen spinach, thawed and squeezed dry
- 1 cup canned artichoke hearts, drained and chopped
- 8 oz cream cheese, softened
- 1 cup shredded mozzarella cheese
- 1/2 cup grated Parmesan cheese
- 1/2 cup mayonnaise
- 1/2 cup sour cream
- 2 cloves garlic, minced
- 1 tsp onion powder
- 1/2 tsp salt
- 1/4 tsp black pepper
- 2 tbsp unsalted butter, melted
- 2 tbsp chopped fresh parsley (optional)
Instructions
1. Prepare the Crust:
- Preheat oven to 375°F (190°C). Line a baking sheet with parchment paper.
- Cut the sourdough loaf into a crosshatch pattern, slicing almost to the bottom but keeping the base intact.
- In a large bowl, mix spinach, artichokes, cream cheese, mozzarella, Parmesan, mayonnaise, sour cream, garlic, onion powder, salt, and pepper until well combined.
- Gently stuff the spinach artichoke mixture into the cuts of the bread, spreading it evenly.
- Place the stuffed loaf on the baking sheet. Brush the top with melted butter.
- Bake for 25-30 minutes, until the cheese is bubbly and the bread is golden. If desired, broil for 1-2 minutes for extra crispiness.
- Remove from oven, sprinkle with parsley if using, and let cool for 5 minutes before serving. Pull apart to enjoy!
Notes
You can customize the seasonings to taste.
I’m Shaykee—born in Morocco, seasoned across continents. From airplane galleys to home kitchens, I share the flavors and stories that shaped my journey.