Cream Cheese Snowflake Bread: A Stunning, Easy-to-Make Holiday Treat
This stunning cream cheese snowflake bread is the ultimate holiday baking project that looks incredibly impressive but is surprisingly simple to execute. Imagine pulling apart warm, fluffy pieces of golden-brown bread to reveal a rich, creamy cheese filling in every bite. Consequently, this beautiful creation becomes the centerpiece of any holiday table, filling your kitchen with the irresistible aroma of freshly baked bread and sweet cream cheese.
Furthermore, this pull-apart snowflake bread offers a delightful combination of textures and flavors that will have your guests asking for the recipe. The exterior bakes to a perfect golden brown with a slightly crisp crust, while the interior remains incredibly soft and pillowy. Each tear-away piece delivers a perfect ratio of tender bread to luscious cream cheese filling, creating a harmonious balance in every mouthful. Ultimately, this easy-to-make holiday treat delivers maximum visual impact with minimal fuss.
Additionally, this cream cheese snowflake bread adapts beautifully to various occasions beyond the winter holidays. You can serve it as a spectacular brunch centerpiece, a special weekend breakfast treat, or even as an impressive dessert for dinner parties. The versatility of this recipe means you will find yourself making it repeatedly throughout the year. Moreover, the process of creating the snowflake shape is genuinely enjoyable and therapeutic, making baking this beautiful bread a memorable experience in itself.
Quick Recipe Highlights
- Flavor Profile: This cream cheese snowflake bread features a delightful contrast between the slightly sweet, yeasty bread and the rich, tangy cream cheese filling. The subtle vanilla and sugar notes complement the creamy center perfectly, while the optional powdered sugar glaze adds a final touch of sweetness that brings all the elements together harmoniously.
- Texture: Experience the wonderful contrast of a slightly crisp golden exterior giving way to an incredibly soft, fluffy bread interior. The cream cheese filling bakes into a smooth, almost custard-like consistency that melts in your mouth, creating a luxurious eating experience that keeps you reaching for just one more pull-apart piece.
- Aroma: As this snowflake bread bakes, your kitchen will fill with the warm, comforting scent of yeast bread combined with the sweet fragrance of vanilla and the rich aroma of melting cream cheese. This combination creates an irresistible olfactory experience that builds anticipation for the beautiful final product coming out of your oven.
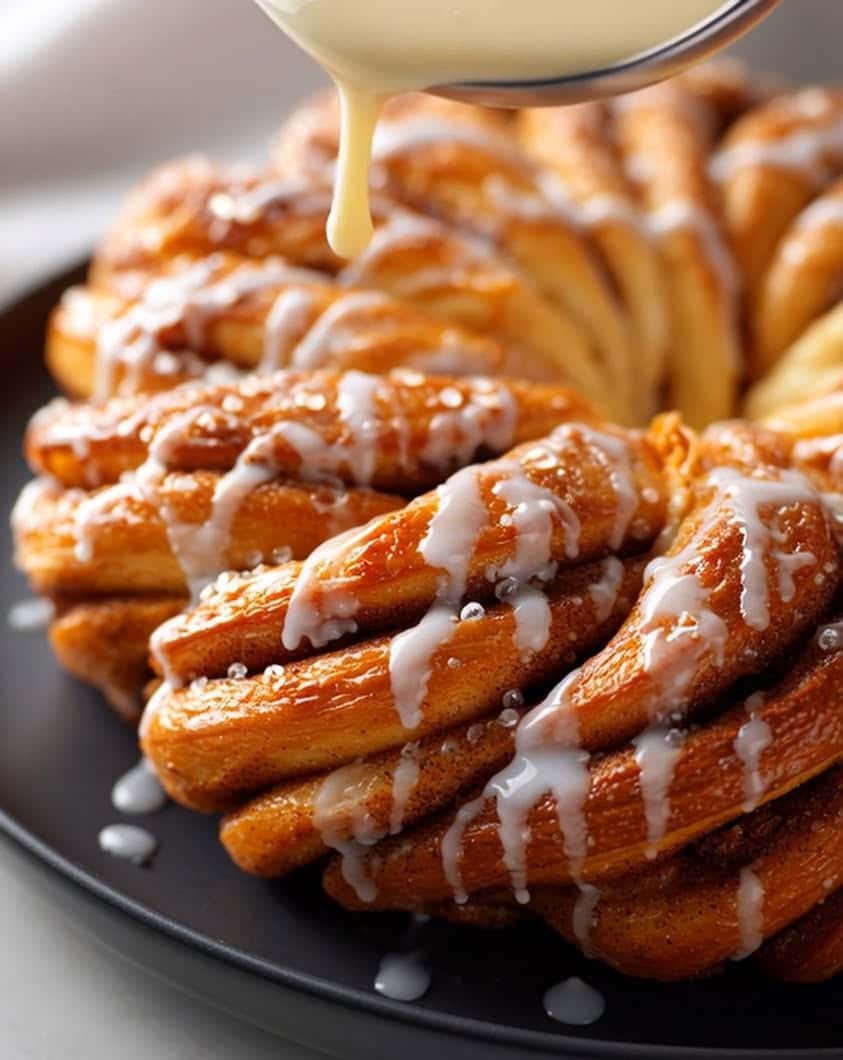
- Visual Appeal: The stunning snowflake design makes this bread a true showstopper on any table. The intricate pattern of golden-brown bread petals surrounding the creamy center creates a beautiful presentation that looks professionally made. When you dust it with powdered sugar, it genuinely resembles a delicate snowflake, making it particularly perfect for holiday gatherings.
- Skill Level Needed: While the final presentation looks professional, this recipe remains accessible to bakers of most skill levels. Basic bread-making experience helps, but the clear instructions guide you through each step methodically. The technique involves simple cutting and shaping that anyone can master with a little patience and attention to detail.
- Special Equipment: You need only basic kitchen tools to create this beautiful bread. A stand mixer with a dough hook makes the kneading process easier, but you can certainly knead by hand. Other essentials include a rolling pin, sharp kitchen scissors or a bench scraper, and a round baking pan or oven-safe skillet for baking.
Recipe Overview
- Difficulty Level: We classify this cream cheese snowflake bread as intermediate because it involves yeast dough preparation, which requires some understanding of how dough should look and feel. However, the steps are clearly explained and easy to follow, making it achievable for determined beginners. The shaping technique seems intricate but actually involves simple cutting and twisting that anyone can manage with careful following of instructions.
- Category: This beautiful creation falls perfectly into multiple categories including holiday baking, sweet breads, brunch items, and party foods. It works wonderfully as a special breakfast treat, an impressive dessert, or a stunning centerpiece for your holiday table. The versatility of this snowflake bread means it can transition seamlessly from morning to evening occasions.
- Cuisine: While not tied to any specific traditional cuisine, this cream cheese snowflake bread draws inspiration from American baking traditions and European sweet bread techniques. The concept of filled, shaped breads appears in various cultures, but this particular recipe modernizes these influences into a visually stunning contemporary creation perfect for today’s holiday tables and special occasions.
- Cost: This recipe uses affordable, pantry-staple ingredients that keep costs reasonable. Basic flour, yeast, sugar, and eggs form the dough foundation, while cream cheese represents the most significant expense. Overall, you can create this impressive bread for a fraction of what similar specialty bakery items would cost, making it both beautiful and budget-friendly for holiday entertaining.
- Season: While this snowflake bread shines during the winter holiday season, its appeal extends throughout the year. The cream cheese filling and soft bread base make it suitable for spring brunches, summer tea parties, or autumn gatherings. You can easily adapt the presentation for different seasons by modifying the shape or adding seasonal flavor variations to the filling.
- Occasion: This bread excels at holiday gatherings, Christmas morning breakfasts, New Year’s brunches, and winter-themed parties. It also makes a wonderful gift for neighbors, teachers, or hosts during the holiday season. Beyond winter, it works beautifully for special birthdays, anniversary breakfasts, or any occasion where you want to serve something visually spectacular and delicious.
Why You’ll Love This Recipe
First and foremost, the taste and texture of this cream cheese snowflake bread will completely win you over. The combination of soft, slightly sweet yeast bread with the rich, tangy cream cheese filling creates an irresistible flavor profile that appeals to all ages. Each pull-apart piece delivers the perfect balance of fluffy bread and creamy filling, making it impossible to stop at just one piece. The subtle vanilla undertones enhance the overall experience without overwhelming the primary flavors. Furthermore, the slight crispness of the golden-brown exterior provides a delightful contrast to the tender interior, creating a multi-textural experience that keeps your taste buds engaged and delighted.
The convenience and preparation benefits of this recipe make it particularly appealing for busy home bakers. Despite its impressive appearance, this snowflake bread comes together with straightforward steps that anyone can follow. The dough requires basic ingredients you likely already have in your pantry, and the filling mixes up in minutes. Additionally, you can prepare the dough in advance and refrigerate it overnight, making morning preparation much simpler. The shaping technique looks complicated but actually involves simple cutting and twisting that creates the beautiful snowflake pattern effortlessly. This means you can achieve professional-looking results without professional baking skills or equipment.
From a nutritional perspective, this cream cheese snowflake bread offers some benefits compared to many store-bought pastries. You control the quality of ingredients, allowing you to choose organic products or adjust sugar levels according to your preferences. The bread provides carbohydrates for energy, while the cream cheese contributes protein and calcium. Moreover, homemade bread avoids the preservatives and artificial ingredients often found in commercial baked goods. While it is certainly a treat, you can feel good about serving this to your family knowing exactly what ingredients went into its creation.
The social and entertaining value of this beautiful bread cannot be overstated. When you bring this stunning cream cheese snowflake bread to the table, it immediately becomes a conversation piece that delights and impresses your guests. The interactive pull-apart nature encourages sharing and creates a communal dining experience that brings people together. This makes it perfect for holiday gatherings, family breakfasts, or special occasions where you want to create memorable moments. The beautiful presentation also photographs wonderfully, making it a popular feature on social media and in family photo albums alike.
Finally, the cost-effectiveness and accessibility of this recipe make it a practical choice for regular baking. Creating this impressive bread at home costs significantly less than purchasing similar specialty items from bakeries. The ingredients are readily available at any grocery store, and no special equipment is required beyond basic kitchen tools. This accessibility means you can enjoy beautiful, artisan-quality bread without the artisan price tag. The recipe also scales well, allowing you to make multiple loaves for gift-giving or larger gatherings without complicated adjustments or additional costs.
Historical Background and Cultural Significance
The origin of shaped breads dates back centuries across various cultures, with different regions developing their own traditional forms. While the specific cream cheese snowflake bread is a modern creation, it draws inspiration from European filled breads like Eastern European babka and Scandinavian sweet breads. The concept of decorating bread with intricate patterns has roots in religious and cultural traditions where symbolic shapes held meaning. The snowflake pattern specifically connects to winter celebrations and the natural beauty of ice crystals, making it particularly suitable for holiday baking. This modern recipe represents an evolution of these traditional techniques adapted for contemporary home bakers seeking beautiful, shareable creations.
Culturally, bread has always held significance as a symbol of community, sharing, and celebration across civilizations. The act of breaking bread together represents friendship and hospitality in many traditions. This cream cheese snowflake bread continues this tradition by being designed specifically for sharing and gathering. The pull-apart nature encourages communal eating, making it perfect for holiday tables where connection and togetherness are celebrated. In many cultures, specially shaped breads marked seasonal changes and important celebrations, and this snowflake bread carries forward that tradition for winter holidays and gatherings.
The evolution of this recipe reflects broader trends in home baking over recent decades. As home bakers gained access to better ingredients and kitchen tools, along with visual inspiration from cooking shows and social media, the expectation for beautiful, professional-looking baked goods increased. This cream cheese snowflake bread represents how traditional baking techniques have been adapted to create visually stunning results achievable in home kitchens. The recipe balances authentic bread-making methods with modern presentation expectations, resulting in a creation that honors baking traditions while meeting contemporary aesthetic standards.
Regional variations of similar concepts exist worldwide, demonstrating the universal appeal of beautiful, filled breads. Scandinavian countries have their cardamom-scented pull-apart breads, while Eastern European traditions include various filled and braided creations. In the United States, the popularity of cream cheese in baking created the perfect conditions for this specific variation to emerge. The snowflake shape itself has become particularly popular in North American holiday baking, reflecting the cultural association of snow with Christmas and winter celebrations. This recipe therefore represents a beautiful fusion of international baking traditions with American ingredient preferences and holiday symbolism.
Ingredient Deep Dive
Bread flour serves as the foundation for this beautiful snowflake bread, providing the necessary protein content to develop the gluten structure that gives the bread its wonderful texture. The higher protein content in bread flour compared to all-purpose flour creates stronger gluten networks, resulting in better dough elasticity and a chewier, more structured final product. This strength is particularly important for shaped breads that need to hold their form during rising and baking. When selecting bread flour, look for unbleached varieties for the best flavor and texture. Store bread flour in an airtight container in a cool, dark place to maintain its freshness. If you need to substitute, you can use all-purpose flour, though the texture may be slightly less chewy.
Cream cheese forms the luxurious heart of this snowflake bread, providing the rich, tangy filling that makes each bite so delightful. Originally developed in the United States in the late 19th century, cream cheese has become a baking staple worldwide. For this recipe, use full-fat, brick-style cream cheese rather than spreadable varieties, as it holds its shape better during baking. The cream cheese should be at room temperature for easy mixing and smooth incorporation of other filling ingredients. Nutritionally, cream cheese provides protein, calcium, and vitamin A, though it should be enjoyed in moderation due to its fat content. For best results, avoid overmixing the filling, as this can incorporate too much air and affect the texture.
Instant yeast makes the bread-making process more convenient by eliminating the need for proofing in water. This modern baking ingredient allows for direct incorporation with dry ingredients, saving time and simplifying the process. Instant yeast became commercially available in the latter half of the 20th century, revolutionizing home bread baking. For this snowflake bread, the yeast provides the necessary leavening to create a light, airy texture while developing the characteristic yeasty flavor of quality bread. Store yeast in the refrigerator or freezer to maintain potency, and always check the expiration date before use. If you only have active dry yeast, you can substitute it by activating it in warm liquid before adding to the recipe.
Granulated sugar plays multiple roles in this recipe, feeding the yeast for proper fermentation while adding subtle sweetness to balance the tangy cream cheese. Sugar also contributes to browning during baking through caramelization and Maillard reactions. In the filling, sugar sweetens the cream cheese to create that perfect sweet-and-tangy balance. When measuring sugar, use the spoon-and-level method for accuracy. While you can reduce sugar slightly if preferred, remember that sugar affects both flavor and texture development. For alternative sweeteners, honey or maple syrup can work, though they may affect the dough’s moisture content and require slight recipe adjustments.
Common Mistakes to Avoid
- Using cold ingredients: Cold eggs, milk, or butter can slow yeast activity and prevent proper dough development. Always use room temperature ingredients unless specified otherwise. This ensures even mixing and optimal yeast performance throughout the dough.
- Over-flouring the work surface: Adding too much flour during kneading and shaping creates a dense, dry bread. Instead, lightly flour your surface and use a bench scraper to manage sticky dough. The dough should remain slightly tacky but not unmanageably sticky.
- Rushing the rise: Insufficient rising time results in dense bread with poor texture. Allow the dough to double in size completely, which may take longer in cooler kitchens. Patience during rising ensures light, airy bread with perfect structure.
- Overmixing the filling: Excessive beating incorporates too much air into the cream cheese mixture, which can cause it to expand unevenly during baking. Mix just until smooth and well-combined for the best texture.
- Cutting too deeply or not deeply enough: Improper cutting affects the final snowflake pattern. Cut about three-quarters through the dough circles, leaving the center intact to maintain the structural integrity while creating defined petals.
- Underbaking: Removing the bread too early results in a doughy center and pale coloring. Bake until deeply golden brown, and use a thermometer to ensure the internal temperature reaches 190°F for perfectly cooked bread.
- Skipping the egg wash: The egg wash creates that beautiful golden-brown shine and helps define the snowflake pattern. Don’t omit this step, as it significantly enhances both appearance and texture.
- Adding glaze too early: Applying powdered sugar or glaze while the bread is too warm causes it to melt and absorb unevenly. Always cool the bread slightly before adding final decorations for the prettiest presentation.
Essential Techniques
Proper dough kneading represents the foundation of successful bread making. This technique develops the gluten network that gives bread its structure and chewy texture. To knead effectively, use the heel of your hand to push the dough away from you, then fold it back over itself, giving it a quarter turn each time. The dough is ready when it becomes smooth, elastic, and slightly tacky but doesn’t stick excessively to your hands or the work surface. This typically takes 8-10 minutes by hand or 5-7 minutes with a stand mixer. Under-kneaded dough results in poor volume and dense texture, while over-kneading can make the bread tough. Look for the windowpane test: gently stretch a small piece of dough between your fingers; it should form a thin, translucent membrane without tearing immediately.
The dough rising process requires careful attention to temperature and timing. Yeast activity depends on warm conditions, ideally between 75-80°F. Create an ideal rising environment by placing the dough in a lightly oiled bowl, covering it with plastic wrap or a damp cloth, and setting it in a warm, draft-free spot. The dough should double in size, which typically takes 1-2 hours depending on kitchen temperature. To test if the dough has risen sufficiently, gently press two fingers about half an inch into the dough; the indentations should remain rather than spring back immediately. Rushing this process by using excessive heat kills the yeast and creates off-flavors, while insufficient rising yields dense bread with poor texture.
Creating the snowflake shape involves specific cutting and twisting techniques that seem intricate but are quite manageable with practice. After rolling the dough into circles and adding filling, use sharp kitchen scissors or a bench scraper to make clean, even cuts. Cut from the outer edge toward the center, stopping about an inch from the middle to maintain structural integrity. The number and spacing of cuts affect the final appearance; typically, 16 evenly spaced cuts create the classic snowflake pattern. After cutting, carefully twist each section to expose the filling and create the petal-like appearance. Consistent cutting depth and angle ensure symmetrical results, while varying these elements creates more organic, natural-looking snowflake patterns.
Pro Tips for Perfect Cream Cheese Snowflake Bread
Weigh your flour instead of using cup measurements for absolute accuracy. Even experienced bakers can pack flour differently into measuring cups, leading to inconsistent results. A kitchen scale ensures perfect hydration and texture every time you make this beautiful snowflake bread.
Create a warm proofing environment by placing your dough in the oven with just the light on. The gentle heat from the bulb creates the ideal temperature for yeast activity without being so hot that it kills the microorganisms. This simple trick ensures consistent rising regardless of your kitchen’s ambient temperature.
Chill the filled dough circles for 15-20 minutes before cutting and shaping. The slightly firmer dough holds its shape better during the intricate cutting process, resulting in cleaner lines and more defined snowflake patterns. This extra step makes the shaping process significantly easier and more precise.
Use a pizza wheel or sharp bench scraper instead of scissors for more controlled cutting. These tools provide cleaner cuts with less dragging of the dough, creating sharper definition in your snowflake pattern. The precision of these tools elevates the final presentation noticeably.
Brush the entire surface with egg wash, including the cut edges and between the petals. This creates uniform browning and gives your snowflake bread that professional, glossy finish. Pay particular attention to the nooks and crannies where the filling is exposed for the most beautiful results.
Rotate your baking pan halfway through the baking time for even browning. Ovens often have hot spots that can cause uneven coloring, and this simple rotation ensures your snowflake bread develops that perfect golden-brown hue uniformly across all the petals and surfaces.
Allow the bread to cool in the pan for 10-15 minutes before transferring to a wire rack. This initial cooling period lets the structure set, preventing collapse or breaking when you move it. The brief rest also makes the bread easier to handle while still serving it warm.
Dust with powdered sugar using a fine-mesh sieve for even, snow-like coverage. Hold the sieve several inches above the bread and gently tap it to create a delicate, professional-looking dusting that enhances the winter wonderland appearance of your beautiful creation.
Variations and Adaptations
Regional variations of this concept allow for cultural customization while maintaining the beautiful snowflake presentation. For a Scandinavian twist, add cardamom to the dough and use a lingonberry or cloudberry jam layer beneath the cream cheese. Mediterranean versions might incorporate orange blossom water and crushed pistachios. Mexican-inspired adaptations could include a sprinkle of cinnamon sugar and a drizzle of cajeta. These regional touches honor different baking traditions while creating unique flavor experiences. The basic snowflake shaping technique adapts beautifully to these variations, proving the versatility of this stunning bread format across culinary traditions.
Seasonal adaptations let you enjoy this beautiful bread throughout the year with appropriate flavor profiles. Spring versions might incorporate lemon zest in the filling and edible flowers for decoration. Summer adaptations could feature berry compotes swirled into the cream cheese. Autumn variations work wonderfully with pumpkin spice in the dough and a maple cream cheese filling. These seasonal twists keep the recipe exciting and relevant no matter the time of year, while the beautiful snowflake shape can be modified into sunburst patterns or floral designs for non-winter occasions.
Dietary modifications make this recipe accessible to those with specific nutritional needs or preferences. Gluten-free versions work well with a quality 1:1 gluten-free flour blend and possibly adding xanthan gum if not included. Vegan adaptations can use plant-based cream cheese and milk, with flax eggs as a binder. Reduced-sugar versions might employ sugar alternatives or simply decrease the sweetener while increasing flavor with vanilla or citrus zest. These modifications ensure everyone can enjoy this beautiful bread regardless of dietary restrictions, with minimal impact on the stunning visual presentation.
Flavor variations let you customize the taste profile to suit different preferences and occasions. Chocolate lovers can add cocoa powder to the dough and chocolate chips to the filling. Citrus variations might include orange, lemon, or lime zest in both dough and filling. Spiced versions could incorporate cinnamon, nutmeg, or pumpkin pie spice for warm, comforting notes. Savory adaptations work beautifully with herb-infused dough and garlic-herb cream cheese. These flavor options demonstrate the incredible versatility of this recipe format while maintaining the beautiful presentation that makes snowflake bread so special.
Serving and Presentation Guide
Plating techniques significantly enhance the visual impact of your beautiful cream cheese snowflake bread. Serve it on a wooden cutting board or decorative platter that provides contrast to the golden-brown bread and white filling. Position it as the centerpiece of your table, allowing the intricate snowflake pattern to be fully visible from all angles. Use a sharp serrated knife for any necessary cutting, though the pull-apart nature means guests can simply tear off pieces. Consider placing the bread on a cake stand to elevate it literally and figuratively as the star of your meal presentation.
Garnishing ideas range from simple to elaborate, depending on the occasion. A light dusting of powdered sugar creates a fresh snowfall effect that enhances the winter theme. For holidays, add strategically placed edible glitter or dusting sugar for a frosty appearance. Fresh rosemary sprigs or cranberries around the base provide color contrast and seasonal relevance. If serving for brunch, fresh berries arranged around the bread add vibrant color. For a more dramatic presentation, drizzle with a simple glaze after cooling slightly, or serve with side bowls of fruit compote or additional cream cheese for spreading.
Traditional accompaniments vary based on when you serve this beautiful bread. For breakfast or brunch, pair with fresh fruit, yogurt parfaits, and breakfast meats. As a dessert, serve with coffee, tea, or dessert wines, and consider offering fruit preserves or chocolate sauce for dipping. Holiday presentations might include it as part of a larger baked goods spread with cookies, scones, and other pastries. The rich, creamy nature of the bread pairs wonderfully with tart fruits like berries or citrus segments that cut through the richness beautifully.
Wine and Beverage Pairing
Wine pairings should complement rather than compete with the rich, slightly sweet character of this cream cheese snowflake bread. Off-dry Rieslings or Gewürztraminers work beautifully, their slight sweetness and acidity balancing the rich cream cheese. Sparkling wines like Prosecco or Cava provide refreshing contrast with their bubbles and crispness. For dessert service, late-harvest wines or ice wines create a luxurious pairing, though their intensity should be considered. If serving as part of a brunch, light-bodied reds like Beaujolais or Pinot Noir can work surprisingly well. Always consider the time of day and accompanying foods when selecting wine pairings.
Non-alcoholic alternatives should provide refreshment and contrast to the rich bread. Sparkling juices like apple or white grape offer sophistication without alcohol. Herbal teas, particularly mint or chamomile, provide calming counterpoints. For colder weather, hot chocolate with a hint of orange or cinnamon makes a comforting companion. Fruit smoothies with tart berries or citrus cut through the richness effectively. Iced coffee or tea works wonderfully for brunch service, providing the caffeine boost many desire in the morning. The key is offering beverages that cleanse the palate between bites of the rich, flavorful bread.
Storage and Shelf Life
Proper storage methods ensure your beautiful cream cheese snowflake bread maintains its quality and food safety. Cool the bread completely before storing to prevent condensation that creates sogginess. Store at room temperature in an airtight container or tightly wrapped in plastic for up to 2 days. For longer storage, refrigerate for up to 5 days, though the texture may firm slightly. The cream cheese filling requires refrigeration if your kitchen is warm or if storing beyond one day. Always bring refrigerated bread to room temperature or warm slightly before serving to restore the soft texture.
Freezing guidelines allow you to enjoy this bread beyond its fresh shelf life. Wrap tightly in plastic wrap followed by aluminum foil or place in a freezer-safe bag, removing as much air as possible. Freeze for up to 3 months for best quality. Thaw overnight in the refrigerator or at room temperature for several hours. Refresh in a 300°F oven for 10-15 minutes to restore the fresh-baked texture and warmth. Note that freezing may slightly alter the texture of the cream cheese filling, though the overall quality remains excellent for a frozen product.
Make Ahead Strategies
Prep timeline options provide flexibility for busy schedules. You can prepare the dough through the first rise, then refrigerate it overnight for baking the next day. Alternatively, assemble the entire bread and refrigerate before the final rise, then bake in the morning. For furthest advance preparation, freeze the fully baked and cooled bread, then thaw and refresh before serving. Each method has different effects on flavor development and texture, with overnight refrigeration often enhancing flavor through slower fermentation. Choose the method that best fits your schedule while considering the slight textural differences each approach creates.
Storage between steps requires understanding how dough behaves under different conditions. Refrigerated dough slows yeast activity dramatically, allowing you to pause the process for 8-24 hours. Bring refrigerated dough to room temperature for about an hour before shaping and proceeding. For freezing unbaked dough, do so after the first rise and shaping, then thaw overnight in the refrigerator before the final rise and baking. Proper wrapping prevents drying or absorbing refrigerator odors. These strategies let you break the recipe into manageable stages that fit into busy schedules while still achieving excellent results.
Scaling Instructions
Halving the recipe works well for smaller households or when you want a smaller portion. Use exactly half of all ingredients and a smaller baking pan. The rising and baking times may decrease slightly, so watch for visual cues rather than relying solely on timer. The shaping process remains identical, though the smaller size may require slightly adjusted cutting measurements. This scaling works perfectly without recipe modifications, making it easy to adjust yield based on your needs. The beautiful snowflake presentation remains equally impressive even at smaller sizes.
Doubling or tripling the recipe requires consideration of equipment capacity and timing. Ensure your mixer bowl can handle the larger dough quantity, or mix in batches. You may need to work in stages for shaping and baking unless you have multiple ovens and baking pans. Rising times may increase slightly with larger dough masses. When baking multiple loaves, rotate pans between oven racks halfway through baking for even results. This scaling lets you create multiple beautiful breads for gift-giving or larger gatherings while maintaining the quality and presentation of a single loaf.
Nutritional Deep Dive
Macro breakdown varies based on specific ingredients and portion size, but generally provides carbohydrates from the flour and sugars, protein from the flour, eggs, and cream cheese, and fats from the butter, eggs, and cream cheese. The balance of these macronutrients creates sustained energy release when consumed as part of a balanced meal. Being aware of this breakdown helps with portion control and balancing with other foods throughout your day. While certainly a treat food, understanding its nutritional composition allows for informed enjoyment as part of an overall healthy eating pattern.
Micronutrient analysis reveals contributions of several important vitamins and minerals. The eggs provide choline for brain health and various B vitamins. Cream cheese offers calcium for bone health and vitamin A for vision and immune function. Enriched flour contributes B vitamins like folate, thiamine, and iron. While not a significant source of fiber unless made with whole grain flour, it does provide valuable nutrients alongside its treat status. These micronutrients add to the overall nutritional profile, making it more than just empty calories.
Dietary Adaptations
Gluten-free adaptation requires a quality 1:1 gluten-free flour blend containing xanthan gum or adding it separately. The dough may be stickier and require careful handling, and rising may be less pronounced. Results vary by flour blend, so experimentation may be needed. The beautiful snowflake shape still works well with proper technique adjustments. Despite these challenges, successful gluten-free versions allow those with celiac disease or gluten sensitivity to enjoy this beautiful holiday tradition.
Dairy-free adaptation replaces milk with plant-based alternatives like almond, soy, or oat milk. Vegan butter substitutes work well in the dough, while numerous plant-based cream cheese options create the filling. The texture and flavor may differ slightly from the original but can still produce excellent results. These adaptations make the recipe accessible to those with dairy allergies or lactose intolerance while maintaining the stunning visual appeal that makes this bread so special.
Troubleshooting Guide
Texture issues often stem from improper dough development or baking conditions. Dense bread typically results from insufficient rising, over-flouring, or inadequate kneading. Conversely, crumbly bread may come from over-kneading or too little hydration. Gummy texture suggests underbaking, while excessive dryness points to overbaking or too much flour. Identifying the specific texture problem helps pinpoint the solution, whether adjusting technique, timing, or ingredient measurements. Most texture issues can be resolved in future batches with careful attention to the specific steps that created the problem.
Flavor balance problems usually involve either insufficient seasoning or ingredient quality issues. Bland bread may need more salt or vanilla in the dough, while overly sweet results call for reduced sugar. Off-flavors can indicate old yeast or rancid fats. The cream cheese filling should strike a perfect balance between tangy and sweet, adjustable with lemon juice or additional sweetener. Taste adjustments should be made gradually, noting changes for future reference. Proper ingredient freshness and accurate measurements prevent most flavor issues before they begin.
Recipe Success Stories
Community feedback consistently highlights the impressive presentation and surprisingly manageable process of this beautiful bread. Many home bakers report receiving compliments that make them feel like professional pastry chefs. First-time bread makers often express pride and accomplishment at creating something so visually stunning. Families establish traditions around making this bread together during the holidays, creating cherished memories alongside delicious results. These success stories demonstrate how accessible beautiful baking can be with clear instructions and a bit of patience.
Variation successes show the incredible adaptability of this recipe format. Home bakers have created stunning seasonal versions with pumpkin filling for autumn and lemon-blueberry for spring. Dietary adaptations have allowed those with restrictions to participate fully in holiday baking traditions. Creative presentations including colored sugars and decorative glazes personalize the basic recipe. These successful variations inspire continued experimentation and prove that the snowflake bread concept provides a wonderful foundation for culinary creativity while maintaining its essential appeal.
Frequently Asked Questions
Can I make this dough ahead and refrigerate it overnight? Absolutely, you can prepare the dough through the first rise, then punch it down, cover tightly, and refrigerate for up to 24 hours. Let it come to room temperature for about an hour before proceeding with rolling and filling. This advance preparation actually enhances flavor development through slow fermentation.
Why didn’t my bread rise properly? Several factors affect rising: old yeast, liquid that was too hot and killed the yeast, cold kitchen temperature, or insufficient rising time. Ensure your yeast is fresh and active, use properly tempered liquids, and allow enough time in a warm environment for the dough to double in size.
Can I freeze the baked bread? Yes, this bread freezes beautifully. Cool completely, wrap tightly in plastic wrap followed by aluminum foil, and freeze for up to 3 months. Thaw overnight in the refrigerator or at room temperature for several hours, then refresh in a 300°F oven for 10-15 minutes.
What can I use instead of cream cheese? While cream cheese provides the classic flavor and texture, you can substitute ricotta cheese (strained), mascarpone, or even a thick Greek yogurt mixture. The texture and flavor will vary, but all can create delicious results with proper adjustment of other filling ingredients.
How do I know when the bread is fully baked? Look for a deep golden brown color and an internal temperature of 190°F when measured with an instant-read thermometer. The bread should sound hollow when tapped on the bottom, and the filling should be set rather than liquid.
Can I make this without a stand mixer? Certainly, you can knead the dough by hand on a lightly floured surface. This typically takes 8-10 minutes of active kneading until the dough becomes smooth, elastic, and slightly tacky. The process is more physical but equally effective.
Why did my filling leak out during baking? Filling leakage usually occurs from overfilling, insufficient sealing at the edges, or cuts that go too close to the center. Use the recommended filling amount, ensure proper sealing when forming the circles, and stop cuts about an inch from the center.
Can I add fruits or other mix-ins to the filling? Absolutely, diced fruits, chocolate chips, or nuts can be added to the filling. Pat dry any juicy fruits to prevent excess moisture, and distribute additions evenly for consistent results. These additions create wonderful flavor variations.
How do I get a more defined snowflake pattern? For sharper definition, ensure your cuts go nearly through the dough layers, twist each segment firmly to expose the filling, and use sufficient egg wash to promote browning. Chilling the filled dough before cutting also helps maintain clean lines.
Can I make mini snowflake breads? Yes, divide the dough into smaller portions and adjust baking time accordingly. Mini versions make excellent individual servings and can bake in muffin tins or small rounds. Reduce baking time by 5-10 minutes, watching for proper coloring.
Additional Resources
Related recipes that complement this beautiful snowflake bread include other holiday baking projects with similar skill levels. Consider trying cinnamon roll wreaths, braided sweet breads, or decorative focaccia designs. These projects build on the skills developed while making snowflake bread and expand your repertoire of impressive baked goods. Seasonal variations might include pumpkin-shaped breads for autumn or floral patterns for spring, applying the same basic techniques with different shaping approaches.
Technique guides for fundamental bread-making skills enhance your overall baking ability. Resources
Print
Cream Cheese Snowflake Bread
Description
A soft, buttery pull-apart bread with a cream cheese filling, shaped like a festive snowflake for the holidays.
Ingredients
For the Crust:
- 3 cups all-purpose flour
- 1/4 cup granulated sugar
- 1 packet active dry yeast
- 1/2 cup warm milk
- 1/4 cup unsalted butter, melted
- 1 large egg
- 1/2 tsp salt
- 8 oz cream cheese, softened
- 1/4 cup powdered sugar
- 1 tsp vanilla extract
- 1 egg, beaten (for egg wash)
- Additional powdered sugar for dusting
Instructions
1. Prepare the Crust:
- In a large bowl, combine flour, sugar, yeast, and salt. Add warm milk, melted butter, and egg; mix until a soft dough forms.
- Knead dough on a floured surface for 5-7 minutes until smooth. Place in a greased bowl, cover, and let rise in a warm place for 1 hour.
- Meanwhile, beat cream cheese, powdered sugar, and vanilla until smooth. Set aside.
- Punch down dough and roll into a 12-inch circle. Cut into 16 wedges. Place a spoonful of cream cheese filling at the wide end of each wedge and roll up toward the point.
- Arrange rolls in a circle on a parchment-lined baking sheet, points facing inward, to form a snowflake shape. Cover and let rise 30 minutes.
- Preheat oven to 350°F (175°C). Brush rolls with egg wash and bake for 25-30 minutes until golden. Cool slightly and dust with powdered sugar before serving.
Notes
You can customize the seasonings to taste.
I’m Shaykee—born in Morocco, seasoned across continents. From airplane galleys to home kitchens, I share the flavors and stories that shaped my journey.